-

Win a Free Custom Engraved Brass Coin!!!
As a way to introduce our brass coins to the community, we will raffle off a free coin during the month of August. Follow link ABOVE for instructions for entering.
-

PRE-ORDER SHIPS IN SCALE TODAY!
The beloved Ships in Scale Magazine is back and charting a new course for 2026!
Discover new skills, new techniques, and new inspirations in every issue.
NOTE THAT OUR FIRST ISSUE WILL BE JAN/FEB 2026
You are using an out of date browser. It may not display this or other websites correctly.
You should upgrade or use an alternative browser.
You should upgrade or use an alternative browser.
Interesting... I washed in pure methanol first but did not abrade and so do not know if the "cleaning" was not sufficient. I only have 9 more cannon to go, so why not try again! Thanks for the advice!
First, wash the cannon well in alcohol and only then insert it. You can also mix this product with water, the reaction will be slower and the effect will be the same. Typically, the mixture is 1:2 oxide or 1:3 oxide. Try it.
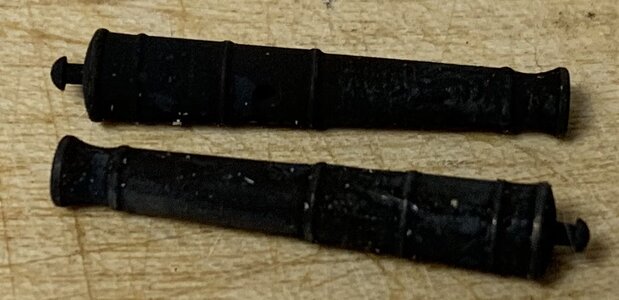
 , first try. Two cannon with about a 1:5 solution of the oxide. Agitated frequently with about a 20 minute soak time. Much better results. I'll probably buff these two up a bit and do a second pass with the oxide.
Great tip!
1:5 or something similar are good, but please make several shorter baths.
put the barrels in, after 1 or 2 minutes, when it is starting to get black put them out, wash them with clear water and rub them slightly with a tissue paper, and once more the same etc.
In your first description in your post #78
The black finish is very flakey (surface layers that easily brush off onto your hands and then expose the raw brass underneath).
the barrels were much much too long inside the bath
1:5 or something similar are good, but please make several shorter baths.
put the barrels in, after 1 or 2 minutes, when it is starting to get black put them out, wash them with clear water and rub them slightly with a tissue paper, and once more the same etc.
In your first description in your post #78
The black finish is very flakey (surface layers that easily brush off onto your hands and then expose the raw brass underneath).
the barrels were much much too long inside the bath
 . I'll try what you recommend next. I have not been able to get the first two cannon to become blacker since the first bath. Can they not turn completely black, or is it the problems with my method so far?
I do not know - usually The Birchwood is working very well.. I'll try what you recommend next. I have not been able to get the first two cannon to become blacker since the first bath. Can they not turn completely black, or is it the problems with my method so far?
Blackening needs realy some time with try and error - It took for me also several steps to get good results.
If you are not happy with the result, you can really try it once more, but before you have to remove all flakes etc. - maybe you use also an old wet toothbrush and clean the surface under water .......
maybe you makes also some test before with some eyebolts or rings or something else out of brass etc.
Could there be fingerprint oils or some other residue that is resisting the contact with the acid? Washing the parts in denatured alcohol or acetone is a critical step, and wear gloves when handing the parts.
Thank you all for the advice on blackening the cannon. I have shelved that portion of the build in favor of finishing the hull recently. But the cannon sub-project will be re-attempted again soon, I assure you!
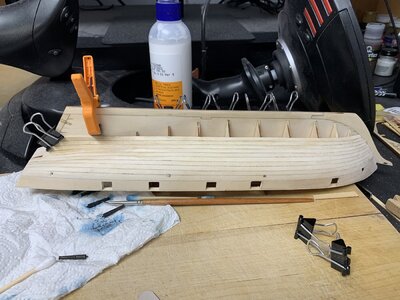
So the final planking exposed a few issues with this model. First, the initial planks were a bit long which I did not mind because I would just trim them off at the rudder. But the final two were short, and the last were short by quite a bit. So I think the angle of the rudder end of the planks was a bit off. Not a big build problem since I can add a bit of length to the last short planks easy enough.
The other issue that concerns me is that the planks did not build up from the deck to the keel without a gap or two. See below:
The port side built mostly to the correct connection with the keel except near the front. I could live with it, but it also exposed a largish gap between the final plank and the one before which I do not understand how!?! I noticed it when fitting and gluing up but could not get it to fit better. And so the first question: Should I sand down that seam until the gap is less or fill with something?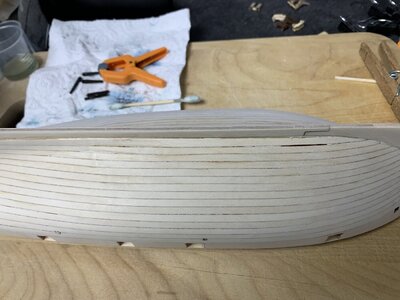
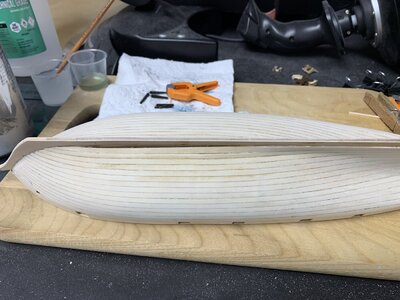
The bigger issue is on the starboard side where nearly the front 1/2 of the last plank was not wide enough to reach the keel at all and left a HUGE (relatively) gap. I have two thoughts... One is that I can try to cut a filler piece out of the original plank wood (using the final plank outside wood for one side!). Or possibly the wood filler again? I would appreciate any advice about how to correct both sides. Remember, I would like to finish this with linseed oil and show a natural(ish) wood finish rather than paint. I think natural wood was more correct for this period?
So the final planking exposed a few issues with this model. First, the initial planks were a bit long which I did not mind because I would just trim them off at the rudder. But the final two were short, and the last were short by quite a bit. So I think the angle of the rudder end of the planks was a bit off. Not a big build problem since I can add a bit of length to the last short planks easy enough.
The other issue that concerns me is that the planks did not build up from the deck to the keel without a gap or two. See below:
The port side built mostly to the correct connection with the keel except near the front. I could live with it, but it also exposed a largish gap between the final plank and the one before which I do not understand how!?! I noticed it when fitting and gluing up but could not get it to fit better. And so the first question: Should I sand down that seam until the gap is less or fill with something?

The bigger issue is on the starboard side where nearly the front 1/2 of the last plank was not wide enough to reach the keel at all and left a HUGE (relatively) gap. I have two thoughts... One is that I can try to cut a filler piece out of the original plank wood (using the final plank outside wood for one side!). Or possibly the wood filler again? I would appreciate any advice about how to correct both sides. Remember, I would like to finish this with linseed oil and show a natural(ish) wood finish rather than paint. I think natural wood was more correct for this period?

I tried a Minwax wood filler product on the port side and was fairly pleased with the results. So I went ahead and tried the largish starboard gap near the front of the keel. Here is a pic after an initial rough sanding. The color does not match exactly but otherwise I am thinking it will be mainly unnoticeable under a linseed oil finish. But that finish will be the true test now, will it not?
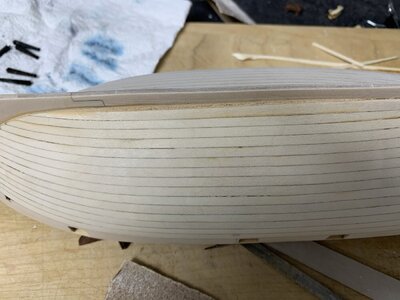

Linseed will probably darken that filled strip along the keel and make it more noticeable. Take some of that filler, apply some to a piece of scrap, and linseed oil it after it dries. I predict it will go dark, much darker than the wood by itself. Because of that, you may want to just wax the hull in plain wood finish to seal it. The lines of the planks are rather attractive, more that the rather poorly stained finish I applied to my Halcon build. The soft wood made the finish uneven, blotchy and hid the nice plank lines, which as you can see from your model, are one of the few attractive features in this model. Were I to redo my model, I would use stained lacquer instead of applying stain directly to the wood to even out the color and preserve the planking lines. If you apply stain to the wood, those yellow areas on your hull from glue residue will really show up in contrast and you will be very disappointed. Because of the poor ability of this cheap wood to look good when stained, 1) making the model plain wood, 2) "painting with wood" of different colors, or 3) painting the hull may be preferable. Each finishing option makes the model look very different from the other. Whatever you choose, Do some finishing experiments on some left over white wood scraps first.I tried a Minwax wood filler product on the port side and was fairly pleased with the results. So I went ahead and tried the largish starboard gap near the front of the keel. Here is a pic after an initial rough sanding. The color does not match exactly but otherwise I am thinking it will be mainly unnoticeable under a linseed oil finish. But that finish will be the true test now, will it not?
View attachment 409567
Last edited:
Good to know. I have a test plank with the filler drying up tonight. I'll try to lightly sand and then apply a first layer of linseed oil tomorrow. Which reminds me... I need to get the oil inside from the garage so it will be room temp!
Thanks for the advice.
M.
Thanks for the advice.
M.
I cut a divot in a scrap and filled with the wood filler and let dry overnight. This morning I sanded it smooth and then applied linseed oil. That was allowed to soak in for the last four hours (no wiping) and then we have these before and after pics:
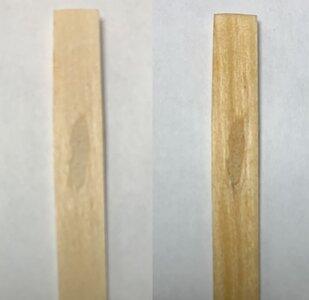 The filler did darken up a bit, but so did the grain in the wood. I think as long as I use the filler only in the gaps between planks on the hull it will still look fine. I will definitely not use it to shape contours on the surface of anything! That would be very noticeable IMO. But in the thin plank gaps I think it may look like wood grain along the seam. At least, I hope.
And the big(ish) fill along the keel will never be seen unless someone wants to pick the model up and *really* inspect it!
Next up, I guess I need to see if you can use PVA on pieces that have already been finished with linseed oil. I'd like to finish the hull like that once planking, filling, and smoothing is complete. But then other pieces (the outside boards where the stays anchor... what are those called?) still need to be attached. I guess I need to check that out before I commit to oiling before gluing those up.
M.
A linseed oil finish will darken over time. PVA will have some difficulty sticking to wood that has been treated with linseed oil, also wood treated with Danish oil. The beams that are used to help in raising the anchors are called "catheads" because they are typically decorated with a lion face on the very end.I cut a divot in a scrap and filled with the wood filler and let dry overnight. This morning I sanded it smooth and then applied linseed oil. That was allowed to soak in for the last four hours (no wiping) and then we have these before and after pics:
View attachment 409685 The filler did darken up a bit, but so did the grain in the wood. I think as long as I use the filler only in the gaps between planks on the hull it will still look fine. I will definitely not use it to shape contours on the surface of anything! That would be very noticeable IMO. But in the thin plank gaps I think it may look like wood grain along the seam. At least, I hope.
And the big(ish) fill along the keel will never be seen unless someone wants to pick the model up and *really* inspect it!
Next up, I guess I need to see if you can use PVA on pieces that have already been finished with linseed oil. I'd like to finish the hull like that once planking, filling, and smoothing is complete. But then other pieces (the outside boards where the stays anchor... what are those called?) still need to be attached. I guess I need to check that out before I commit to oiling before gluing those up.
M.
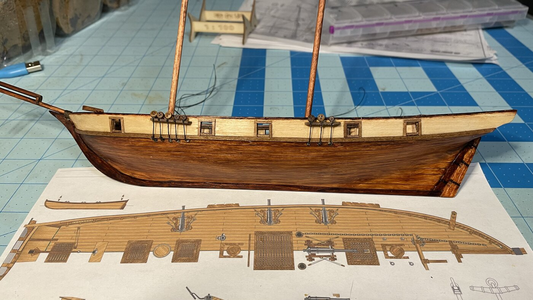
Ah. I had not even thought about what those beams were for or called (yet)! Thanks. I was actually asking about the boards on the outside of the gunwales where the lower deadeyes for the stays are anchored. In your pic there are the 5 deadeyes for the front mast on one of those boards and then further back another three for the main?A linseed oil finish will darken over time. PVA will have some difficulty sticking to wood that has been treated with linseed oil, also wood treated with Danish oil. The beams that are used to help in raising the anchors are called "catheads" because they are typically decorated with a lion face on the very end.
I wish this kit came with full English build directions as those would have told me the names of all these ship components that I am trying to learn...
Ahhh. Those horizontal boards are called "chainwales" or more commonly now, "channels". I assume that the reason they got the name chainwales, is because they are typically mounted as extensions off the wales on large ships, and that the chainplates that connect the lower deadeyes to the hull are held away from hull by them. The channels move the bottom ends of the shrouds outboard so that the shrouds will touch the gunwales, and moving them outboard strengthens the geometry of support for the masts. It takes a while for beginning ship modelers to absorb an entire dictionary of maritime terms. It comes with time. And, some of these terms change over time as well as being different between countries.Ah. I had not even thought about what those beams were for or called (yet)! Thanks. I was actually asking about the boards on the outside of the gunwales where the lower deadeyes for the stays are anchored. In your pic there are the 5 deadeyes for the front mast on one of those boards and then further back another three for the main?
I wish this kit came with full English build directions as those would have told me the names of all these ship components that I am trying to learn...
In all seriousness, I was working on some parts of the model when my 16 year old daughter walked through behind me and I showed her this:
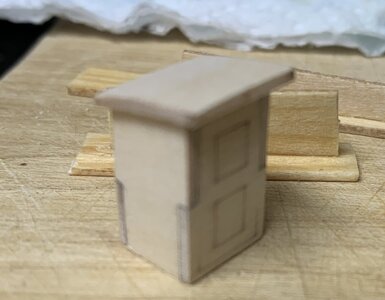
I told her it was likely a "poop hut" and that this was "number 1 (the first one I had built so far)" and I was still working on (still glueing up) "number 2." She laughed hysterically as she went back up the stairs. She said, "Dad, think about what you just said. Say it again... slowly".

I told her it was likely a "poop hut" and that this was "number 1 (the first one I had built so far)" and I was still working on (still glueing up) "number 2." She laughed hysterically as she went back up the stairs. She said, "Dad, think about what you just said. Say it again... slowly".
NICE!!!! That's hilarious!In all seriousness, I was working on some parts of the model when my 16 year old daughter walked through behind me and I showed her this:
View attachment 410556
I told her it was likely a "poop hut" and that this was "number 1 (the first one I had built so far)" and I was still working on (still glueing up) "number 2." She laughed hysterically as she went back up the stairs. She said, "Dad, think about what you just said. Say it again... slowly".


I glued up two test pieces with PVA: one with linseed oiled (cured) pieces and another with raw wood. Both were with a piece attached edgewise to another at a 90-degree angle to simulate the way a channel would be glued to the hull. After a day of drying, I snapped both off to test how well they adhered. The linseed oil pieces snapped off quite a bit easier and very sharply. The PVC did not soak into the wood much, if at all. The non-oiled pieces were significantly tougher to snap apart and would flex back and forth rather than snap off sharply. I assume that is because the PVA penetrated into the wood and created a deeper, rubberier bond. That is DEFFINTELY the way I want to go with the model! I would assume that trying to rig up the model to channels that were glued on after oiling would end up with the channels snapping off repeatedly!A linseed oil finish will darken over time. PVA will have some difficulty sticking to wood that has been treated with linseed oil, also wood treated with Danish oil. The beams that are used to help in raising the anchors are called "catheads" because they are typically decorated with a lion face on the very end.
Thanks, Kurt.
M.
The nice thing about the channels is that they really do not have a lot of stress on them with the shrouds rigged. There is equal force, pulling them down and up at the same time as the chain plates rest against the edge of the channel. I have glued channel channels directly to the hall without reinforcements and they never have broken off because the rigging presses them straight against the hull.I glued up two test pieces with PVA: one with linseed oiled (cured) pieces and another with raw wood. Both were with a piece attached edgewise to another at a 90-degree angle to simulate the way a channel would be glued to the hull. After a day of drying, I snapped both off to test how well they adhered. The linseed oil pieces snapped off quite a bit easier and very sharply. The PVC did not soak into the wood much, if at all. The non-oiled pieces were significantly tougher to snap apart and would flex back and forth rather than snap off sharply. I assume that is because the PVA penetrated into the wood and created a deeper, rubberier bond. That is DEFFINTELY the way I want to go with the model! I would assume that trying to rig up the model to channels that were glued on after oiling would end up with the channels snapping off repeatedly!
Thanks, Kurt.
M.


