-

Win a Free Custom Engraved Brass Coin!!!
As a way to introduce our brass coins to the community, we will raffle off a free coin during the month of August. Follow link ABOVE for instructions for entering.
-

PRE-ORDER SHIPS IN SCALE TODAY!
The beloved Ships in Scale Magazine is back and charting a new course for 2026!
Discover new skills, new techniques, and new inspirations in every issue.
NOTE THAT OUR FIRST ISSUE WILL BE JAN/FEB 2026
You are using an out of date browser. It may not display this or other websites correctly.
You should upgrade or use an alternative browser.
You should upgrade or use an alternative browser.
VASA 490 Build Log - Billing Boats, 1:75 [COMPLETED BUILD]
Hi Daniel,
I share your frustration with blackening metals. Here is something I have been trying lately...
I clean in vinegar (but other degreasers should work too), put the item in the bluing/blackening agent but only for a short time - maybe 15-45 seconds, take it out and rinse it in water, allow it to dry, then wipe it off with a soft towel to remove the black powdery layer, then (if it's not dark enough) back into the blackening agent for another short cycle... Repeat as necessary being certain to allow it to dry between treatments and each time wiping off the black powdery layer (it is often quite thin or nonexistent if I put the piece in the blackener for a short enough time). I have not perfected this by any means - but I am getting much better results with repeated short exposures than with any other techniques I have tried. When I do it this way the 'black' doesn't seem to chip off as much. Something to try on your next ship...
Hi Paul,Hi Daniel,
I share your frustration with blackening metals. Here is something I have been trying lately...
I clean in vinegar (but other degreasers should work too), put the item in the bluing/blackening agent but only for a short time - maybe 15-45 seconds, take it out and rinse it in water, allow it to dry, then wipe it off with a soft towel to remove the black powdery layer, then (if it's not dark enough) back into the blackening agent for another short cycle... Repeat as necessary being certain to allow it to dry between treatments and each time wiping off the black powdery layer (it is often quite thin or nonexistent if I put the piece in the blackener for a short enough time). I have not perfected this by any means - but I am getting much better results with repeated short exposures than with any other techniques I have tried. When I do it this way the 'black' doesn't seem to chip off as much. Something to try on your next ship...
That sounds promising in certain situations, maybe with larger and less numerous objects. This black craft wire seems to be working ok. I hesitated to use it at first because I thought the heat of soldering would melt, burn, or become its own problem, but I've been able to time the weld process (after 100 plus attempts) to effect minimal damage to the wire. So, with a little bit of 'micro' painting touch up I believe I can live with it.
Thank you for the tip Paul.
PS I do have to grind the tips to remove the coating for the solder to stick.
I agree the carvings are better than the plain wood. It goes with the theme of the ship. Everything looks great so far Daniel!Hi all!
I have a short update that involves my first attempt at carving. The two so called chesstrees needed replacing without the pulleys but just a hole for the rigging to go thru. I welcome all thumbs up as well as thumbs down, I have not glued them in yet.
View attachment 280366View attachment 280367View attachment 280368View attachment 280369
The original for comparison
View attachment 280370
Thank you for your opinions, comments, or suggestions.
Kurt Konrath
Kurt Konrath
Thanks for these instructions, I have saved and reused my brass blackening agent, and wondered why it seems to stop working after several uses.For the white "alloy" metals, also known as "pewter", it's a zinc & tin alloy, I use the Super Gun Blue and not the Brass Black.
It works very very well.... Again, degrease the items.
- Poor some blueing into a small container / cup;
- put some of the items into the cup with the blueing agency inside it
- let it turn black and take it out; (just a few seconds to 1 minute)
- put the item into another cup with clean water and cleanse it
- dry the item and use a clean cloth or brush to whipe the item, you'll see you get a bit of a egg gloss shine.
When finished, throw away the residue of the blueing stuff, don't put it back into the bottle or it will contaminate the rest in the bottle and it will losen it's strength!
Sorry Daniël, for getting off topic into your buildlog. I hope you don't mind...
Thanks for your input, Dean. I was hoping to see your comment.I agree the carvings are better than the plain wood. It goes with the theme of the ship. Everything looks great so far Daniel!
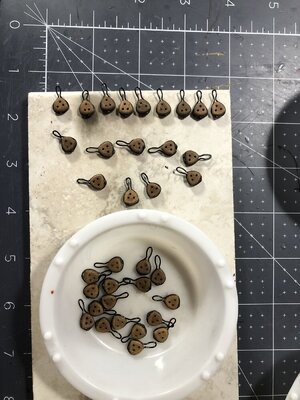
Good afternoon everyone. It seems quite today so I will update my build log. I have managed to work out all my problems with stropping of the dead eyes, they are now a satisfactory black in color, all welded up with only a few rewelds required. So far just the starboard side fore and main mast chain plates installed.
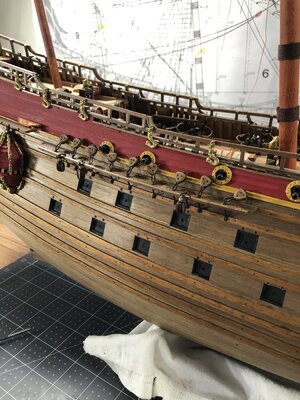
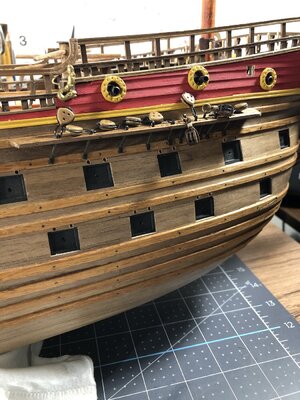
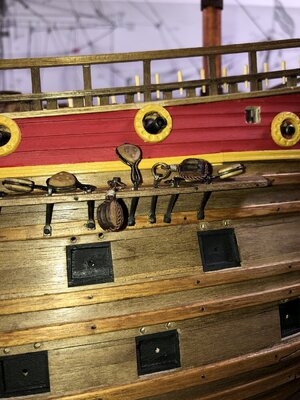
Here are some close ups of my double sheave block rope-stropped and attached to the bar portion of the assembly. Notice I have these incorrectly put together, there should be an iron ring between the rope and bar. Naturally I didn't catch this until after I had placed them onto the hull and plate. The hull photos show my redo. Technically this is still not right; I should have a metal hook attached to the block strop which then hooks into the ring. I will fix this at another time.
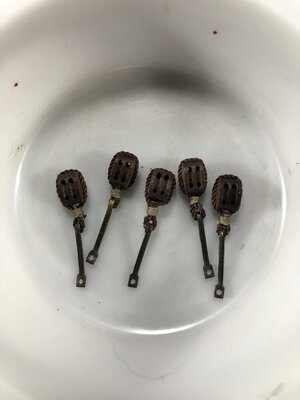
Thanks for stopping by, until next time Happy Modeling.


Here are some close ups of my double sheave block rope-stropped and attached to the bar portion of the assembly. Notice I have these incorrectly put together, there should be an iron ring between the rope and bar. Naturally I didn't catch this until after I had placed them onto the hull and plate. The hull photos show my redo. Technically this is still not right; I should have a metal hook attached to the block strop which then hooks into the ring. I will fix this at another time.


Thanks for stopping by, until next time Happy Modeling.
BOOM! Way to persist with the strops - those look great! That's nice looking rope you made  .
.
 .
.Thanks Paul. I had to stop assembly at one point and make some 1mm dark rope as well as some 0.5mm seizing rope. For me this is not a nuisance but a nice break in the action, (at least for now).BOOM! Way to persist with the strops - those look great! That's nice looking rope you made.
Looking great Daniel. Your deadeye strops appear really good - quite the expert at soldering now!!
Are you going to rig the pendants with their violin blocks before shrouds? I found this was beneficial as their tension can be adjusted to help with the shroud installation after the pendants.
PeterG
Are you going to rig the pendants with their violin blocks before shrouds? I found this was beneficial as their tension can be adjusted to help with the shroud installation after the pendants.
PeterG
Good morning Daniel. Your perseverance with these strops has paid dividends for sure. Excellent.
- Joined
- Jan 9, 2020
- Messages
- 10,566
- Points
- 938

You can be very well pleased with your deadeyes and strops Daniel! This is what I admire about our builders. As far as the block strop which should have a metal hook which hooks into the ring, I am positive that only you know will know about this. And yet, because you know, you are willing to redo them. If politicians and businessmen had paid a tenth of the time to their electorate and customers, that we pay to our models to get them correct, the world would be a much better place.
- Joined
- Sep 3, 2021
- Messages
- 5,198
- Points
- 738

Amen to that, plus the fact there are quite some modelers, willing to fess up to their mistakes. Haven't seen many so called leaders being able to just do that.If politicians and businessmen had paid a tenth of the time to their electorate and customers, that we pay to our models to get them correct, the world would be a much better place.
Enough of that, let's enjoy the superb build of this Vasa...
Thank you Peter. Soldering fascinates me, it's like bowling or golf, once in a while you get a strike or a birdie, but the rest of the time not so much. Ha!Looking great Daniel. Your deadeye strops appear really good - quite the expert at soldering now!!
Are you going to rig the pendants with their violin blocks before shrouds? I found this was beneficial as their tension can be adjusted to help with the shroud installation after the pendants.
PeterG
At this point I plan on installing the lower-level tops then the lower shrouds. I'll set the violin blocks along with all the other blocking and eyelets along the various spars prior to their installation. It is my understanding the violin blocks go out on the end of the spars where the spars are milled down which act as a sort of stop keeping the blocking from sliding down the spar toward the mast. You mention 'pendants', is that another term for spar?
Thanks Grant!Good morning Daniel. Your perseverance with these strops has paid dividends for sure. Excellent.
I was looking around South Africa on google earth the other day as well as your city. Your town and surrounding area are beautiful!
Thank you, Heinrich. From my limited experience in this hobby, I know it will actually be easier to do the line work with one end free, then just hook it in and tie it off.You can be very well pleased with your deadeyes and strops Daniel! This is what I admire about our builders. As far as the block strop which should have a metal hook which hooks into the ring, I am positive that only you know will know about this. And yet, because you know, you are willing to redo them. If politicians and businessmen had paid a tenth of the time to their electorate and customers, that we pay to our models to get them correct, the world would be a much better place.
Thank you, Johan.Amen to that, plus the fact there are quite some modelers, willing to fess up to their mistakes. Haven't seen many so called leaders being able to just do that.
Enough of that, let's enjoy the superb build of this Vasa...
Hello Daniel. Yes Cape Town is a magical place. We have many challenges here in SA, poverty and corruption being the most prevalent however it is a very special place to live. CheersThanks Grant!
I was looking around South Africa on google earth the other day as well as your city. Your town and surrounding area are beautiful!
Hi Daniel great looking sheaving on the blocks how do you get them all the same. I can really see the benefits of hand made ropes.Good afternoon everyone. It seems quite today so I will update my build log. I have managed to work out all my problems with stropping of the dead eyes, they are now a satisfactory black in color, all welded up with only a few rewelds required. So far just the starboard side fore and main mast chain plates installed.
View attachment 281640View attachment 281641View attachment 281642
Here are some close ups of my double sheave block rope-stropped and attached to the bar portion of the assembly. Notice I have these incorrectly put together, there should be an iron ring between the rope and bar. Naturally I didn't catch this until after I had placed them onto the hull and plate. The hull photos show my redo. Technically this is still not right; I should have a metal hook attached to the block strop which then hooks into the ring. I will fix this at another time.
View attachment 281643View attachment 281644
Thanks for stopping by, until next time Happy Modeling.


