Bravo ! c'est une beau modèle !
-

Win a Free Custom Engraved Brass Coin!!!
As a way to introduce our brass coins to the community, we will raffle off a free coin during the month of August. Follow link ABOVE for instructions for entering.
-

PRE-ORDER SHIPS IN SCALE TODAY!
The beloved Ships in Scale Magazine is back and charting a new course for 2026!
Discover new skills, new techniques, and new inspirations in every issue.
NOTE THAT OUR FIRST ISSUE WILL BE JAN/FEB 2026
- Home
- Forums
- Ships of Scale Group Builds and Projects
- Bluenose PoF Group Build
- Bluenose Group Build Logs
You are using an out of date browser. It may not display this or other websites correctly.
You should upgrade or use an alternative browser.
You should upgrade or use an alternative browser.
YUANQING BLUENOSE - Peter Voogt [COMPLETED BUILD]
- Thread starter Peter Voogt
- Start date
- Watchers 74
Merci beaucoup, Bosco.Bravo ! c'est une beau modèle !
Salutation, Peter
- Joined
- Sep 3, 2021
- Messages
- 5,197
- Points
- 738

Really got to come up with a whole new set of superlatives, but lacking those; again this looks superb!Sometimes you have an idea in your head for a long time .......... and then you have to get it out.
With this support as a result:
View attachment 319921
I build my BN as a yard model and then she must also be displayed like this:
View attachment 319922
View attachment 319923
The uprights are secured to the connection with the beams with hex bolts. Will I soon be able to exhibit her at a meeting in the Netherlands.
Then the question may arise, why are the front and back not supported further. Keep this display stand in mind... --> Display Stand <--
Regards, Peter
At minimums this is all very inspirational.
Thanks, Johan. My inspiration was the ‘Hemerica on the slipway’ from Jan Blonk on the Dutch forum. Just the stand and not the weathering.Really got to come up with a whole new set of superlatives, but lacking those; again this looks superb!
At minimums this is all very inspirational.
Regards, Peter
Brilliant!Sometimes you have an idea in your head for a long time .......... and then you have to get it out.
With this support as a result:
View attachment 319921
I build my BN as a yard model and then she must also be displayed like this:
View attachment 319922
View attachment 319923
The uprights are secured to the connection with the beams with hex bolts. Will I soon be able to exhibit her at a meeting in the Netherlands.
Then the question may arise, why are the front and back not supported further. Keep this display stand in mind... --> Display Stand <--
Regards, Peter
Thanxs, Mark. It’s much appreciate.Brilliant!
Regards, Peter
- Joined
- Oct 28, 2018
- Messages
- 760
- Points
- 403

Nicely done the standard Peter
Fits the model very well
Fits the model very well
Thanxs, Henk. After some adjustments I was also happy with it.Nicely done the standard Peter
Fits the model very well
Regards, Peter
Hi Peter, from Sout Africa, I am joining these acivities at late stage but hopefully will be able to see how you are doing with this kit. Love the way you have started the log, it feels like reading a good novel ...groet uit zuid afrika
Hi Etienne. Baie dankie vir jou besoek en die mooi woorde.Hi Peter, from Sout Africa, I am joining these acivities at late stage but hopefully will be able to see how you are doing with this kit. Love the way you have started the log, it feels like reading a good novel ...groet uit zuid afrika
It’s never to late to meet each other on the SOS. And I still have many months/years to go before my BN is finished.
Regards, Peter
Good morning Peter. I have nothing to say....Sometimes you have an idea in your head for a long time .......... and then you have to get it out.
With this support as a result:
View attachment 319921
I build my BN as a yard model and then she must also be displayed like this:
View attachment 319922
View attachment 319923
The uprights are secured to the connection with the beams with hex bolts. Will I soon be able to exhibit her at a meeting in the Netherlands.
Then the question may arise, why are the front and back not supported further. Keep this display stand in mind... --> Display Stand <--
Regards, Peter
 .....blown away by your work! Cheers Grant
Thanxs. Grant.Good morning Peter. I have nothing to say.........blown away by your work! Cheers Grant
‘Anyways the wind blows’, the direction doesn’t matter.
Regards, Peter
Beautiful craftsmanship and imagination.
Thanxs, Rob.Beautiful craftsmanship and imagination.
It’s a ’lttle bit out of the box’ of the nice YQ-kit.
Regard, Peter
While waiting for the deadeyes, went back to the aft deck to make the construction of the cabin.
This photo of W.R. MacAskill from the 'Novascotia archives' is my source of inspiration and interpretation:
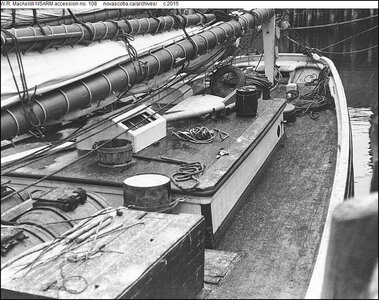
For the construction I'll stick to my 'principles':
-front and port side closed (as in the photo above);
-starboard side open with visible frame construction;
-rear on the starboard side half open with nibbled side.
The rough shell, dry-fit on the deck:
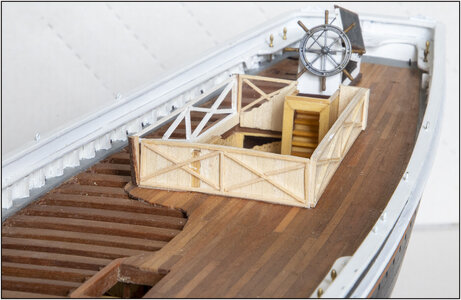
- the frames are on the edge of the deck beams;
- the inner wall with vertical planks extends almost to the underside of the deck beams;
-the outer wall with vertical planks connects to the deck, but gets a frame on the deck.
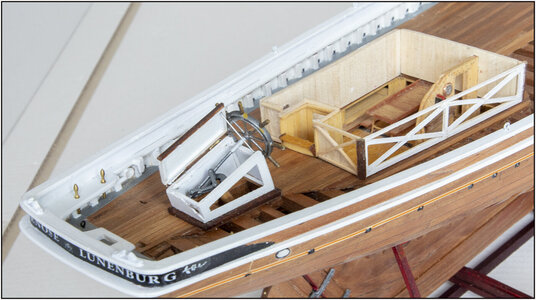
The frames are made of 1x1 mm/ 0.04" beams just near the fish holds and the forecastle.
Now I can get started with:
-the outer walls with airport;
-the profiled molding around de cabin on the deck and under the roof;
-the slightly curved roof with roofing material and planks on the side;
-the companion way with sliding cover with guides and both doors;
-compass housing with compass;
-sky light;
-chimney for the stove;
-some eyebolts with a ring on the front;
-paint the outside wall, top moulding, visible frames, sky light and sliding cover white;
-inside walls with linseed oil;
-rebuild the interior.
To have a view of the interior of the cabin, I also thought to make the roof half with a nibbled side. But that's a nice view in the overall picture. That's why I make the roof removable. To take a inside view, if wanted. I then secure the guides for the sliding cover in the roof and the doors remain attached to the walls. That's a challenge to get it to fit properly.
So I'm still working on this part for a while.
Regards, Peter
This photo of W.R. MacAskill from the 'Novascotia archives' is my source of inspiration and interpretation:

For the construction I'll stick to my 'principles':
-front and port side closed (as in the photo above);
-starboard side open with visible frame construction;
-rear on the starboard side half open with nibbled side.
The rough shell, dry-fit on the deck:

- the frames are on the edge of the deck beams;
- the inner wall with vertical planks extends almost to the underside of the deck beams;
-the outer wall with vertical planks connects to the deck, but gets a frame on the deck.

The frames are made of 1x1 mm/ 0.04" beams just near the fish holds and the forecastle.
Now I can get started with:
-the outer walls with airport;
-the profiled molding around de cabin on the deck and under the roof;
-the slightly curved roof with roofing material and planks on the side;
-the companion way with sliding cover with guides and both doors;
-compass housing with compass;
-sky light;
-chimney for the stove;
-some eyebolts with a ring on the front;
-paint the outside wall, top moulding, visible frames, sky light and sliding cover white;
-inside walls with linseed oil;
-rebuild the interior.
To have a view of the interior of the cabin, I also thought to make the roof half with a nibbled side. But that's a nice view in the overall picture. That's why I make the roof removable. To take a inside view, if wanted.
So I'm still working on this part for a while.
Regards, Peter
Last edited:
Thanks, Heinrich. The advantage of building slow is that you have all the time to consider your options of the pros and cons and eventually change them.Hi Peter. I fully agree that a removable roof would be the way to go - the end result, I am positive, will follow suit with the exquisite quality of the rest of the model.
Regards, Peter
Last edited:
Hi Uwe. Checked my e-mails a moment ago and saw the alert of your post.A beautiful way with the open and partly open houses, also the wheel house
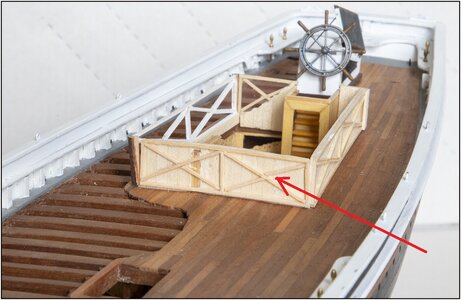
only one fast comment, about a small mistake, which "jumped" immediately into my eye, when I opend your post
Here the cross / stiffener is not fitting
View attachment 321385
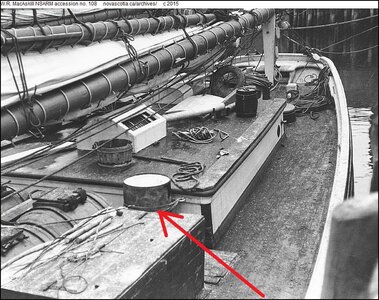
or you will add also such a barrel ?
View attachment 321386
I appreciate your study of the photos and interpretation of the possible consequences.
Just for your a sneak preview:
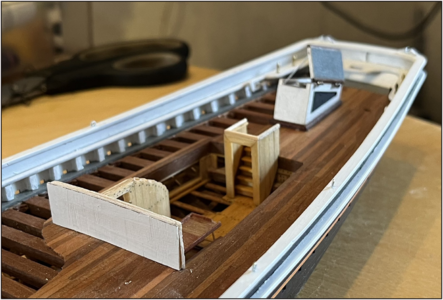
I know that the crossbeam was not fitting nicely. But ........ just placed the outside planking with a pre paint.
Later on the wall gets on both side the 1/4 round corner posts and the frames along the wall on the deck and under the roof etc etc.
(Oh ...... and adjusted the crossbeam on the back-side of the starboard wall.
Regards, Peter
Last edited:
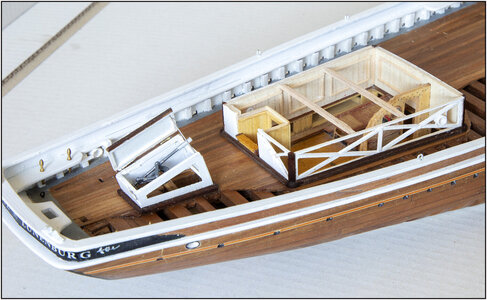
I can imagine that some of you have raised the eyebrows after seeing the dry fit of the base ..... 
That is why I show the different stages of construction.
Now with the advantage of building modules:
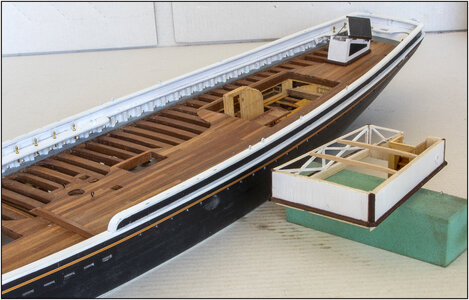
I can take it off the ship and then finish the details like the bottom frame.
Placed on the deck, with also 2 roof beams:
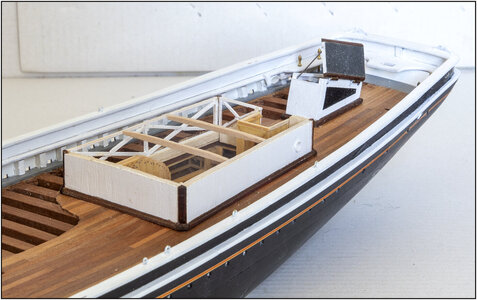
Only when everything is ready I will glue the cabin to the deck.
I have provided the 2 complete inner walls with some moldings to break the surface a bit:
The interior gets the layer of linseed oil later.
Now I can start customizing the roof with all the recesses and the molding below the roof. And I can take everything out again to make the doors and the sliding cover. And de rest of the list.
Regards, Peter

That is why I show the different stages of construction.
Now with the advantage of building modules:

I can take it off the ship and then finish the details like the bottom frame.
Placed on the deck, with also 2 roof beams:

Only when everything is ready I will glue the cabin to the deck.
I have provided the 2 complete inner walls with some moldings to break the surface a bit:

The interior gets the layer of linseed oil later.
Now I can start customizing the roof with all the recesses and the molding below the roof. And I can take everything out again to make the doors and the sliding cover. And de rest of the list.
Regards, Peter
Last edited:


