-

Win a Free Custom Engraved Brass Coin!!!
As a way to introduce our brass coins to the community, we will raffle off a free coin during the month of August. Follow link ABOVE for instructions for entering.
-

PRE-ORDER SHIPS IN SCALE TODAY!
The beloved Ships in Scale Magazine is back and charting a new course for 2026!
Discover new skills, new techniques, and new inspirations in every issue.
NOTE THAT OUR FIRST ISSUE WILL BE JAN/FEB 2026
- Home
- Forums
- Ships of Scale Group Builds and Projects
- Bluenose PoF Group Build
- Bluenose Group Build Logs
You are using an out of date browser. It may not display this or other websites correctly.
You should upgrade or use an alternative browser.
You should upgrade or use an alternative browser.
YUANQING BLUENOSE - Peter Voogt [COMPLETED BUILD]
- Thread starter Peter Voogt
- Start date
- Watchers 74
- Joined
- Sep 3, 2021
- Messages
- 5,198
- Points
- 738

Now you said it...You only have to watch out for the wires …….
You know I said this quite some time ago; whenever my (finished) POF Bluenose can pass the Litmus test, I will commit myself to that particular undertaking. Oh, and I'll be the one deciding.
A steady pace, Paul. No problem for posting here. The other viewers can remember how it starts ........Day 2 and all is well. Coming along nicely.View attachment 325012
Last edited:
- Joined
- Sep 3, 2021
- Messages
- 5,198
- Points
- 738

You plan to be ready by the end of september this year, Paul?Day 2 and all is well. Coming along nicely. Whoops, wrong thread and don't know how to delete.View attachment 325012
Ha Ha maybe next year, just a couple of days off, so making the most of it, plus I need another video for my channel for tomorrow.You plan to be ready by the end of september this year, Paul?
Peter
I love your model - and your work
All these details are amazing - you are on the way to make a real first class model
I love your model - and your work
All these details are amazing - you are on the way to make a real first class model
Thanks, Uwe. Very much appreciated!Peter
I love your model - and your work
All these details are amazing - you are on the way to make a real first class model
But now I am with the details almost at the limit.
Regards, Peter
I never thought that after so many years I could still practice my grandfather's profession on this scale 1:72: the tubing of fish barrels. 
It's fascinating how the fit of this set is. Here are a few steps of putting them together:
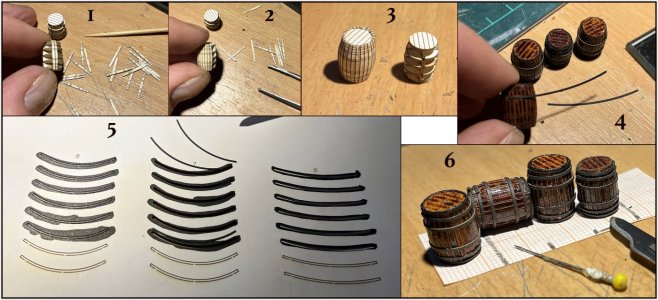
1: after assembling the base parts that slide into each other and the lid and bottom on it, the staves can be applied. Glued together with wood glue, applied with a toothpick;
2: the staves bend nicely against each other in a curved shape;
3: a completed and a assembled base;
4: fitting the hoops, 6 per barrel. Glued with CA, the glue applied with a needle.
5: I first blackened the hoops in the cardboard before cutting them loose;
6: the result of 2 different sizes. I painted them with Schmincke Aero Color 28602, Brasil-Braun.
These are the 5 different sizes:

The material for the barrels themselves is contained in A4 sheets of 0.4 and 0.6 mm cardboard. The hoops of 0.25 mm.
I was pleasantly surprised with the dimensions of all parts. Even all the hoops fitted together perfectly around the barrels.
I can heartily recommend this set.
Regards, Peter
It's fascinating how the fit of this set is. Here are a few steps of putting them together:

1: after assembling the base parts that slide into each other and the lid and bottom on it, the staves can be applied. Glued together with wood glue, applied with a toothpick;
2: the staves bend nicely against each other in a curved shape;
3: a completed and a assembled base;
4: fitting the hoops, 6 per barrel. Glued with CA, the glue applied with a needle.
5: I first blackened the hoops in the cardboard before cutting them loose;
6: the result of 2 different sizes. I painted them with Schmincke Aero Color 28602, Brasil-Braun.
These are the 5 different sizes:

The material for the barrels themselves is contained in A4 sheets of 0.4 and 0.6 mm cardboard. The hoops of 0.25 mm.
I was pleasantly surprised with the dimensions of all parts. Even all the hoops fitted together perfectly around the barrels.
I can heartily recommend this set.
Regards, Peter
The barrels with the attached storage spaces are ready:
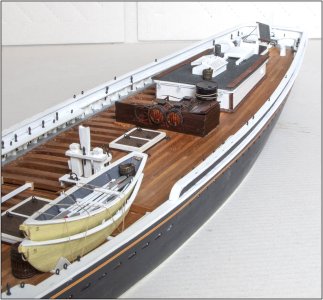
The whole in Brasil Brown pigment ink from Schmincke. (You'll have to scroll up a bit for the comparison with the old photo.)
The hatch can (of course) open:
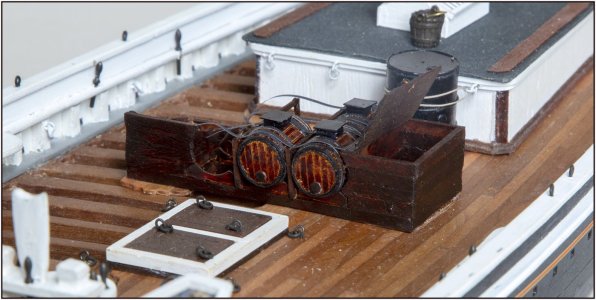
The barrels are secured with tension straps. The square hatches on the barrels. (No, it stops once, these can't open.)
From the 'built' port side, less barrels and material to the 'open' starboard and aft:
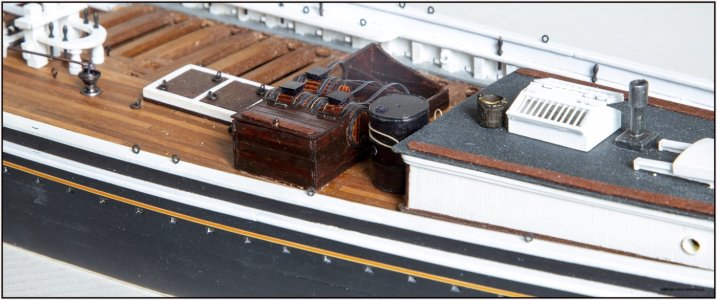
All in all, quite a few hours went into it. But I'm happy with it.
Regards, Peter

The whole in Brasil Brown pigment ink from Schmincke. (You'll have to scroll up a bit for the comparison with the old photo.)
The hatch can (of course) open:

The barrels are secured with tension straps. The square hatches on the barrels. (No, it stops once, these can't open.)
From the 'built' port side, less barrels and material to the 'open' starboard and aft:

All in all, quite a few hours went into it. But I'm happy with it.
Regards, Peter
Nice job Peter, great detail.
These additions are wonderful and will create a genuine working vessel look in the end. Very nice.
Thanks, Paul. Yes, that object has a lot of parts. On the (oldNice job Peter, great detail.
Regards, Peter
Last edited:
Thanxs, Paul. I hadn't thought of this myself when I started this BN. But along the way I got more and more ideas. Finally managed to realize.These additions are wonderful and will create a genuine working vessel look in the end. Very nice.
A step further would be 'weathering', as in the old photos. But that then goes towards neglect or something in that direction. But maybe a challenge for someone else.
Regards, Peter
Agreed. Weathering is a thing and needs to be realized from the very beginning in my opinion. Still, it is possible to create the look of a working vessel absent of the weathering. The addition of these small bits began when you starting building out the spaces below the deck. To not include the same level of detail on the deck would have created an artistic inconsistency. I’m just trying to give you credit for being internally consistent. And a talented artist. I hope the translation works here.Thanxs, Paul. I hadn't thought of this myself when I started this BN. But along the way I got more and more ideas. Finally managed to realize.
A step further would be 'weathering', as in the old photos. But that then goes towards neglect or something in that direction. But maybe a challenge for someone else.
Regards, Peter
So was I at work, which was not always appreciated.I’m just trying to give you credit for being internally consistent.
Thanxs for this compliment, Paul.And a talented artist. I hope the translation works here.
Regards, Peter
All those fine details bring the model more and more to life. Superbly done.The barrels with the attached storage spaces are ready:
View attachment 325445
The whole in Brasil Brown pigment ink from Schmincke. (You'll have to scroll up a bit for the comparison with the old photo.)
The hatch can (of course) open:
View attachment 325446
The barrels are secured with tension straps. The square hatches on the barrels. (No, it stops once, these can't open.)
From the 'built' port side, less barrels and material to the 'open' starboard and aft:
View attachment 325447
All in all, quite a few hours went into it. But I'm happy with it.
Regards, Peter
- Joined
- Jan 9, 2020
- Messages
- 10,566
- Points
- 938

The barrels and their brown color look superb, but I would have kept the original color of the "cradle" for more contrast between the two. Now it all looks very dark - and on the pictures - I repeat, on the pictures - slightly out of kilter with the rest of your wood finishes. This is, however, just my take - in real life it might look perfect!
Thanks, Herman. She's becoming a working vessel.All those fine details bring the model more and more to life. Superbly done.
Regards, Peter
Hi Heinrich. Thanks for your critical eye. I appreciate is, it keeps me sharp.The barrels and their brown color look superb, but I would have kept the original color of the "cradle" for more contrast between the two. Now it all looks very dark - and on the pictures - I repeat, on the pictures - slightly out of kilter with the rest of your wood finishes. This is, however, just my take - in real life it might look perfect!
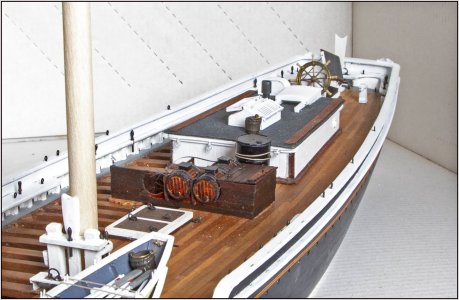
In terms of dark appearance, it partly has to do with the high contrasts. The dark brown of the wood with the light white of the bulwark and background. A digital chip cannot handle that well.
One more photo for you, with some adjusted lighting:
Just a comparison in grayscale:
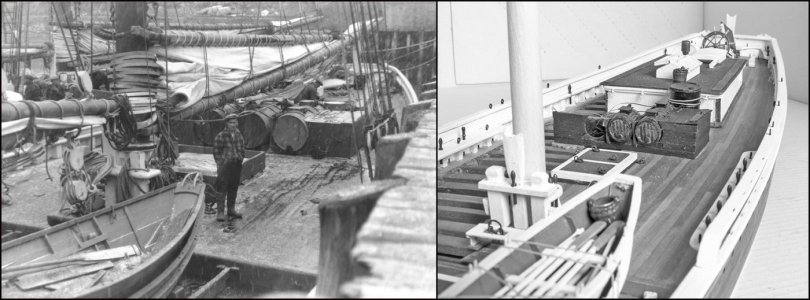
But even with my 24mm lens, I could not make the same point of view. But that has to do with the other types of cameras and lenses from the past.
PS: The dories had no white border. But I did that to stay a bit in the style of the BN itself.
Regards, Peter
Last edited:


