True story Johan....I dont know if for us mere mortals it is better for it to stay in the peripherals.Exactly, once it's in one's head...
-

Win a Free Custom Engraved Brass Coin!!!
As a way to introduce our brass coins to the community, we will raffle off a free coin during the month of August. Follow link ABOVE for instructions for entering.
-

PRE-ORDER SHIPS IN SCALE TODAY!
The beloved Ships in Scale Magazine is back and charting a new course for 2026!
Discover new skills, new techniques, and new inspirations in every issue.
NOTE THAT OUR FIRST ISSUE WILL BE JAN/FEB 2026
- Home
- Forums
- Ships of Scale Group Builds and Projects
- Bluenose PoF Group Build
- Bluenose Group Build Logs
You are using an out of date browser. It may not display this or other websites correctly.
You should upgrade or use an alternative browser.
You should upgrade or use an alternative browser.
YUANQING BLUENOSE - Peter Voogt [COMPLETED BUILD]
- Thread starter Peter Voogt
- Start date
- Watchers 74
ditto..Every time you post the total picture I am truly amazed what you are able to produce on this scale. Very well done.
True story Johan....I dont know if for us mere mortals it is better for it to stay in the peripherals.
Aha ....... again some 'Brothers in Arms' ........ditto..
Thanxs, Grant.
Before I can continue with the construction on top of the lower masts, I first had to make the mast hoops. The main- and top sails are attached to this and thus slide up and down over the masts.
Here's the example in the old photo and the specification drawing in Howard Chapell's book:
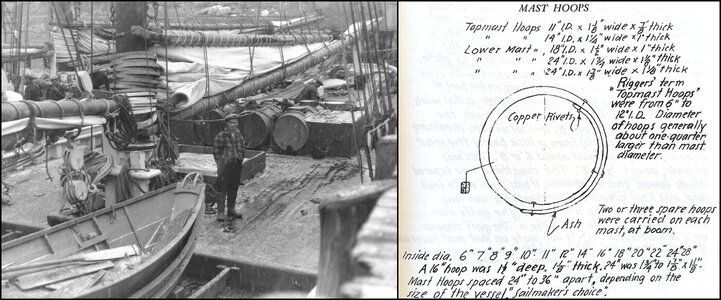
Here you are looking at the reefed main sail behind the main mast. (There is a good chance that it will also appear on my BN. )
)
The kit does not provide these hoops and in terms of desired size I think I can find them somewhere. So got started myself. With the following steps:
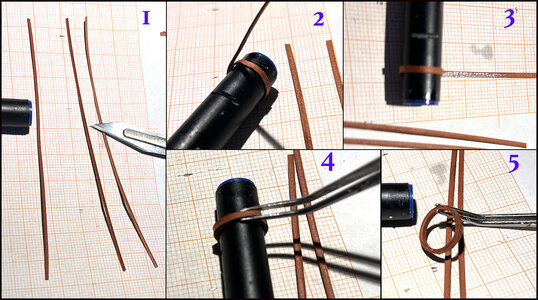
1: Selected a nice brown color from my Admiral's scrap-book paper collection. Cut strips of about a mm there.
2: Select a pen with the right diameter. Chapelle writes that the 'hoops' are about a quarter larger than the diameter of the mast. My main boom is 7.6 mm at the bottom. The pen is 9.3mm. So look for other pens for the foremast and upper masts.
Strips cut to length so they can go 3x around the pen.
Secure the first contact point of the 1st round with glue.
3: Always apply a piece of glue and start rolling.
4: Because I glue with wood glue (PVA), the glue remains flexible for a while and I can place the rows nicely on top of each other.
5: The end between the points of the picet so that I can clamp it flat in the rest to get a round hoop.
Then this will be the result:
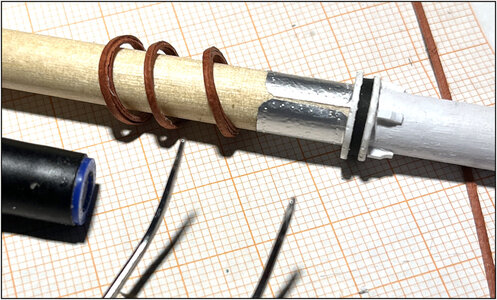
According to L.B. Jenson in The Saga has 36 on the mainmasts, so 18 each. On the uppermasts 24, so 12 each.
He draws fewer in his drawings. But Chapelle writes, "Two or three spare hoops are carried on each mast at the boom.
I have something to do .........
Regards, Peter
Here's the example in the old photo and the specification drawing in Howard Chapell's book:

Here you are looking at the reefed main sail behind the main mast. (There is a good chance that it will also appear on my BN.
The kit does not provide these hoops and in terms of desired size I think I can find them somewhere. So got started myself. With the following steps:

1: Selected a nice brown color from my Admiral's scrap-book paper collection. Cut strips of about a mm there.
2: Select a pen with the right diameter. Chapelle writes that the 'hoops' are about a quarter larger than the diameter of the mast. My main boom is 7.6 mm at the bottom. The pen is 9.3mm. So look for other pens for the foremast and upper masts.
Strips cut to length so they can go 3x around the pen.
Secure the first contact point of the 1st round with glue.
3: Always apply a piece of glue and start rolling.
4: Because I glue with wood glue (PVA), the glue remains flexible for a while and I can place the rows nicely on top of each other.
5: The end between the points of the picet so that I can clamp it flat in the rest to get a round hoop.
Then this will be the result:

According to L.B. Jenson in The Saga has 36 on the mainmasts, so 18 each. On the uppermasts 24, so 12 each.
He draws fewer in his drawings. But Chapelle writes, "Two or three spare hoops are carried on each mast at the boom.
I have something to do .........
Regards, Peter
Last edited:
- Joined
- Sep 3, 2021
- Messages
- 5,190
- Points
- 738

Definitely, but it's so tempting to try and do something outside one's comfort zone...dont know if for us mere mortals it is better for it to stay in the peripherals.
True story- so I guess that means you are going for itDefinitely, but it's so tempting to try and do something outside one's comfort zone...

Good morning Peter. It is incredible what you achieve with some innovation and paper “stolen” from the admiral - who would have thought. Your detail on your BN is “off the charts” so to speak. An outstanding BN is being built here. Cheers GrantBefore I can continue with the construction on top of the lower masts, I first had to make the hoops. The main- and top sails are attached to this and thus slide up and down over the masts.
Here's the example in the old photo and the specification drawing in Howard Chapell's book:
View attachment 326436
Here you are looking at the reefed main sail behind the main mast. (There is a good chance that it will also appear on my BN.)
The kit does not provide these hoops and in terms of desired size I think I can find them somewhere. So got started myself. With the following steps:
View attachment 326437
1: Selected a nice brown color from my Admiral's scrap-book paper collection. Cut strips of about a mm there.
2: Select a pen with the right diameter. Chapelle writes that the 'hoops' are about a quarter larger than the diameter of the mast. My main boom is 7.6 mm at the bottom. The pin is 9.3mm. So look for other pins for the foremast and upper masts.
Strips cut to length so they can go 3x around the pen.
Secure the first contact point of the 1st round with glue.
3: Always apply a piece of glue and start rolling.
4: Because I glue with wood glue (PVA), the glue remains flexible for a while and I can place the rows nicely on top of each other with a pin set.
5: The end between the points of the picet so that I can clamp it flat in the rest to get a round hoop.
Then this will be the result:
View attachment 326438
According to L.B. Jenson in The Saga has 36 on the mainmasts, so 18 each. On the uppermasts 24, so 12 each.
He draws fewer in his drawings. But Chapelle writes, "Two or three spare hoops are carried on each mast at the boom.
I have something to do .........
Regards, Peter
Thanxs, Grant.Good morning Peter. It is incredible what you achieve with some innovation and paper “stolen” from the admiral - who would have thought. Your detail on your BN is “off the charts” so to speak. An outstanding BN is being built here. Cheers Grant
The hoops are so evident in the various descriptions and photos that I couldn't help but make them.
I had a piece of very thin veneer laying around, but that's somewhere I can't find it now......
I have also cut rings from ballpoint pen holders and from otherwise small tubes, but not with the desired visual result.
Regards, Peter
Thanks, Heinrich. But in the meantime I've been busy with fine-tuning.....This is the best of Dutch ingenuity applied to Bluenose.
Sometimes you think you're doing the right thing. Until you sort out a few things.
The 18 hoops for the main boom, according to Chapelle, were these dimensions: 24" I.D. x 1 7/8" wide x 1 1/8" thick.
If I translate that to the BN scale of 1:72, then the diameter is correct. But the width and thickness ......... that should then be "as thin as possible" .........
Therefore started again with not 3 rounds but 2:
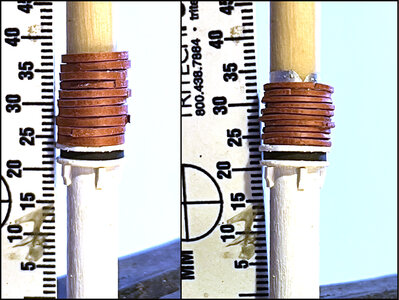
On the left picture 10 hoops with 2 rounds. But the thickness of the 10 was disappointing: 13 mm. Then 18 becomes a whole stack.
That's why I started again with thinner cut strips.
The result on the right: 10 hoops are 9 mm thick. That's better.
With here the stack of 18 hoops on the deck:
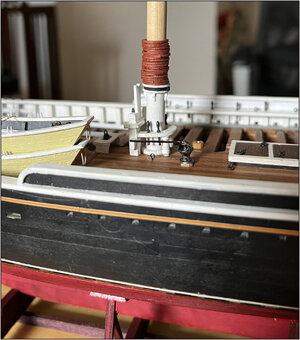
I am satisfied with that. Maybe no spare hoops ........ Then according to Jenson's drawings I can suffice with 15.
That decision will be made when I have the boom and the gaff (with possibly the sail) ready.
For the upper masts I have to look at the 2 turns in proportion. Maybe it will be 1 round there.
To be continued ........
Regards, Peter
The 18 hoops for the main boom, according to Chapelle, were these dimensions: 24" I.D. x 1 7/8" wide x 1 1/8" thick.
If I translate that to the BN scale of 1:72, then the diameter is correct. But the width and thickness ......... that should then be "as thin as possible" .........
Therefore started again with not 3 rounds but 2:

On the left picture 10 hoops with 2 rounds. But the thickness of the 10 was disappointing: 13 mm. Then 18 becomes a whole stack.
That's why I started again with thinner cut strips.
The result on the right: 10 hoops are 9 mm thick. That's better.
With here the stack of 18 hoops on the deck:

I am satisfied with that. Maybe no spare hoops ........ Then according to Jenson's drawings I can suffice with 15.
That decision will be made when I have the boom and the gaff (with possibly the sail) ready.
For the upper masts I have to look at the 2 turns in proportion. Maybe it will be 1 round there.
To be continued ........
Regards, Peter
Last edited:
The beauty is in the details.
Thanxs, Jan. And those tiny parts take the most of your time.The beauty is in the details.
Regards, Peter
Good morning Peter. Only a "like" today no "love"...you have had enoughSometimes you think you're doing the right thing. Until you sort out a few things.
The 18 hoops for the main boom, according to Chapelle, were these dimensions: 24" I.D. x 1 7/8" wide x 1 1/8" thick.
If I translate that to the BN scale of 1:72, then the diameter is correct. But the width and thickness ......... that should then be "as thin as possible" .........
Therefore started again with not 3 rounds but 2:
View attachment 326695
On the left picture 10 hoops with 2 rounds. But the thickness of the 10 was disappointing: 13 mm. Then 18 becomes a whole stack.
That's why I started again with thinner cut strips.
The result on the right: 10 hoops are 9 mm thick. That's better.
With here the stack of 18 hoops on the deck:
View attachment 326696
I am satisfied with that. Maybe no spare hoops ........ Then according to Jenson's drawings I can suffice with 15.
That decision will be made when I have the boom and the gaff (with possibly the sail) ready.
For the upper masts I have to look at the 2 turns in proportion. Maybe it will be 1 round there.
To be continued ........
Regards, Peter
 . It good to know even the clever talented modelers make scale dimensional errors. I have been thinking how to make collars for my bowsprit and you have given me the answer...Thank you. Cheers Grant
You are welcome, Grant. You can / may use as much as possible from what I show ……. whatever it is the solution for.Good morning Peter. Only a "like" today no "love"...you have had enough. It good to know even the clever talented modelers make scale dimensional errors. I have been thinking how to make collars for my bowsprit and you have given me the answer...Thank you. Cheers Grant
Regards, Peter
Thanks, Mark. Indeed: practice, look, compare, re-do, look ........ spot on!Practice makes perfect hey Peter? Those hoops look spot on now
regards, Peter
Chapter of hoops also closed.
Lower masts are 3.9mm x 1.25 = 4.875 for those hoops. Now let me have a 5mm wood twist drill that is 4.85mm at the 'foot'. That's within my range.....
"My sources" disagree about the number of hoops:
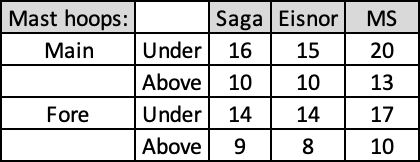
Jenson and Eisnor are pretty consistent.
I have decided not to put spare hoops above, so 19 pieces will suffice:
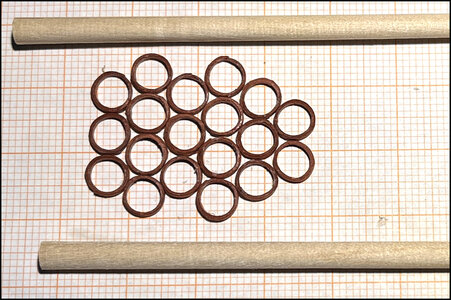
10 on the main mast and 9 on the foremast. They are nevertheless made of 2 turns/layers, then they still get a certain robustness. 1 round was fragile with a not nice thickening on the glued part.
All hoops:
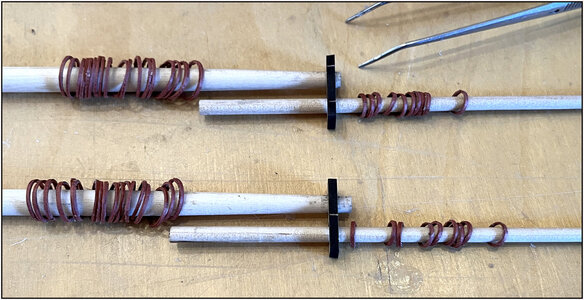
Underneath the mainmast gets 16 and the foremast 14. Maybe 1 spare for the statue, so I can pick the best one.
Regards, Peter
Lower masts are 3.9mm x 1.25 = 4.875 for those hoops. Now let me have a 5mm wood twist drill that is 4.85mm at the 'foot'. That's within my range.....
"My sources" disagree about the number of hoops:

Jenson and Eisnor are pretty consistent.
I have decided not to put spare hoops above, so 19 pieces will suffice:

10 on the main mast and 9 on the foremast. They are nevertheless made of 2 turns/layers, then they still get a certain robustness. 1 round was fragile with a not nice thickening on the glued part.
All hoops:

Underneath the mainmast gets 16 and the foremast 14. Maybe 1 spare for the statue, so I can pick the best one.
Regards, Peter
Last edited:
Started dressing the masthead of the mainmast.
The information on the drawings of YQ, MS and Eisnor:
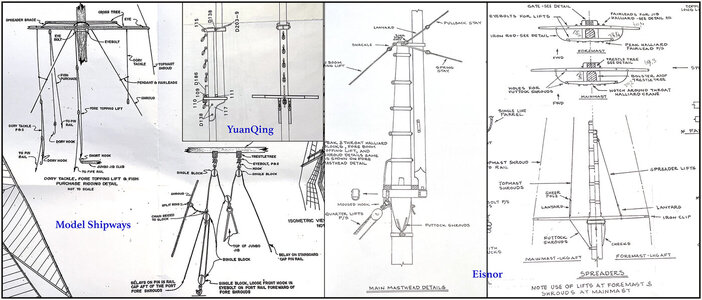
The insert, about top center, is from the YQ manual.
The cheeks are different in shape and too coarse, the front spreader is too short and there are no calves.
MS and Eisnor differ in installing hoists for the sloops and cargo. Selected Eisnor here.
Decided to build scratch. Here are the first parts:
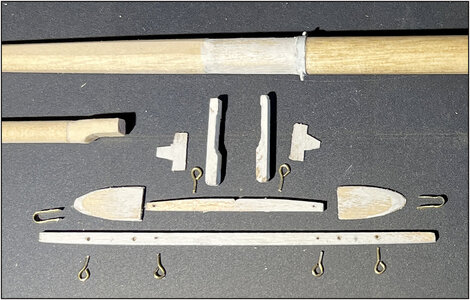
-The mast has received the first band with an eye on both sides in witch the futtock shrouds where hooked in.
-The front of the mast is flattened and the rear and sides are slightly chamfered.
-Where the cheeks are placed, the mast is also flattened.
-The trestle trees fall slightly around the mast at the front and form the confinement of the foot of the upper mast.
-The foot of the upper mast has a recess so that it runs transversely around the front spreader. And gets closer to the mast top of the lower mast.
-2 side brackets and already some eyebolts for the spreaders. Because these are now easy to apply and can be painted with.
The parts mounted:
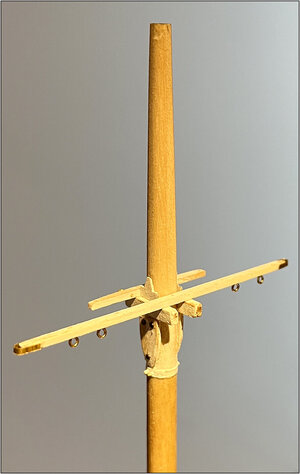
Everything had to be aligned squarely and straight of course.
All this now first finish and paint and then get started with all the fittings on the mast top.
Regards, Peter
The information on the drawings of YQ, MS and Eisnor:

The insert, about top center, is from the YQ manual.
The cheeks are different in shape and too coarse, the front spreader is too short and there are no calves.
MS and Eisnor differ in installing hoists for the sloops and cargo. Selected Eisnor here.
Decided to build scratch. Here are the first parts:

-The mast has received the first band with an eye on both sides in witch the futtock shrouds where hooked in.
-The front of the mast is flattened and the rear and sides are slightly chamfered.
-Where the cheeks are placed, the mast is also flattened.
-The trestle trees fall slightly around the mast at the front and form the confinement of the foot of the upper mast.
-The foot of the upper mast has a recess so that it runs transversely around the front spreader. And gets closer to the mast top of the lower mast.
-2 side brackets and already some eyebolts for the spreaders. Because these are now easy to apply and can be painted with.
The parts mounted:

Everything had to be aligned squarely and straight of course.
All this now first finish and paint and then get started with all the fittings on the mast top.
Regards, Peter
Last edited:
I was just practicing how to place my BN on the uprights after transport for the Dutch exhibition next week, when a saw this post of Maarten @Maarten:
So, made 2 pictures:


Same principle (cut in half), different style.
It will be nice next week in Duizel!
Regards, Peter
Hms Alert by Maarten [COMPLETED BUILD]
Amazingly detailed work Maarten. I am sure the real ship did not look this good.
shipsofscale.com


Same principle (cut in half), different style.
It will be nice next week in Duizel!
Regards, Peter
Last edited:

