No problem, Heinrich. Knots are there to tie or unravel …….Nope - Dutch ships also used the eyesplice seized to the first and last shrouds.
View attachment 357332
View attachment 357333
De Zeven Provincien - Dik
Het VOC Retourschip - H.N. Kamer
Sorry, Peter for interrupting!
-

Win a Free Custom Engraved Brass Coin!!!
As a way to introduce our brass coins to the community, we will raffle off a free coin during the month of August. Follow link ABOVE for instructions for entering.
-

PRE-ORDER SHIPS IN SCALE TODAY!
The beloved Ships in Scale Magazine is back and charting a new course for 2026!
Discover new skills, new techniques, and new inspirations in every issue.
NOTE THAT OUR FIRST ISSUE WILL BE JAN/FEB 2026
- Home
- Forums
- Ships of Scale Group Builds and Projects
- Bluenose PoF Group Build
- Bluenose Group Build Logs
You are using an out of date browser. It may not display this or other websites correctly.
You should upgrade or use an alternative browser.
You should upgrade or use an alternative browser.
YUANQING BLUENOSE - Peter Voogt [COMPLETED BUILD]
- Thread starter Peter Voogt
- Start date
- Watchers 74
- Joined
- Aug 8, 2019
- Messages
- 5,577
- Points
- 738

Never trust the modern writers. There is no proof on Dutch ships of eye splices on the ratlines in the 17th century. Dik speaks about "waarschijnlijk" probably. Models like the William Rex or the HZ, PW don't have them. Also on details drawings of that time they where not there. Only in a much later period they appear on paintings and models of Dutch ships.Nope - Dutch ships also used the eyesplice seized to the first and last shrouds.
View attachment 357332
View attachment 357333
De Zeven Provincien - Dik
Het VOC Retourschip - H.N. Kamer
Sorry, Peter for interrupting!
The picture you shared doesn't show an eyesplice.
All right, my new ratline begin and ending knot!All 8 shrouds finally fixed:
View attachment 357304
Started with weaving the ratlines.
First put a line every 4 to keep the distance between the shrouds and they are not pulled each other. Also here only between the first 3 shrouds.
View attachment 357305
Of course with the much discussed knots lately. In the middle with a clove hitch. At the ends with a 'Cow Hitch'. Both lower parts mirrors to each other. In the climbing world we call that a Lark's Head.
Regards, Peter
I think there is enough food for starting a thread somewhere about ratlines knots during all the centuries.Never trust the modern writers. There is no proof on Dutch ships of eye splices on the ratlines in the 17th century. Dik speaks about "waarschijnlijk" probably. Models like the William Rex or the HZ, PW don't have them. Also on details drawings of that time they where not there. Only in a much later period they appear on paintings and models of Dutch ships.
The picture you shared doesn't show an eyesplice.
I am building a kind of modern schooner from Nova Scotia on a scale that has its limits.
Regards, Peter
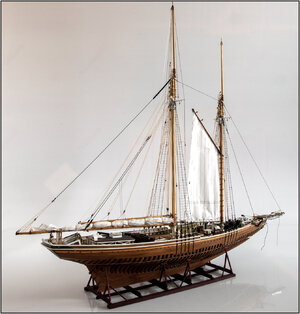
First a complete picture before I show the details.
The ratlines are installed and the reefed fore sail is set:
I am satisfied with the appearance of the not entirely short cut end of the swept back line, which I have attached to the line itself with a tip of thinned wood line:
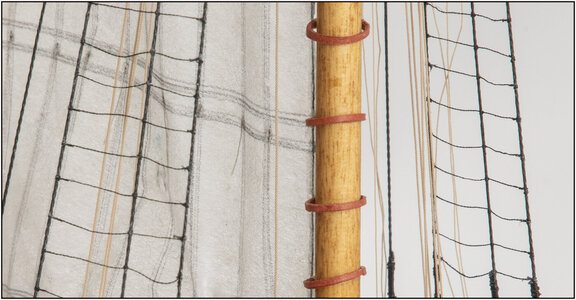
In this 1:72 scale it looks quite similar to the eye splices at both ends of the ratlines that are attached to the shrouds.
I have to put the shrouds back in position a bit to level out the ratlines. When securing the halliards of the sail with the tweezers, everything was pretty in the way.
The boom is lifted out of the Boom Crutch at the end with the boom topping lift. Tensioned at the bottom with the boom sheet:
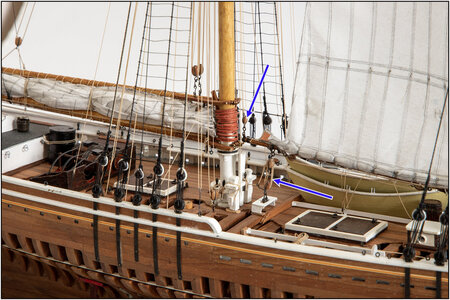
The fetching part of the sheet runs through an eye on the block to the belaying pin on the table at the foot of the mast.
The gaff was raised with the throat halliard and the peak halliard:
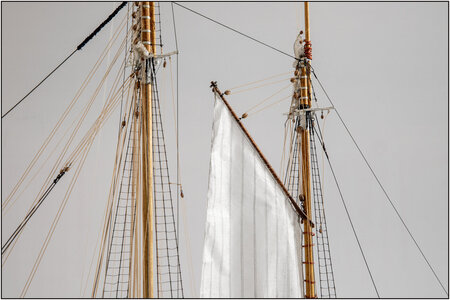
They are both reeved in the same way as the main gaff. On one side the hauling part, which is secured via a block on the deck, is secured to the mast foot:
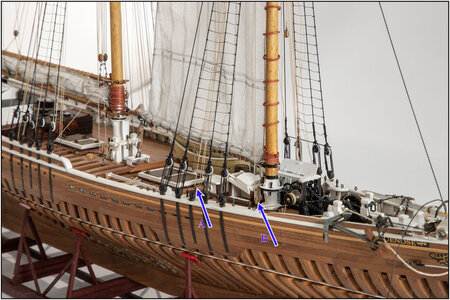
B is the fetching part of the peak halliard. With his tackle on the port side, just seen behind the motorhousing, with a hook block secured in a eye by the shrouds.
A is the tackle from the throat halliard. With the fetching part by the mast foot on the port side.
For the memory, the drawing from the peak halliard:
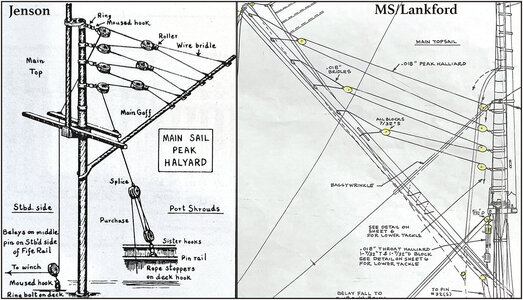
Then I can now pull the lines of the topsail through the relevant blocks and secure it.
Regards, Peter
The ratlines are installed and the reefed fore sail is set:

I am satisfied with the appearance of the not entirely short cut end of the swept back line, which I have attached to the line itself with a tip of thinned wood line:

In this 1:72 scale it looks quite similar to the eye splices at both ends of the ratlines that are attached to the shrouds.
I have to put the shrouds back in position a bit to level out the ratlines. When securing the halliards of the sail with the tweezers, everything was pretty in the way.
The boom is lifted out of the Boom Crutch at the end with the boom topping lift. Tensioned at the bottom with the boom sheet:

The fetching part of the sheet runs through an eye on the block to the belaying pin on the table at the foot of the mast.
The gaff was raised with the throat halliard and the peak halliard:

They are both reeved in the same way as the main gaff. On one side the hauling part, which is secured via a block on the deck, is secured to the mast foot:

B is the fetching part of the peak halliard. With his tackle on the port side, just seen behind the motorhousing, with a hook block secured in a eye by the shrouds.
A is the tackle from the throat halliard. With the fetching part by the mast foot on the port side.
For the memory, the drawing from the peak halliard:

Then I can now pull the lines of the topsail through the relevant blocks and secure it.
Regards, Peter
Last edited:
- Joined
- Aug 14, 2018
- Messages
- 829
- Points
- 403

Most excellent Peter, you are a true inspiration, love it.First a complete picture before I show the details.
The ratlines are installed and the fore sail is set:
View attachment 357620
I am satisfied with the appearance of the not entirely short cut end of the swept back line, which I have attached to the line itself with a tip of thinned wood line:
View attachment 357621
In this 1:72 scale it looks quite similar to the eye splices at both ends of the ratlines that are attached to the shrouds.
I have to put the shrouds back in position a bit to level out the ratlines. When securing the halliards of the sail with the tweezers, everything was pretty in the way.
The boom is lifted out of the Boom Crutch at the end with the boom topping lift. Tensioned at the bottom with the boom sheet:
View attachment 357622
The fetching part of the sheet runs through an eye on the block to the belaying pin on the table at the foot of the mast.
The gaff was raised with the throat halliard and the peak halliard:
View attachment 357623
They are both reeved in the same way as the mainsail gaff. On one side the hauling part, which is secured via a block on the deck, is secured to the mast foot:
View attachment 357624
B is the fetching part of the peak halliard. With his tackle on the port side, just seen behind the motorhousing, with a hook block secured in a eye by the shrouds.
A is the tackle from the throat halliard. With the fetching part by the mast foot on the port side.
Then I can now pull the lines of the topsail through the relevant blocks and secure it.
regards, Peter
All the best JJ..
Stunning Peter. The realism is unmatched.
Stunning Peter, I wonder how they pulled the baggywrinkles down when the main sail is set?
Thanks Jack. Pick up at much as you can use.Most excellent Peter, you are a true inspiration, love it.
All the best JJ..
Regards, Peter
Last edited:
Thanks, Paul. But I got feeling the nervousness from all the fiddling. But from time to time a cup of thee .....Stunning Peter. The realism is unmatched.
Regards, Peter
Canoe21
Lawrence
Hello Peter, What a great job you have did on your YQ- Bluenose., You must be real proud. Well Done.First a complete picture before I show the details.
The ratlines are installed and the reefed fore sail is set:
View attachment 357620
I am satisfied with the appearance of the not entirely short cut end of the swept back line, which I have attached to the line itself with a tip of thinned wood line:
View attachment 357621
In this 1:72 scale it looks quite similar to the eye splices at both ends of the ratlines that are attached to the shrouds.
I have to put the shrouds back in position a bit to level out the ratlines. When securing the halliards of the sail with the tweezers, everything was pretty in the way.
The boom is lifted out of the Boom Crutch at the end with the boom topping lift. Tensioned at the bottom with the boom sheet:
View attachment 357622
The fetching part of the sheet runs through an eye on the block to the belaying pin on the table at the foot of the mast.
The gaff was raised with the throat halliard and the peak halliard:
View attachment 357623
They are both reeved in the same way as the main gaff. On one side the hauling part, which is secured via a block on the deck, is secured to the mast foot:
View attachment 357624
B is the fetching part of the peak halliard. With his tackle on the port side, just seen behind the motorhousing, with a hook block secured in a eye by the shrouds.
A is the tackle from the throat halliard. With the fetching part by the mast foot on the port side.
For the memory, the drawing from the peak halliard:
View attachment 357630
Then I can now pull the lines of the topsail through the relevant blocks and secure it.
Regards, Peter
Regards Lawrence
Thanks, Lawrence. Certainly proud, but above all also satisfied that I was able to set the sail in this way. The Japanese paper is fragile. The crew had to carry out 2 minor repairs. Also visible on 2 of the images. But that makes it a bit more realistic.Hello Peter, What a great job you have did on your YQ- Bluenose., You must be real proud. Well Done.
Regards Lawrence
Regards, Peter
- Joined
- Sep 3, 2021
- Messages
- 5,198
- Points
- 738

And I most definitely will be there...Something what the most here don't know. This ship will be on display in the Maritime Museum in Amsterdam.
This is guaranteed to be the biggest attraction to go see.
And highly deserved
Thanks, Stephan. As info for the others:Something what the most here don't know. This ship will be on display in the Maritime Museum in Amsterdam.
This is guaranteed to be the biggest attraction to go see.
And highly deserved
On September 30th there will be a National Exhibition from the Dutch Scale Shipbuilders (NVM). For models of ships from before 1940.
Regards, Peter
Thanks, Johan. Indeed … no race ….. at the end of the year ……..Getting close to the finish line now and yes, I know, it's not a race.
Again, the overall appearance is very convincing and she grew into an absolute eyecatcher.
This will be very hard to surpass.
And about the surpass ….. That's what I thought after The Lee was ready…..
Regards, Peter
It will be a great gathering.And I most definitely will be there...
Canoe21
Lawrence
Hello Peter, Sure wish that I could be there, sounds like a great time, Enjoy.
Regards Lawrence
Regards Lawrence


