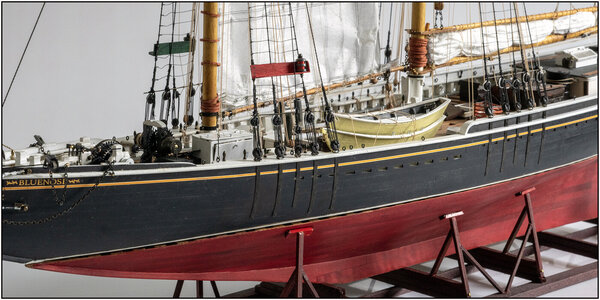
YUANQING BLUENOSE - Peter Voogt [COMPLETED BUILD]

Continued finishing items between both masts:
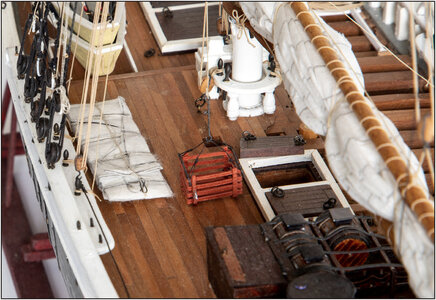
1100 Hooks.jpg
1: flag line to the top of the foremast. Secured to the side of the spreader bar.
2: the two front dorie hooks. The one on the port side attached to the forward loop of the dorie. The aft was already set when installing the main boom.
3: Because of hoisting the dorie, the forward port fish-hook has been secured to the railing in front of the shrouds.
4: the aft port fish-hook is secured on a crate. Ready to lower through the open hatch.

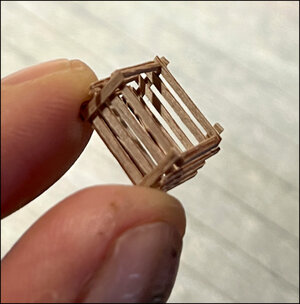
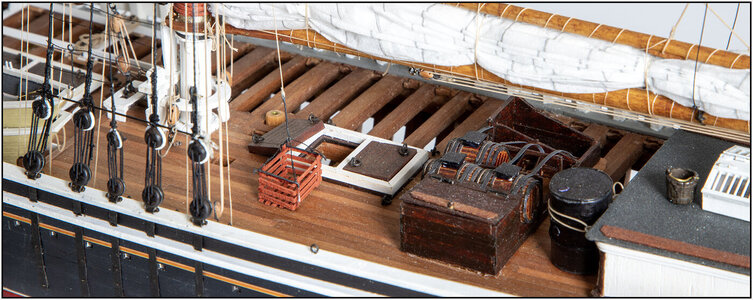
Because I couldn't find a suitable crate, I made one myself:
1101 Fish.jpg
Dimensions L/W/H: 13x10x9mm / .51"x.39"x.35".
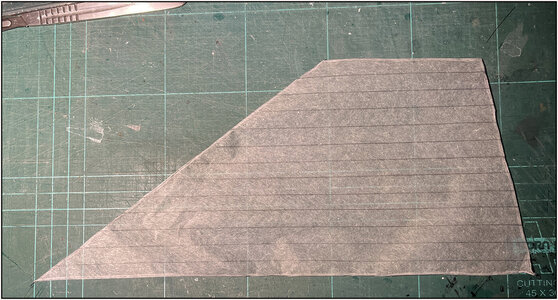
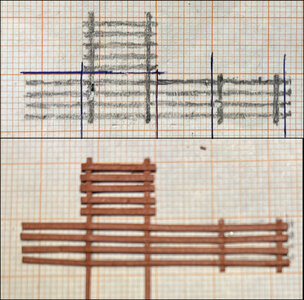
First I made a sketch and assembled it from strips of 1 mm/.04" that I cut from the same thick paper as I made the mast hoops from:
1102 Fish.jpg
The blue lines are the fold lines. Press lightly with a knife.
I fold the 4 walls towards each other, glue the ends together, fold the bottom to the walls and glue that too.
Sorry the bottom picture is not sharp. Quickly made with the iPhone sometimes see is stubborn ............ looks like his boss ...... ;)
I also will make 1 or 2 for in the fish hold. Then I'll take some pictures of the different steps.

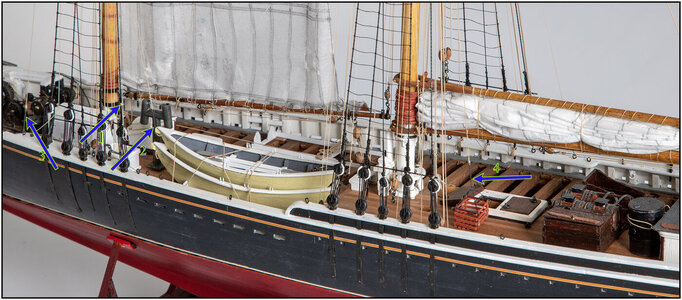
From the starboard side:
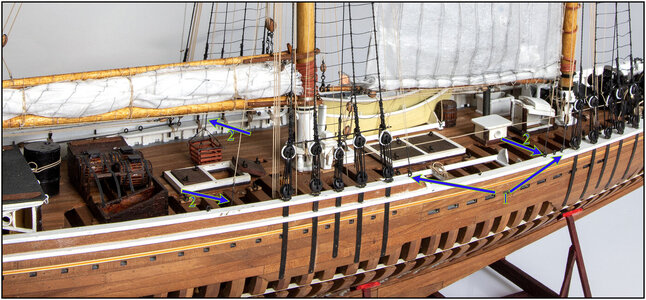
1103 Fish.jpg
1: Both dorie hooks.
2: the fish-hooks and the crate in front of the opened hatch.
So there are extra eyes on the railing to flexible handling of the rigging.
Regards, Peter
 
Last edited:
Continued finishing items between both masts:
View attachment 358902
1: flag line to the top of the foremast. Secured to the side of the spreader bar.
2: the two front dorie hooks. The one on the port side attached to the forward loop of the dorie. The aft was already vasy when installing the main boom.
3: Because of the hoisting of dorie, the forward port fish-hook has been secured to the railing in front of the shrouds.
4: the aft port fish-hook is secured on a crate. Ready to lower through the open hatch.

Because I couldn't find a suitable crate, I made one myself:
View attachment 358903
Dimensions L/W/H: 13x10x9mm / .51"x.39"x.35".
First I made a sketch and assembled it from strips of 1 mm/.04" that I cut from the same thick paper as I made the mast hoops from:
View attachment 358904
The blue lines are the fold lines. Press lightly with a knife.
I fold the 4 walls towards each other, glue the ends together, fold the bottom to the walls and glue that too.
Sorry the bottom picture is not sharp. Quickly made with the iPhone sometimes see is stubborn ............ looks like his boss ...... ;)
I also will make 1 or 2 for in the fish hold. Then I'll take some pictures of the different steps.

From the starboard side:
View attachment 358905
1: Both dorie hooks.
2: the fish-hooks and the crate in front of the opened hatch.
So there are extra eyes on the railing or flexible handling of the rigging.
Regards, Peter
Hello Peter, Great work on all of the detail that you are adding to your one of a kind YQ-Bluenose.
Regards Lawrence
 
I told Captain Voogt that I wanted to start on the foredeck with the 3 jib sails.
That was against the sore leg. “You are busy with almost all sails, but the Fisherman's Staysail also belongs between the two masts”.
OK, so let's get started:
1105 Fishermans.jpg
Cutting, applying lines etc.

This is how it would appear:
1106 Fishermans.jpg
But a BN with a storm sail and then also a Fisherman's Staysail? That is irresponsible!

Decided in consultation to fold the sail and tide it up with the tack line:
1107 Fishermans.jpg
In 3 stages.

This is how it is now temporarily on deck:
1108 Fishermans.jpg
To be stored in the hold.
Regards, Peter
 
Last edited:
Continued finishing items between both masts:
View attachment 358902
1: flag line to the top of the foremast. Secured to the side of the spreader bar.
2: the two front dorie hooks. The one on the port side attached to the forward loop of the dorie. The aft was already set when installing the main boom.
3: Because of hoisting the dorie, the forward port fish-hook has been secured to the railing in front of the shrouds.
4: the aft port fish-hook is secured on a crate. Ready to lower through the open hatch.

Because I couldn't find a suitable crate, I made one myself:
View attachment 358903
Dimensions L/W/H: 13x10x9mm / .51"x.39"x.35".
First I made a sketch and assembled it from strips of 1 mm/.04" that I cut from the same thick paper as I made the mast hoops from:
View attachment 358904
The blue lines are the fold lines. Press lightly with a knife.
I fold the 4 walls towards each other, glue the ends together, fold the bottom to the walls and glue that too.
Sorry the bottom picture is not sharp. Quickly made with the iPhone sometimes see is stubborn ............ looks like his boss ...... ;)
I also will make 1 or 2 for in the fish hold. Then I'll take some pictures of the different steps.

From the starboard side:
View attachment 358905
1: Both dorie hooks.
2: the fish-hooks and the crate in front of the opened hatch.
So there are extra eyes on the railing to flexible handling of the rigging.
Regards, Peter
For a small two mast ship she sure does have a lot of lines coming from somewhere, going somewhere...
That crate, that's a real nice touch, plus it gives the attached lines function. Also folding the crate from a flat pattern is quite ingenious. Thumbsup
 
I told Captain Voogt that I wanted to start on the foredeck with the 3 jib sails.
That was against the sore leg. “You are busy with almost all sails, but the Fisherman's Staysail also belongs between the two masts”.
OK, so let's get started:
View attachment 358937
Cutting, applying lines etc.

This is how it would appear:
View attachment 358938
But a BN with a storm sail and then also a Fisherman's Staysail? That is irresponsible!

Decided in consultation to fold the sail and tide it up with the tack line:
View attachment 358939
In 3 stages.

This is how it is now temporarily on deck:
View attachment 358940
To be stored in the hold.
Regards, Peter
Captain Voogt is right, period.
Storing the fisherman's stay sail on deck? I'd say that's a lot of AL-FI added to the mix, but it looks good, folded and ready for use.
 
Captain Voogt is right, period.
Storing the fisherman's stay sail on deck? I'd say that's a lot of AL-FI added to the mix, but it looks good, folded and ready for use.
Thanks, Johan. Indeed: ready to use.
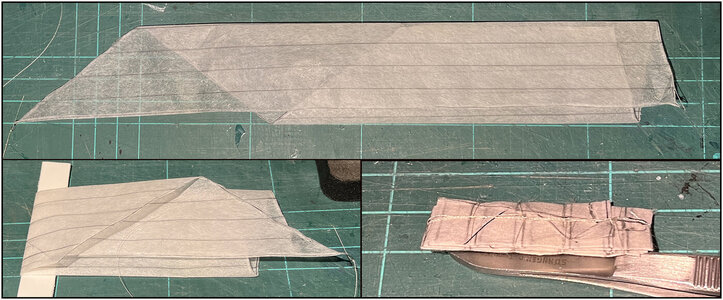
After the 2 folds in the length direction, the 2 ends are folded towards each other where the 4 corners meets each other. Then folded zig-zag /\/\/\/\/\ started at the folded side. This is how the 4 corners came to lie together on top.
A matter of hooking in the 2 tackles in the 2 top corner eyes (peak and throat), holding the 2 lines of the both bottom corners (sheet and tack) and then pulling the sail up. Then it unfolds itself (un-zig-zag ;)) and you have the sail under control till it stands. It takes a while to fold, but setting up is a matter of hooking and hoisting.
PS: This is (also) the way we fold and store the sails of a windmill. :)
Regards, Peter
 
Last edited:
Thanks, Johan. Indeed: ready to use.
After the 2 folds in the length direction, the 2 ends are folded towards each other where the 4 corners meets each other. Then folded zig-zag /\/\/\/\/\ started at the folded side. This is how the 4 corners came to lie together on top.
A matter of hooking in the 2 tackles in the 2 the top corners eyes, holding the 2 lines of the both bottom corners and then pulling the sail up. Then it unfolds itself (un-zig-zag ;)) and you have the sail under control till it stands.
PS: This is (also) the way we fold and store the sails of a windmill. :)
Regards, Peter
The tricks of an old, not so old miller. ;)
But essentially this is what I expect fishermen/seamen would do; fold the sails ready to hook up for "easy" deployment. Now they just removed the sail from the holds and await the captain's orders.
As an added bonus, both the sail and the crate liven up the quarterdeck, in combination with the barrels it looks very believable.
 
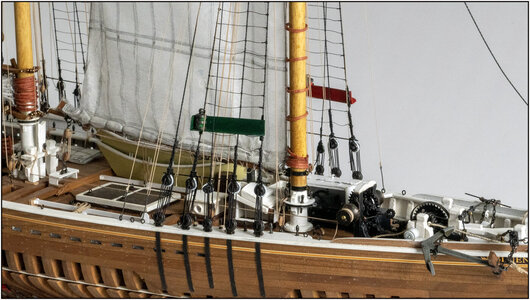
The running lights installed:
1109 Lights.jpg
The lantern boards are made of thin plywood and colored with Ecoline. On either side of the box a brass bracket, with which they are seized to the shrouds.

The Captain likes a little bit of brass fittings, like the clock in his cabin and the compass. The two lanterns were also first applied in brass. But the old photos show something different:
1110 Lights.jpg
So blackened them. Also in terms of shape, with the points protruding above the boards, found this one in the correct scale.

Also with a port side:
1111 Lights.jpg
Can we now also show the others in which direction we are sailing.
Regards, Peter
 
Last edited:
Back
Top