Fascinating, fascinating. What great build log to follow. Your attention to detail is incredible.
-

Win a Free Custom Engraved Brass Coin!!!
As a way to introduce our brass coins to the community, we will raffle off a free coin during the month of August. Follow link ABOVE for instructions for entering.
-

PRE-ORDER SHIPS IN SCALE TODAY!
The beloved Ships in Scale Magazine is back and charting a new course for 2026!
Discover new skills, new techniques, and new inspirations in every issue.
NOTE THAT OUR FIRST ISSUE WILL BE JAN/FEB 2026
- Home
- Forums
- Ships of Scale Group Builds and Projects
- Bluenose PoF Group Build
- Bluenose Group Build Logs
You are using an out of date browser. It may not display this or other websites correctly.
You should upgrade or use an alternative browser.
You should upgrade or use an alternative browser.
YUANQING BLUENOSE - Peter Voogt [COMPLETED BUILD]
- Thread starter Peter Voogt
- Start date
- Watchers 74
I like the smaller - better, and they are not flat.And could make them a little smaller:
I agree the smallest ones will look best. Great job! As I mentioned before, if you have a vice, you can flatten them a little. 
Thanks, Jim. Much appreciated!I like the smaller - better, and they are not flat.
You also thanks, Dean.I agree the smallest ones will look best. Great job! As I mentioned before, if you have a vice, you can flatten them a little.
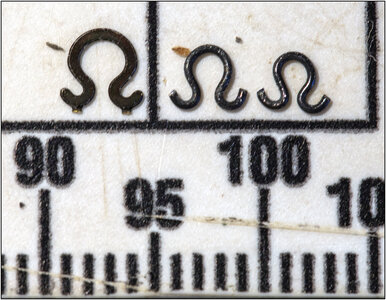
They are now so small, they are hardly to handle. After bending I flattened them between a needle nose pliers to get the wobble out. But to get them there .........
Regards, Peter
Hello Peter -
I am catching up with your BN. This is surely stunning work. The details are so lifelike and real. Its like being there on it !!!!
I am catching up with your BN. This is surely stunning work. The details are so lifelike and real. Its like being there on it !!!!
We have to be creative in our solutions.Thanks, Jim. Much appreciated!
You also thanks, Dean.
They are now so small, they are hardly to handle. After bending I flattened them between a needle nose pliers to get the wobble out. But to get them there .........
Regards, Peter
Tape them to masking tape or painters tape in a row and put a piece on top to sandwich them in the tape. Put tape in vice and clamp!
You may only be able to flatten a few at a time, maybe four to start. But you can experiment with that. Just cut the tape between them at every four or more and put that piece in the vice. That way you can handle them. Hope that works for you.
Last edited:
A fascinating little detail about the Hanks. Just curious, were the Hanks in the original BN 'flat'? I know the photo etched ones you bought were but that's the nature of all photo etched parts.
That’s a good question Daniel, they were forged and may have have been slightly flat on the ends.A fascinating little detail about the Hanks. Just curious, were the Hanks in the original BN 'flat'? I know the photo etched ones you bought were but that's the nature of all photo etched parts.

As shown above, they were mostly round with tapered ends that were closed. A detail that may be very difficult at scale. As that would require tapering the end of a piece so small it’s hard to hold!
But putting them in the vice would be more for ensuring they are flat, not so much to create a flat surface on the diameter. Hope that makes sense. In fact, if they are relatively flat after making them, it may not even be necessary to put them in a vice.
Makes sense, you would want the hank longitudinal cross section to be in the same plane.That’s a good question Daniel, they were forged and may have have been slightly flat on the ends.
View attachment 359620
As shown above, they were mostly round with tapered ends that were closed. A detail that may be very difficult at scale. As that would require tapering the end of a piece so small it’s hard to hold!
But putting them in the vice would be more for ensuring they are flat, not so much to create a flat surface on the diameter. Hope that makes sense. In fact, if they are relatively flat after making them, it may not even be necessary to put them in a vice.
- Joined
- Aug 8, 2019
- Messages
- 5,577
- Points
- 738

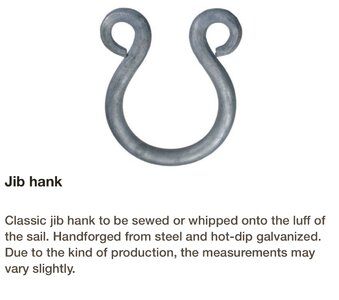
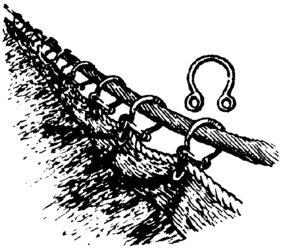
Impressive to make these details. I searched for these classic jib hanks, not much info about them. But I see that the both eyes are close to hold the rope in between.

Maybe this is usefull for you.
Another way to try is just make the U form and then after flatten drill the holes. In that case you could make them even smaller. Just thinking of me.

Maybe this is usefull for you.
Another way to try is just make the U form and then after flatten drill the holes. In that case you could make them even smaller. Just thinking of me.
And finally, you could use a small diameter rope wrapped around the jig to predetermine the length of wired needed. Then cut the wire to length and taper both ends. Then wrap it around the jig pins.
Thanks for your compliments, Donnie. And fine you are passing by again.Hello Peter -
I am catching up with your BN. This is surely stunning work. The details are so lifelike and real. Its like being there on it !!!!
Regards, Peter
Last edited:
Thanks Daniel. And about if they are flat or round ………. For myself I think they are round, but showing first the flat photo etched …….A fascinating little detail about the Hanks. Just curious, were the Hanks in the original BN 'flat'? I know the photo etched ones you bought were but that's the nature of all photo etched parts.
That’s a good question Daniel, they were forged and may have have been slightly flat on the ends.
View attachment 359620
As shown above, they were mostly round with tapered ends that were closed. A detail that may be very difficult at scale. As that would require tapering the end of a piece so small it’s hard to hold!
But putting them in the vice would be more for ensuring they are flat, not so much to create a flat surface on the diameter. Hope that makes sense. In fact, if they are relatively flat after making them, it may not even be necessary to put them in a vice.
Impressive to make these details. I searched for these classic jib hanks, not much info about them. But I see that the both eyes are close to hold the rope in between.
View attachment 359621
Maybe this is usefull for you.
Another way to try is just make the U form and then after flatten drill the holes. In that case you could make them even smaller. Just thinking of me.
And thanks for thinking with me for making the perfectly perfect hank’s. But please consider: this is scale 1:72!And finally, you could use a small diameter rope wrapped around the jig to predetermine the length of wired needed. Then cut the wire to length and taper both ends. Then wrap it around the jig pins.
But on this scale and now +/- 2mm in outside diameter, I doubted if anyone would see that they are more of less flat of round.
About holes at the ends: the tension of the installing rope is pulling between both ends. Just a bend for not falling of the iron: Hanks 2.0
And about flattening the end and then drill both holes …….. in scale 1:72. Yes I have drills of 0.3mm, but ……..
For now I am already happy that I made them so tiny. I will sleep for all this 1 night and will see ……
Regards, Peter
Last edited:
- Joined
- Aug 8, 2019
- Messages
- 5,577
- Points
- 738

I did it in scale 1:75, but it is not easy to do and my fingers are bigger then yoursAnd about flattening the end and then drill both holes …….. in scale 1:72. Yes I have drills of 0.3mm, but ……..
Post in thread 'VOC ship The Prins Willem (scale 1:75) Year 1651' https://shipsofscale.com/sosforums/...-willem-scale-1-75-year-1651.6761/post-206743
Maybe it give you an idea to try something. I used brass.
T.H.A.N.K.S. JohanI.N.S.A.N.E!
I don't think the kit developers of Yuan Qing ever foresaw what a gifted modeler could do to their kit.
Kudos!
Regards, Peter
I agree what you have created at scale already is a worthy part. I guess we are all thinking about if you wanted to make it exactly like the real thing. But that’s like a lot of rigging knots, etc., and sometimes scale limits us. So using what you have made is fine in my opinion. It’s all a matter of what you envision going on the ship, and what’s possible.Thanks Daniel. And about if they are flat or round ………. For myself I think they are round, but showing first the flat photo etched …….
And thanks for thinking with me for making the perfectly perfect hanks. But please consider: this is scale 1:72!
But on this scale and now +/- 2mm in outside diameter, I doubted if anyone would see that they are more of less flat of round.
About holes at the ends: the tension of the installing rope is pulling between both ends. Just a bend for not falling of the iron.
And about flattening the end and then drill both holes …….. in scale 1:72. Yes I have drills of 0.3mm, but ……..
For now I am already happy that I made them so tiny. I will sleep for all this 1 night and will see ……
Regards, Peter
- Joined
- Sep 3, 2021
- Messages
- 5,198
- Points
- 738

A year into this POF-build in 1:72 scale I have to conclude that it's nigh impossible to get everything scaled down accurately. At a certain point it becomes increasingly difficult, moving to impossible, to manufacture, handle and assemble parts.I agree what you have created at scale already is a worthy part. I guess we are all thinking about if you wanted to make it exactly like the real thing. But that’s like a lot of rigging knots, etc., and sometimes scale limits us. So using what you have made is fine in my opinion. It’s all a matter of what you envision going on the ship, and what’s possible.
What's shown in this build log is probably as close as you can get without going full watch maker.


