Looking great...the finish line is close! 
-

Win a Free Custom Engraved Brass Coin!!!
As a way to introduce our brass coins to the community, we will raffle off a free coin during the month of August. Follow link ABOVE for instructions for entering.
-

PRE-ORDER SHIPS IN SCALE TODAY!
The beloved Ships in Scale Magazine is back and charting a new course for 2026!
Discover new skills, new techniques, and new inspirations in every issue.
NOTE THAT OUR FIRST ISSUE WILL BE JAN/FEB 2026
- Home
- Forums
- Ships of Scale Group Builds and Projects
- Bluenose PoF Group Build
- Bluenose Group Build Logs
You are using an out of date browser. It may not display this or other websites correctly.
You should upgrade or use an alternative browser.
You should upgrade or use an alternative browser.
YUANQING BLUENOSE - Peter Voogt [COMPLETED BUILD]
- Thread starter Peter Voogt
- Start date
- Watchers 74
Thank, Lawrence. When there are more detail, I will post them.Hello Peter, Sure wish that I could be there, sounds like a great time, Enjoy.
Regards Lawrence
Regard, Peter
Thanks, Dean. As you well know, there is still a list to work on.Looking great...the finish line is close!
Regards, Peter
Thanks, Heinrich. I am sure there are other builders with beautiful models ......... What I see on the Dutch forum ....... what was present in Duizel ........Just superb, Peter - and about the exp(h)ed(b)ition - I have no doubt as to what model will be the star of the show!
Regards, Peter
Hi Peter,
I had some catching up to do but again amazing what you can do at this scale.
I had some catching up to do but again amazing what you can do at this scale.
Thanks, Maarten. By inspiration from what I saw with other builders, or input from them, plans were adjusted a bit. Takes some time and energy, but gives satisfaction when it turns out as you had in mind.Hi Peter,
I had some catching up to do but again amazing what you can do at this scale.
Regards, Peter
I wish I could see it in person, and shake your hand.Thanks, Stephan. As info for the others:
On September 30th there will be a National Exhibition from the Dutch Scale Shipbuilders (NVM). For models of ships from before 1940.
Regards, Peter
As with your Robert E. Lee build, you continue to impress me with your ingenuity and creative problem solving, often finding solutions that use materials and techniques never done before. And your research and dedication to authenticity at scale is admirable.
In conclusion, I am convinced any ship you build would be worthy of exhibition. You are gifted Peter, and I am fortunate to have befriended you and follow your work, and to even have the opportunity to contribute in a small way. Best wishes always.
Last edited:
Thank you Dean, my respected friend from far over the ocean, for this generous post. Shaking hands and talking face to face about our mutual hobbies would be great. Who knows what lies ahead in the future.......I wish I could see it in person, and shake your hand.
As with your Robert E. Lee build, you continue to impress me with your ingenuity and creative problem solving, often finding solutions that use materials and techniques never done before. And your research and dedication to authenticity at scale is admirable.
In conclusion, I am convinced any ship you build would be worthy of exhibition. You are gifted Peter, and I am fortunate to have befriended you and follow your work, and to even have the opportunity to contribute in a small way. Best wishes always.
Then I would also like to thank you again for what you have meant with your 3D design skills for, among other things, my BN. What you achieve with that is also admirable. With the gems that now adorn my BN.
I also enjoy watching your building skills with your methodical approach. With your last posted images of the NL, I estimate that carving will be a new big challenge for you. I look forward with pleasure to see the result. With your Lion beside you nodding in satisfaction at the results.
Regards, Peter
Some steps have been taken for the overall picture of the BN.
All stays installed towards both topmasts. That had to be done together because this is important for the alignment in the longitudinal direction:
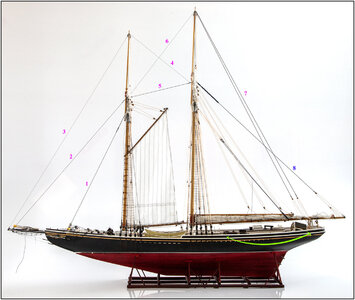
With the thickness of the lines used:
1: Jumbo Jib Stay, 0.45mm/.017".
2: Jib Stay, 0.35mm/.013", which absorbs the forces via the Spring Stay (5) of the Topping Lift (8).
3: Balloon Jib Stay, 0.25mm/.009", connected via the front topmast to the Pulback Stay (4).
4: Pulback Stay, 0.25mm/.009".
5: Spring Stay, 0.45mm/.017".
6: Main Topmast Stay, 0.25mm/.009", which is connected via the main topmast to the double Flying Backstays.
7: Flying Backstays, 0.6mm/.023".
8: Topping lift, 0.6mm/.023".
Both Flying Backstays are placed on the railing just behind the main mast when the ship starts to sail more from the wind and the main boom has to be turned overboard. (See yellow arrow)
They are also equipped with a somewhat thick line because they have to absorb the forces on the top mast under full sail. Especially if the Fisherman's Staysail is also used.
Both Flying Backstays are attached to an iron with a double hook. That iron is attached to an eye at the rear of the deck:
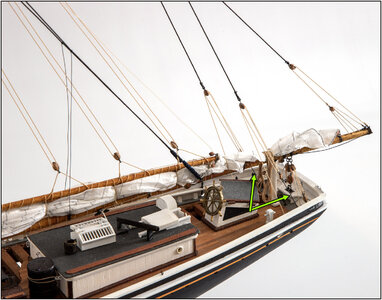
The stays are 0.6mm/.023" wire. A 3.5mm/.15" double and single sheave block with a 0.35mm/.013" wire running through them.
I had already applied the 6 lines for rigging the foremast topsail when making the sail. I was now able to fasten these to their belaying pins relatively quickly. Just a reminder with the previously posted drawing:
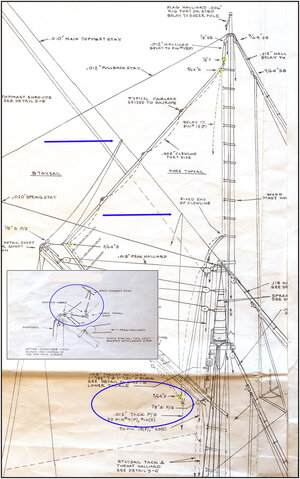
When the topsail is fed on the port side, the starboard sheet and tack pass over the Main Topmast Stay.
To starboard, then the port sheet and tack over the Spring Stay.
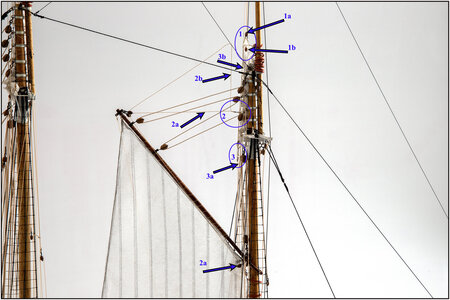
At the top, circle 1:
1a: the halliard passing through a block at the top of the topmast, then through an eye at the rear of the aft short spreader bar and then the center belaying pin at the shrouds to port. The topsail is also stowed on the port side.
1b: the clewline that runs directly down the halliard and is secured to the same pin.
On the side, circle 2:
2a: the port sheet passing through the port block at the far end of the gaff and then along the gaff to the block under the claw and then to 5th belay pin at the port shrouds.
2b: if the topsail has to be fed on the starboard side, the topsail is pulled over the Main Topmast Stay with the starboard sheet. It now runs first over the stay and then to the starboard block on the end of the gaff, then to the block under the claw and to the pin at the starboard shrouds.
At the bottom of circle 3:
3a: the port neck runs from the sail directly on the port side along the mast to a belaying pin at the mast foot.
3b: As with the starboard sheet, the starboard neck runs from the sail first over the Main Topmast Stay and then on the starboard side along the mast to the mast foot.
The stays between the two topmasts:
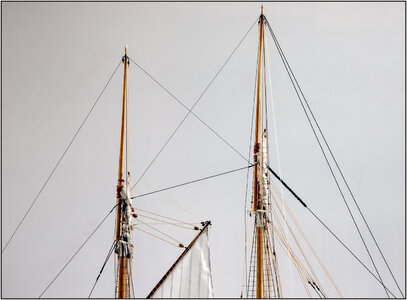
It getting quite busy at the foremast:
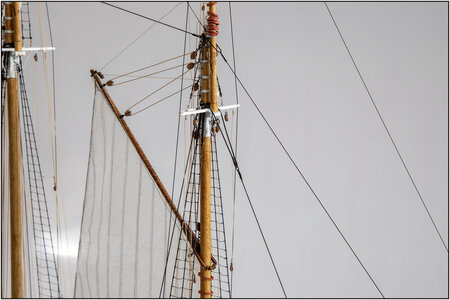
Also made the side stays for the front top mast. These are implemented as a 'stringer':
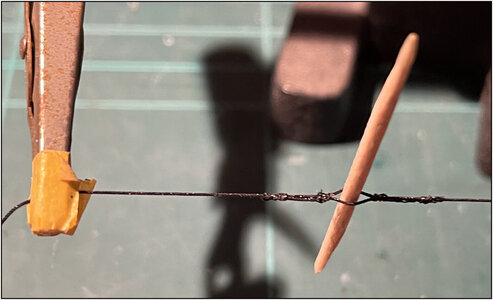
Both ends together and secured with slings.
And secured on the outside between the middle shrouds:
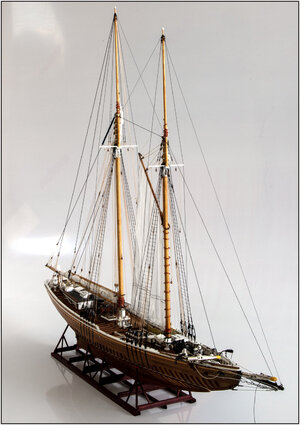
Which immediately gives a nice picture of the lines of the BN.
Still some ropes to do on the fore mast .........
Regards, Peter
All stays installed towards both topmasts. That had to be done together because this is important for the alignment in the longitudinal direction:

With the thickness of the lines used:
1: Jumbo Jib Stay, 0.45mm/.017".
2: Jib Stay, 0.35mm/.013", which absorbs the forces via the Spring Stay (5) of the Topping Lift (8).
3: Balloon Jib Stay, 0.25mm/.009", connected via the front topmast to the Pulback Stay (4).
4: Pulback Stay, 0.25mm/.009".
5: Spring Stay, 0.45mm/.017".
6: Main Topmast Stay, 0.25mm/.009", which is connected via the main topmast to the double Flying Backstays.
7: Flying Backstays, 0.6mm/.023".
8: Topping lift, 0.6mm/.023".
Both Flying Backstays are placed on the railing just behind the main mast when the ship starts to sail more from the wind and the main boom has to be turned overboard. (See yellow arrow)
They are also equipped with a somewhat thick line because they have to absorb the forces on the top mast under full sail. Especially if the Fisherman's Staysail is also used.
Both Flying Backstays are attached to an iron with a double hook. That iron is attached to an eye at the rear of the deck:

The stays are 0.6mm/.023" wire. A 3.5mm/.15" double and single sheave block with a 0.35mm/.013" wire running through them.
I had already applied the 6 lines for rigging the foremast topsail when making the sail. I was now able to fasten these to their belaying pins relatively quickly. Just a reminder with the previously posted drawing:

When the topsail is fed on the port side, the starboard sheet and tack pass over the Main Topmast Stay.
To starboard, then the port sheet and tack over the Spring Stay.

At the top, circle 1:
1a: the halliard passing through a block at the top of the topmast, then through an eye at the rear of the aft short spreader bar and then the center belaying pin at the shrouds to port. The topsail is also stowed on the port side.
1b: the clewline that runs directly down the halliard and is secured to the same pin.
On the side, circle 2:
2a: the port sheet passing through the port block at the far end of the gaff and then along the gaff to the block under the claw and then to 5th belay pin at the port shrouds.
2b: if the topsail has to be fed on the starboard side, the topsail is pulled over the Main Topmast Stay with the starboard sheet. It now runs first over the stay and then to the starboard block on the end of the gaff, then to the block under the claw and to the pin at the starboard shrouds.
At the bottom of circle 3:
3a: the port neck runs from the sail directly on the port side along the mast to a belaying pin at the mast foot.
3b: As with the starboard sheet, the starboard neck runs from the sail first over the Main Topmast Stay and then on the starboard side along the mast to the mast foot.
The stays between the two topmasts:

It getting quite busy at the foremast:

Also made the side stays for the front top mast. These are implemented as a 'stringer':

Both ends together and secured with slings.
And secured on the outside between the middle shrouds:

Which immediately gives a nice picture of the lines of the BN.
Still some ropes to do on the fore mast .........
Regards, Peter
Last edited:
Outstanding Peter! This one goes to my bookmarks.Some steps have been taken for the overall picture of the BN.
All stays installed towards both topmasts. That had to be done together because this is important for the alignment in the longitudinal direction:
View attachment 358315
With the thickness of the lines used:
1: Jumbo Jib Stay, 0.45mm/.017".
2: Jib Stay, 0.35mm/.013", which absorbs the forces via the Spring Stay (5) of the Topping Lift (8).
3: Balloon Jib Stay, 0.25mm/.009", connected via the front topmast to the Pulback Stay (4).
4: Pulback Stay, 0.25mm/.009".
5: SpringStay, 0.45mm/.017".
6: Main Topmast Stay, 0.25mm/.009", which is connected via the main topmast to the double Flying Backstays.
7: Flying Backstays, 0.6mm/.023".
8: Topping lift, 0.6mm/.023".
Both Flying Backstays are placed on the railing just behind the main mast when the ship starts to sail more from the wind and the main boom has to be turned overboard. (See yellow arrow)
Both Flying Backstays are attached to an iron with a double hook. That iron is attached to an eye at the rear of the deck:
View attachment 358316
The stays are 0.6mm/.023" wire. A 3.5mm/.15" double and single sheave block with a 0.35mm/.013" wire running through them.
I had already applied the 6 lines for rigging the foremast topsail when making the sail. I was now able to fasten these to their belaying pins relatively quickly. Just a reminder with the previously posted drawing:
View attachment 358322
When the topsail is fed on the port side, the starboard sheet and tack pass over the Main Topmast Stay.
To starboard, then the port sheet and tack over the Spring Stay.
View attachment 358317
At the top, circle 1:
1a: the halliard passing through a block at the top of the topmast, then through an eye at the rear of the aft short spreader bar and then the center belaying pin at the shrouds to port. The topsail is also stowed on the port side.
1b: the clewline that runs directly down the halliard and is secured to the same pin.
On the side, circle 2:
2a: the port sheet passing through the port block at the far end of the gaff and then along the gaff to the block under the claw and then to 5th belay pin at the port shrouds.
2b: if the topsail has to be fed on the starboard side, the topsail is pulled over the Main Topmast Stay with the starboard sheet. It now runs first over the stay and then to the starboard block on the end of the gaff, then to the block under the claw and to the pin at the starboard shrouds.
At the bottom of circle 3:
3a: the port neck runs from the sail directly on the port side along the mast to a belaying pin at the mast foot.
3b: As with the starboard sheet, the starboard neck runs from the sail first over the Main Topmast Stay and then on the starboard side along the mast to the mast foot.
The stays between the two topmasts:
View attachment 358318
It getting quite busy at the foremast:
View attachment 358320
Also made the side stays for the front top mast. These are implemented as a 'stringer':
View attachment 358319
Both ends together and secured with slings.
And secured on the outside between the middle shrouds:
View attachment 358321
Which immediately gives a nice picture of the lines of the BN.
Still some ropes to doen the fore mast .........
Regards, Peter
Thanks, Daniel. I had to figure out quite a bit before I understand exactly how all the lines should run. And mainly what their function was. Then you also understand why they run like that. Then it is a small effort to clarify that with some pictures. Otherwise, for the viewer it will just be a big mess of lines with ....... nice, it must be .......Outstanding Peter! This one goes to my bookmarks.
Regards, Peter
Wow lots to learn watching as the rigging gets more and more complicated.
Thanks, Jan. Complicated for sure. By every new line looking carefully not to cross another. And not hang behind a line with one of the tweezers .......Wow lots to learn watching as the rigging gets more and more complicated.
Regards, Peter
- Joined
- Jan 9, 2020
- Messages
- 10,566
- Points
- 938

It's at times like these, when even I am at a loss for words. What a great tutorial this whole build is - I was just thinking how much help your build log would be to anyone building the YQ Bluenose and looking for guidance. And the best is that it is not limited to one segment of the build but, literally includes every single little detail. With instructions like these, it is only the imagination of the aspirant builder which would limit him - such is the scope of your build! Momentous!
What a very nice word, Heinrich.It's at times like these, when even I am at a loss for words. What a great tutorial this whole build is - I was just thinking how much help your build log would be to anyone building the YQ Bluenose and looking for guidance. And the best is that it is not limited to one segment of the build but, literally includes every single little detail. With instructions like these, it is only the imagination of the aspirant builder which would limit him - such is the scope of your build! Momentous!
Regards, Peter
- Joined
- Sep 3, 2021
- Messages
- 5,198
- Points
- 738

Having had the opportunity to see her in real life makes me realize pictures just don't do her justice, but still, these pictures clearly show this is an exceptional build. They also drive home the point that it is critical to research and plan ahead, when one steps away from the kit-supplied drawings and build instructions.Some steps have been taken for the overall picture of the BN.
All stays installed towards both topmasts. That had to be done together because this is important for the alignment in the longitudinal direction:
View attachment 358315
With the thickness of the lines used:
1: Jumbo Jib Stay, 0.45mm/.017".
2: Jib Stay, 0.35mm/.013", which absorbs the forces via the Spring Stay (5) of the Topping Lift (8).
3: Balloon Jib Stay, 0.25mm/.009", connected via the front topmast to the Pulback Stay (4).
4: Pulback Stay, 0.25mm/.009".
5: Spring Stay, 0.45mm/.017".
6: Main Topmast Stay, 0.25mm/.009", which is connected via the main topmast to the double Flying Backstays.
7: Flying Backstays, 0.6mm/.023".
8: Topping lift, 0.6mm/.023".
Both Flying Backstays are placed on the railing just behind the main mast when the ship starts to sail more from the wind and the main boom has to be turned overboard. (See yellow arrow)
They are also equipped with a somewhat thick line because they have to absorb the forces on the top mast under full sail. Especially if the Fisherman's Staysail is also used.
Both Flying Backstays are attached to an iron with a double hook. That iron is attached to an eye at the rear of the deck:
View attachment 358316
The stays are 0.6mm/.023" wire. A 3.5mm/.15" double and single sheave block with a 0.35mm/.013" wire running through them.
I had already applied the 6 lines for rigging the foremast topsail when making the sail. I was now able to fasten these to their belaying pins relatively quickly. Just a reminder with the previously posted drawing:
View attachment 358322
When the topsail is fed on the port side, the starboard sheet and tack pass over the Main Topmast Stay.
To starboard, then the port sheet and tack over the Spring Stay.
View attachment 358317
At the top, circle 1:
1a: the halliard passing through a block at the top of the topmast, then through an eye at the rear of the aft short spreader bar and then the center belaying pin at the shrouds to port. The topsail is also stowed on the port side.
1b: the clewline that runs directly down the halliard and is secured to the same pin.
On the side, circle 2:
2a: the port sheet passing through the port block at the far end of the gaff and then along the gaff to the block under the claw and then to 5th belay pin at the port shrouds.
2b: if the topsail has to be fed on the starboard side, the topsail is pulled over the Main Topmast Stay with the starboard sheet. It now runs first over the stay and then to the starboard block on the end of the gaff, then to the block under the claw and to the pin at the starboard shrouds.
At the bottom of circle 3:
3a: the port neck runs from the sail directly on the port side along the mast to a belaying pin at the mast foot.
3b: As with the starboard sheet, the starboard neck runs from the sail first over the Main Topmast Stay and then on the starboard side along the mast to the mast foot.
The stays between the two topmasts:
View attachment 358318
It getting quite busy at the foremast:
View attachment 358320
Also made the side stays for the front top mast. These are implemented as a 'stringer':
View attachment 358319
Both ends together and secured with slings.
And secured on the outside between the middle shrouds:
View attachment 358321
Which immediately gives a nice picture of the lines of the BN.
Still some ropes to do on the fore mast .........
Regards, Peter
Meticulously planned and expertly executed.

I agree 100% Johan! This is a YQ on steroids!Having had the opportunity to see her in real life makes me realize pictures just don't do her justice, but still, these pictures clearly show this is an exceptional build. They also drive home the point that it is critical to research and plan ahead, when one steps away from the kit-supplied drawings and build instructions.
Meticulously planned and expertly executed.
One would be hard pressed to follow this even with step by step instructions!
True story!I agree 100% Johan! This is a YQ on steroids!
One would be hard pressed to follow this even with step by step instructions!
Having had the opportunity to see her in real life makes me realize pictures just don't do her justice, but still, these pictures clearly show this is an exceptional build. They also drive home the point that it is critical to research and plan ahead, when one steps away from the kit-supplied drawings and build instructions.
Meticulously planned and expertly executed.
I agree 100% Johan! This is a YQ on steroids!
One would be hard pressed to follow this even with step by step instructions!
You're a nice bunch of conniving friends who know ‘how to screw up things’.True story!
 In the most positive sense of this words.
 Like Brother in Arms:
Regard, Peter


