-

Win a Free Custom Engraved Brass Coin!!!
As a way to introduce our brass coins to the community, we will raffle off a free coin during the month of August. Follow link ABOVE for instructions for entering.
-

PRE-ORDER SHIPS IN SCALE TODAY!
The beloved Ships in Scale Magazine is back and charting a new course for 2026!
Discover new skills, new techniques, and new inspirations in every issue.
NOTE THAT OUR FIRST ISSUE WILL BE JAN/FEB 2026
- Home
- Forums
- Ships of Scale Group Builds and Projects
- Bluenose PoF Group Build
- Bluenose Group Build Logs
You are using an out of date browser. It may not display this or other websites correctly.
You should upgrade or use an alternative browser.
You should upgrade or use an alternative browser.
YUANQING BLUENOSE - Peter Voogt [COMPLETED BUILD]
- Thread starter Peter Voogt
- Start date
- Watchers 74
Fabulous, your precise building at that scale is very impressive.
Jan
Jan
Inventief
Thanxs Steef and Jan.Fabulous, your precise building at that scale is very impressive.
Jan
I do like to think and work 'out of the box' from the kit. And if you have the time to let things sink in, the solution often comes along.
Regards, Peter
Last edited:
- Joined
- Jan 9, 2020
- Messages
- 10,566
- Points
- 938

I think Stephan hit the nail on the head with "inventive" - very inventive in fact and proof of the fact that you think long and hard about this build.  However, I will remain "benieuwd" until the process is finished and I can see how the overall effect pans out ... (don't shoot me now!)
 However, I will remain "benieuwd" until the process is finished and I can see how the overall effect pans out ... (don't shoot me now!)
Haha Heinrich, I’ll never shoot the messenger! There will definitely be surprises.I think Stephan hit the nail on the head with "inventive" - very inventive in fact and proof of the fact that you think long and hard about this build.However, I will remain "benieuwd" until the process is finished and I can see how the overall effect pans out ... (don't shoot me now!)
Regards, Peter
- Joined
- Jan 9, 2020
- Messages
- 10,566
- Points
- 938

Stephan, you must remember - good fathers are always worried what their children, and particularly their boys, get up to.(benieuwd) curiosity killed the cat @Heinrich

Hello, Mon Amie! Your build log is one of those I like a lot! Not just because of the great craftsmanship and accuracy while you build, the explanations: why, where, and what makes it informative, educational, and very interesting to read.
I like the rounded bolt's heads. Do you still use the 'burr' method to make these? Are all the bolts are made from steel? Do you treat them with a chemical of a sort, so they didn't rust over time? Pregaps it might be stainless steel or?
I like the rounded bolt's heads. Do you still use the 'burr' method to make these? Are all the bolts are made from steel? Do you treat them with a chemical of a sort, so they didn't rust over time? Pregaps it might be stainless steel or?
Thanxs, Jim, for the compliments!.Hello, Mon Amie! Your build log is one of those I like a lot! Not just because of the great craftsmanship and accuracy while you build, the explanations: why, where, and what makes it informative, educational, and very interesting to read.
I like the rounded bolt's heads. Do you still use the 'burr' method to make these? Are all the bolts are made from steel? Do you treat them with a chemical of a sort, so they didn't rust over time? Pregaps it might be stainless steel or?
Yes, I have 'burred' them all, still with that 1e cup-burr. Amazing how strong such tiny little thing is.
The nails are a kind of steel. Here the cut parts:
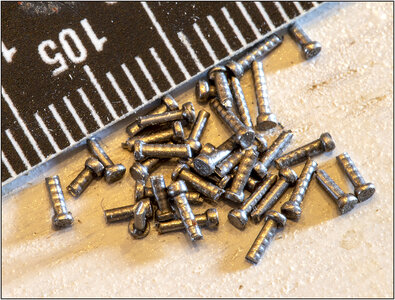
I have not treated them. They are still for +35 years in my stash and no signs of rust. On the model they will get a protection layer.
On this moment I am doing some test with linseed oil and Lord Nelson varnish in mat and semi-mat on some frame-parts sheets.
The semi-mat is to glossy.
Here the test of the linseed oil (left) and the Lord Nelson mat (right), applied in various ways such as a brush or a cotton swab:
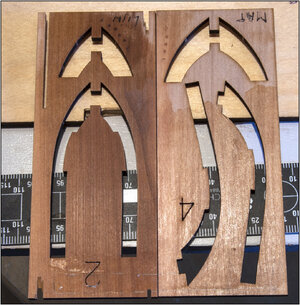
With the light on it, depending of the angle, the left mat-varnish also gives a shiny reflection. I don't like that at all.
On top you can also see what it does to the treenails made with the needle.
And what you wrote before: The linseed oil penetrates in the grooves and emphasizes the color imitating perfect cailking.
So, I think it will be the old fashion linseed oil.
Shine on you Crazy Diamond ......but not to shiny
Regards, Peter
I have to agree…but…I don’t know that I would have left the nail heads on? Maybe just pieces of nails instead. Otherwise it looks like a piece of a giant nail, that kind of ruins the scale? That and the fact that they have grooves in them, which is common for nails to prevent backing out (ie ring shank). So to look like pig iron, I would have probably used something more generic and unidentifiable.I think Stephan hit the nail on the head with "inventive" - very inventive in fact and proof of the fact that you think long and hard about this build.However, I will remain "benieuwd" until the process is finished and I can see how the overall effect pans out ... (don't shoot me now!)
I have to agree…but…I don’t know that I would have left the nail heads on? Maybe just pieces of nails instead. Otherwise it looks like a piece of a giant nail, that kind of ruins the scale? That and the fact that they have grooves in them, which is common for nails to prevent backing out (ie ring shank). So to look like pig iron, I would have probably used something more generic and unidentifiable.
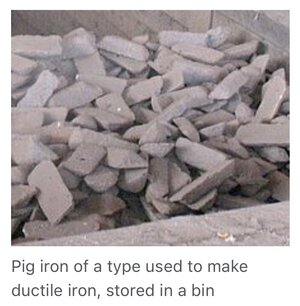
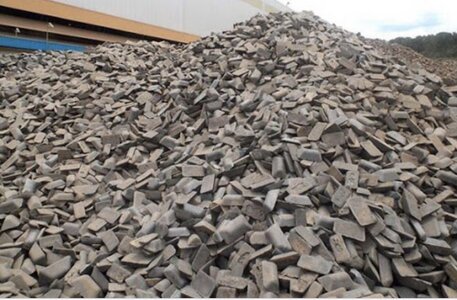
Thanxs for the reaction. I know about the pig iron. I could also:Here are images of pig iron for reference…
View attachment 248475View attachment 248476
As you can see, it is made in bars that look more like rock or bricks. I think a very small crushed rock or coral, used in aquariums, may be a better representative of pig iron in 1/72 scale.
-do nothing;
-make no macro-pictures;
-look at the model from normal view distance.
Now I used the things I have to look like waste pieces of cast iron.
Regards, Peter
Last edited:
- Joined
- Aug 8, 2019
- Messages
- 5,584
- Points
- 738

Action heeft decoratie steentjesBut of course I welcome this discussion, about something that no one has yet applied in this group build.
@Dean62 Dean: Aquarium stones is a good option. I will visit a aqua-store to look.
Or a train modelshop for rocks for the bed of a railway line.
Regards, Peter
Thanks for the tip, Steef.Action heeft decoratie steentjes
Near home: found. Get on with it.
Regards, Peter
You have gone to so much trouble thus far to make everything accurate, I hate to see you compromise on ballast material. So I am just trying to be helpful of course. And you are correct, you are the first to add these details and I’m sure your model will be a premier example for others to follow! So lead them well!But of course I welcome this discussion, about something that no one has yet applied in this group build.
@Dean62 Dean: Aquarium stones is a good option. I will visit a aqua-store to look.
Or a train modelshop for rocks for the bed of a railway line.
Regards, Peter
Dean, thank you very much to set me sharp and on course. And thanks to @Steef66 Steef, in a big shop nearby (Action) for €0.79 I bought this:You have gone to so much trouble thus far to make everything accurate, I hate to see you compromise on ballast material. So I am just trying to be helpful of course. And you are correct, you are the first to add these details and I’m sure your model will be a premier example for others to follow! So lead them well!
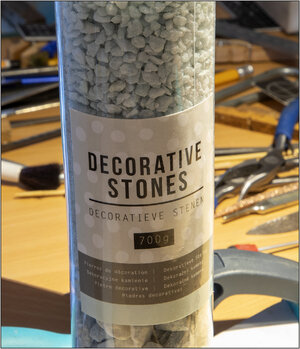
With inside 3 different sizes of little stones.
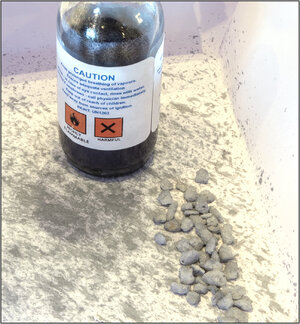
Not the right color, but a hand full tumbled in a tube with some Steel-paint and let them dry:
Then tumbled with some of the glue and inserted:
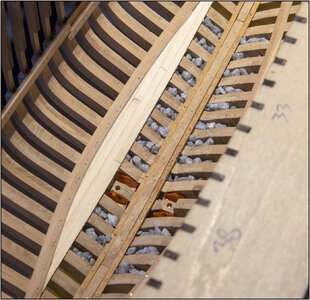
Tomorrow after drying some better pictures. I am glad I have made this change.
THANXS GUYS!
Regards, Peter
Last edited:
Now that looks like the real deal.
Jan
Jan

