-

Win a Free Custom Engraved Brass Coin!!!
As a way to introduce our brass coins to the community, we will raffle off a free coin during the month of August. Follow link ABOVE for instructions for entering.
-

PRE-ORDER SHIPS IN SCALE TODAY!
The beloved Ships in Scale Magazine is back and charting a new course for 2026!
Discover new skills, new techniques, and new inspirations in every issue.
NOTE THAT OUR FIRST ISSUE WILL BE JAN/FEB 2026
- Home
- Forums
- Ships of Scale Group Builds and Projects
- Bluenose PoF Group Build
- Bluenose Group Build Logs
You are using an out of date browser. It may not display this or other websites correctly.
You should upgrade or use an alternative browser.
You should upgrade or use an alternative browser.
YUANQING BLUENOSE - Peter Voogt [COMPLETED BUILD]
- Thread starter Peter Voogt
- Start date
- Watchers 74
Thanxs Jan, I'm glad it turned in the right direction.Now that looks like the real deal.
Jan
Regards, Peter
Congratulations on this great success.And to top it all - South Africa has just beaten the British and Irish Lions 2-1 in the Test Series! Now I can go to sleep a happy man!
Much better! And you don’t have to save nail heads anymore…Dean, thank you very much to set me sharp and on course. And thanks to @Steef66 Steef, in a big shop nearby (Action) for €0.79 I bought this:
View attachment 248648
With inside 3 different sizes of little stones.
Not the right color, but a hand full tumbled in a tube with some Steel-paint and let them dry:
View attachment 248649
Then tumbled with some of the glue and inserted:
View attachment 248650
Tomorrow after drying some better pictures. I am glad I have made this change.
THANXS GUYS!
Regards, Peter
You know I’m always looking to help!
- Joined
- Oct 28, 2018
- Messages
- 760
- Points
- 403

The stones look good and fit better
Good choice
Good choice

Much better! And you don’t have to save nail heads anymore…
You know I’m always looking to help!
Thanks, Dean and Henk.The stones look good and fit better
Good choice
Regards, Peter
OOH, I like that. Looks na
OOH, I like that. Looks just right.Dean, thank you very much to set me sharp and on course. And thanks to @Steef66 Steef, in a big shop nearby (Action) for €0.79 I bought this:
View attachment 248648
With inside 3 different sizes of little stones.
Not the right color, but a hand full tumbled in a tube with some Steel-paint and let them dry:
View attachment 248649
Then tumbled with some of the glue and inserted:
View attachment 248650
Tomorrow after drying some better pictures. I am glad I have made this change.
THANXS GUYS!
Regards, Peter
And this is how it looks from the starboard site, witch will be visible on the display:
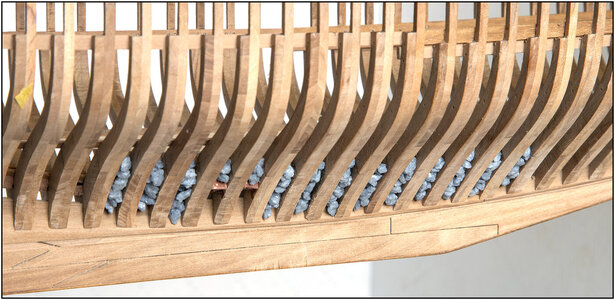
Some stones just didn't have enough glue. A few more will be added piece by piece.
Before I can place the lower deck beams of the middle floor, I started with the linseed oil:
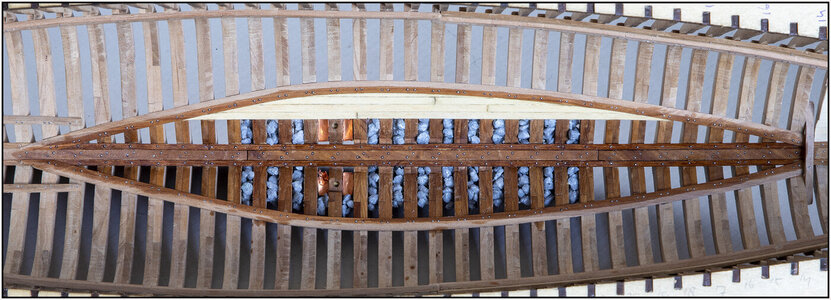
I have to pay attention to where parts still need to be glued. Because otherwise it will not adhere to the oiled parts.
Started with the first deck beams. Glue, let the first glue dry and then the nails so that they take some glue into the underlying wood:
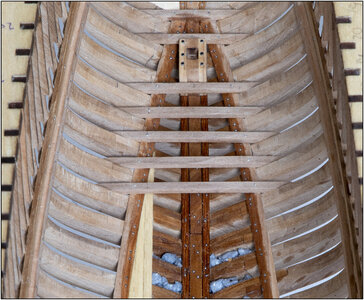
Once this layer of beams has been applied, I can continue with the linseed oil. With it is now constantly reasoning what the next small step is. Because there are still some parts to glue on the inside of the frames.
But I'm still working on these bars. After a while I can see how the oil has been absorbed. I think the treated wood will be a little lighter.
Now with the first beams has been applied, I think I can still get through with my brush with oil. I can try that in the front and the aft.
Regards, Peter

Some stones just didn't have enough glue. A few more will be added piece by piece.
Before I can place the lower deck beams of the middle floor, I started with the linseed oil:

I have to pay attention to where parts still need to be glued. Because otherwise it will not adhere to the oiled parts.
Started with the first deck beams. Glue, let the first glue dry and then the nails so that they take some glue into the underlying wood:

Once this layer of beams has been applied, I can continue with the linseed oil. With it is now constantly reasoning what the next small step is. Because there are still some parts to glue on the inside of the frames.
But I'm still working on these bars. After a while I can see how the oil has been absorbed. I think the treated wood will be a little lighter.
Now with the first beams has been applied, I think I can still get through with my brush with oil. I can try that in the front and the aft.
Regards, Peter
Last edited:
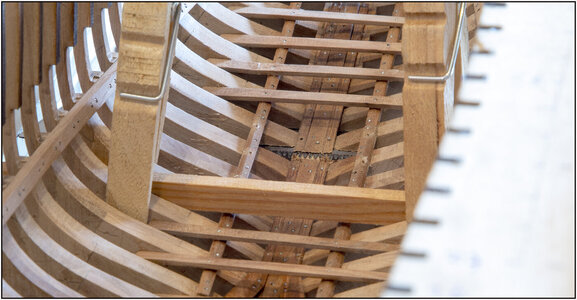
All the lower deck / cross beams have been installed and additionally secured with the nails:
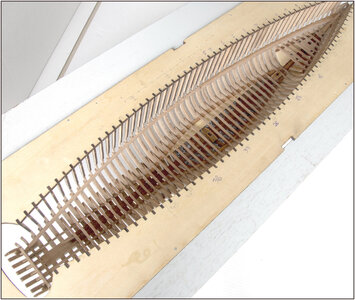
What is under those beams is covered with linseed oil. Now that it has dried and has penetrated the wood, it gives the wood a nice matte shade. The rest of the parts get the oil in several steps.
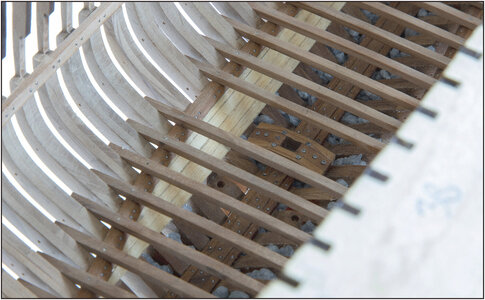
You still have a view of the ceiling and ballast through the beams:
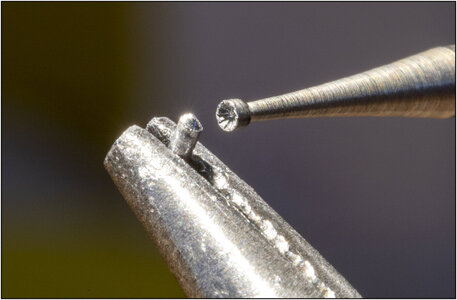
The nails give a clear accent. That's because the rounded top always reflects light, no matter which side the light comes from.
Nice to see here:
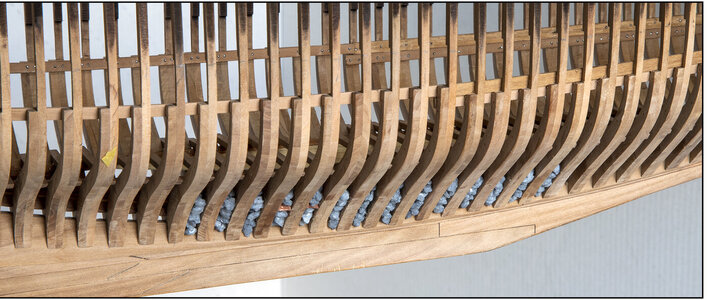
And another picture of the starboard side with supplemented ballast and a view through the frames:
Regards, Peter

What is under those beams is covered with linseed oil. Now that it has dried and has penetrated the wood, it gives the wood a nice matte shade. The rest of the parts get the oil in several steps.

You still have a view of the ceiling and ballast through the beams:
The nails give a clear accent. That's because the rounded top always reflects light, no matter which side the light comes from.
Nice to see here:

And another picture of the starboard side with supplemented ballast and a view through the frames:

Regards, Peter
Last edited:
Thanxs Heinrich.In one word. superb!
Because of the preliminary work I was now able to continue working well.
Gr. Peter
A few members of the SoS knew about my plans. Inspired by the cut of @Maarten Maarten.
A BN as an “open waterline shipyard model”.
This means that the hull is cut at the waterline.
Here's what I mean:
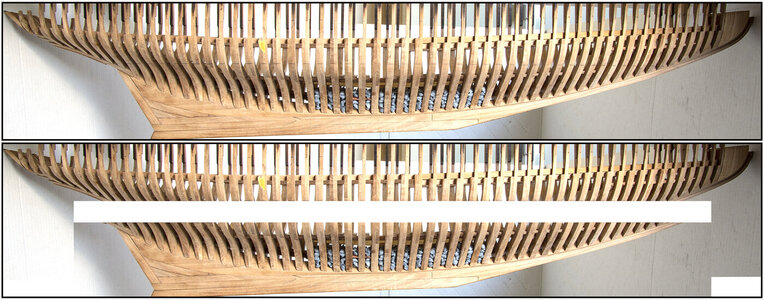
With the advantage that you will also keep a view of all the work I now do on the inside of the hull. And the layout of the cabins and fish holds that I still want to make.
I have already marked out the waterline on the hull. A matter of securing the hull in the stand and marking it all around.
I was planning to only post about this when everything was over. But I would like you to enjoy the excitement and tension that this brings.
So here are some pictures from the beginning and how I approached it.
Until recently I didn't know when I would do this. When the whole hull was ready, for nth solidity?
Decided to do it now. Because now I can still reach the inside to make adjustments if necessary.
First I made a mold in which I could align the model exactly on the waterline:
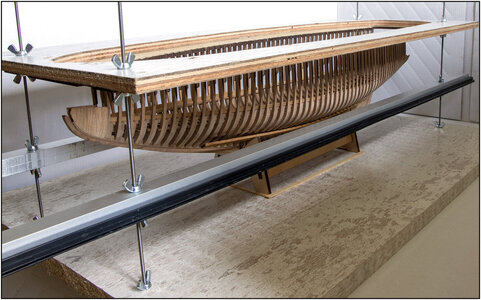
I had already attached the YQ jig to the top plate, to get a firmer surface.
I have now secured it with threaded ends on a sturdy bottom plate.
In between I attached 2 aluminum profiles. The advantage of these profiles is that they are straight and sturdy.
All with washers and wing nuts so I could level the hull to the waterline. Both in length and width.
Then I could screw up both profiles so that they came to the waterline at cutting thickness:
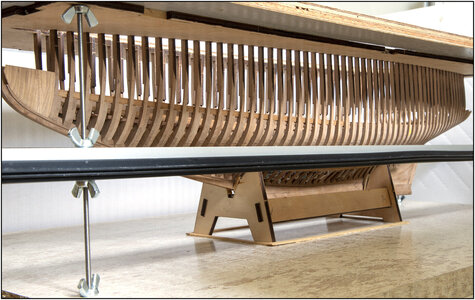
At the front the waterline starts just below the lowest point of the 5th frame.
And at the rear it also starts just below the 5th frame from the back:
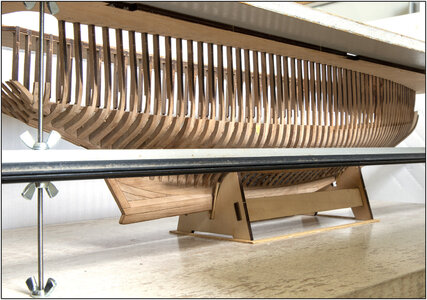
All can be found on the drawings of YQ.
There are some lines on the hull above and below the waterline. I intended to fix the frames on the inside and/or outside with battens. But due to the different chamfering of the frames, it was almost impossible to get that batten neatly on the waterline and cutting the batten would result in different thicknesses. And I would have to expand the waterline again on the battens. A lot of work that did not ensure success. Decided to go straight to sawing.
When everything was checked for the 3rd time, the saw was set up:
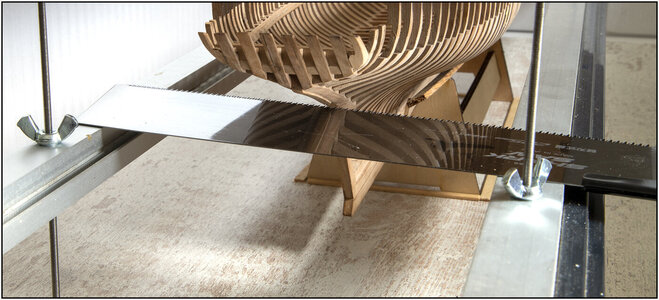
I had bought the Japanese Kataba saw for this a while ago. With enough space to be able to make supported pulls. Because the teeth of a Japanese saw are "on pull".
Also double check the alignment of the saw:
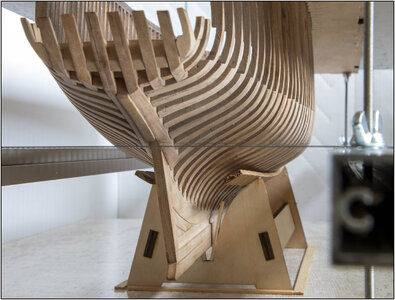
And no turning back:
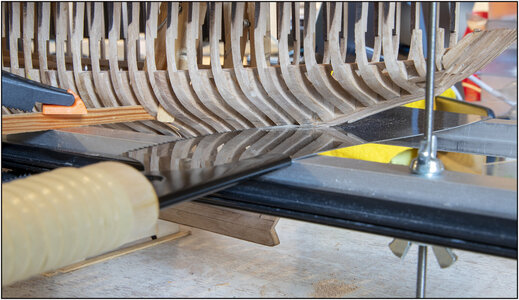
For the photo, I let the saw hang loosely. You can see the flexibility of the blade. When sawing, I let the blade be guided by the two profiles.
Through the first 3 frames:
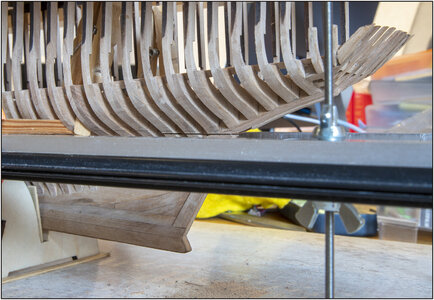
Phoe phoe ..... exciting ……..
I'm still sawing through the frames and the keel. As soon as the saw is also visible on the inside, I'll come up with an update.
Regards, Peter
A BN as an “open waterline shipyard model”.
This means that the hull is cut at the waterline.
Here's what I mean:

With the advantage that you will also keep a view of all the work I now do on the inside of the hull.
I have already marked out the waterline on the hull. A matter of securing the hull in the stand and marking it all around.
I was planning to only post about this when everything was over.
So here are some pictures from the beginning and how I approached it.
Until recently I didn't know when I would do this. When the whole hull was ready, for nth solidity?
Decided to do it now. Because now I can still reach the inside to make adjustments if necessary.
First I made a mold in which I could align the model exactly on the waterline:

I had already attached the YQ jig to the top plate, to get a firmer surface.
I have now secured it with threaded ends on a sturdy bottom plate.
In between I attached 2 aluminum profiles. The advantage of these profiles is that they are straight and sturdy.
All with washers and wing nuts so I could level the hull to the waterline. Both in length and width.
Then I could screw up both profiles so that they came to the waterline at cutting thickness:

At the front the waterline starts just below the lowest point of the 5th frame.
And at the rear it also starts just below the 5th frame from the back:

All can be found on the drawings of YQ.
There are some lines on the hull above and below the waterline. I intended to fix the frames on the inside and/or outside with battens. But due to the different chamfering of the frames, it was almost impossible to get that batten neatly on the waterline and cutting the batten would result in different thicknesses. And I would have to expand the waterline again on the battens. A lot of work that did not ensure success. Decided to go straight to sawing.
When everything was checked for the 3rd time, the saw was set up:

I had bought the Japanese Kataba saw for this a while ago. With enough space to be able to make supported pulls. Because the teeth of a Japanese saw are "on pull".
Also double check the alignment of the saw:

And no turning back:

For the photo, I let the saw hang loosely. You can see the flexibility of the blade. When sawing, I let the blade be guided by the two profiles.
Through the first 3 frames:

Phoe phoe ..... exciting ……..
I'm still sawing through the frames and the keel. As soon as the saw is also visible on the inside, I'll come up with an update.
Regards, Peter
Last edited:
Wow! I real nail bitter for sure...I wish you success my friend!A few members of the SoS knew about my plans. Inspired by the cut of @Maarten Maarten.
A BN as an “open waterline shipyard model”.
This means that the hull is cut at the waterline.
Here's what I mean:
View attachment 249795
With the advantage that you will also keep a view of all the work I now do on the inside of the hull.And the layout of the cabins and fish holds that I still want to make.
I have already marked out the waterline on the hull. A matter of securing the hull in the stand and marking it all around.
I was planning to only post about this when everything was over.But I would like you to enjoy the excitement and tension that this brings.
So here are some pictures from the beginning and how I approached it.
Until recently I didn't know when I would do this. When the whole hull was ready, for nth solidity?
Decided to do it now. Because now I can still reach the inside to make adjustments if necessary.
First I made a mold in which I could align the model exactly on the waterline:
View attachment 249796
I had already attached the YQ jig to the top plate, to get a firmer surface.
I have now secured it with threaded ends on a sturdy bottom plate.
In between I attached 2 aluminum profiles. The advantage of these profiles is that they are straight and sturdy.
All with washers and wing nuts so I could level the hull to the waterline. Both in length and width.
Then I could screw up both profiles so that they came to the waterline at cutting thickness:
View attachment 249797
At the front the waterline starts just below the lowest point of the 5th frame.
And at the rear it also starts just below the 5th frame from the back:
View attachment 249798
All can be found on the drawings of YQ.
There are some lines on the hull above and below the waterline. I intended to fix the frames on the inside and/or outside with battens. But due to the different chamfering of the frames, it was almost impossible to get that batten neatly on the waterline and cutting the batten would result in different thicknesses. And I would have to expand the waterline again on the battens. A lot of work that did not ensure success. Decided to go straight to sawing.
When everything was checked for the 3rd time, the saw was set up:
View attachment 249799
I had bought the Japanese Kataba saw for this a while ago. With enough space to be able to make supported pulls. Because the teeth of a Japanese saw are "on pull".
Also double check the alignment of the saw:
View attachment 249800
And no turning back:
View attachment 249801
For the photo, I let the saw hang loosely. You can see the flexibility of the blade. When sawing, I let the blade be guided by the two profiles.
Through the first 3 frames:
View attachment 249802
Phe phoe ..... exciting ……..
I'm still sawing through the frames and the keel. As soon as the saw is also visible on the inside, I'll come up with an update.
Regards, Peter
I thought you might have a section of frames removed on the open side, but I had no idea you were going to cut the ship in half!
My fear is that you need more support for the upper section, as the frames are not getting much support from just being in the jig at top. And it may have been beneficial to add the inner ceiling planks first, or at least the deck beams? The upper frames will need two areas of support, upper and lower...which the deck beams will provide. Anyway...fingers crossed!
Last edited:
DON'T DO THIS TO ME !!!!!!!The Dutchman has gone mad! It has finally happened!
Yep, it gonna happens.Wow! I real nail bitter for sure...I wish you success my friend!
I thought you might have some frames removed on that side, but I had no idea you were going to cut the ship in half!
And the plan is, you can put them later also back on each other whit a little gap. Some special thing with the rudder and a lot of other things to think about. LOL!
Regards, Peter
You do have your work cut out for you...pun intended!Yep, it gonna happens.
And the plan is, you can put them later also back on each other whit a little gap. Some special thing with the rudder and a lot of other things to think about. LOL!
Regards, Peter
They have. On top in the jig and on 2/3 on the bearing beams.The upper frames will need two areas of support, upper and lower...which the deck beams will provide.
All in all I have thought about 10 times when to start.
Finally chose this option. If the upper deck beams were in there, I couldn't reach inside anymore.
I still have the option to fix the frames to each other with the tiny screw clamps.
Regards, Peter


