YUANQING BLUENOSE - Peter Voogt [COMPLETED BUILD]

You’re missing my point, it wouldn’t matter if you planked the deck first. Once you cut the ship in half, you can get underneath the deck easily! ;)
The deck beams keep the upper frames from being able to pivot from port to starboard after the ship is cut in half. Right now there is nothing doing that, except the upper end glued to the jig.
I think we're talking something past each other. I still want to be able to get to the keel on the inside, in case I have anything to make adjustments during the cut.
And the cut goes under the upper bearing beams. The frames has in both parts at least 2 connections.
Regards, Peter
 
Last edited:
So you leave us with the ship partially cut…a real cliff hanger…lol. :p
I was thinking a good way to do this may be to make a board the same size as the upper jig, and attach the keel to it. Then put the ship on it’s side (both boards holding it level) and run through a band saw? Would need to be a thin blade with fine teeth and a guide to keep it perfectly straight. But that’s using power tools…lol. ;)
A nice option, Dean. For someone else who would cut his model. I think I have now more control over my muscle power. ;)
Regards, Peter
 
When I was with you some time ago, you unfolded plans how you would proceed with the construction.

I couldn't even imagine your sawing action at the time.

But now that I see your photos how you handled this, incredibly clever

I already knew that your BN would be different than the drawings indicated, and given what you have in your living room (including The Lee) (museum worthy) I already knew that this was going to be very special.

I'm curious about the other photos

I'm going to continue removing the charcoal from the frames
 
Not having done any frames, and listening to the chatter about how fragile they are/were, it will be a suspenseful time too hear how they withstand the sawing action, even if slow and careful with a very sharp saw. Best of luck for success. Rich
Hi Rich, the whole construction of the frames, keelson+sisters, bearing beams etc, feels very solid.
Just let the saw do its job with wit. No extra pressure (for me or the saw) :)
Regards, Peter
 
When I was with you some time ago, you unfolded plans how you would proceed with the construction.
I couldn't even imagine your sawing action at the time.
But now that I see your photos how you handled this, incredibly clever
I already knew that your BN would be different than the drawings indicated, and given what you have in your living room (including The Lee) (museum worthy) I already knew that this was going to be very special.
I'm curious about the other photos
I'm going to continue removing the charcoal from the frames
Thanks, Henk.
During your visit I had broad outlines of the plans. After that I was busy with further elaboration and now reality.
Good luck with your frames. It's a bit of biting, but with the necessary attention now it will be very pleasant to work with them later.
Regards, Peter
 
When I saw these photos first time,
269 Cut.jpg
I was afraid, that you are too low, but I said to me, that you will know it very well, where the waterline is
...... but ...... I was still afraid and try to check it......

Blog - Bluenose - EN 1 Header2.jpg

And I realized, that the waterline of the Bluenose was really extremely low

WOW WOW WOW - these last words describing my feelings about your decision to cut - but I have a very good feeling (also knowing @Maarten s resulty on his Alert)
 
When I saw these photos first time,
View attachment 250027
I was afraid, that you are too low, but I said to me, that you will know it very well, where the waterline is
...... but ...... I was still afraid and try to check it......

View attachment 250028

And I realized, that the waterline of the Bluenose was really extremely low

WOW WOW WOW - these last words describing my feelings about your decision to cut - but I have a very good feeling (also knowing @Maarten s resulty on his Alert)
Thank you, Uwe. For the concern and doing your own resurch.:)
The design of YQ starts there 1e frame where in the drawing frame 3 is placed. And then the waterline starts under the 5e/7e.
I really appreciate that everyone thinks along and responds. That was kind of my intention to post from the start of this sawing venture.;)
Regards, Peter
 
Last edited:
Why aren’t you sawing! :p
Well Dean .......
Because:
-the saw makes such a nice clean cut;
-I have now a clear view of the intended water line on the inside;
-and because I have also read all the advice,
I decided to first apply the inner ceiling to just below the intended saw cut:
273 Planking.jpg
But it will soon save work and presumably a tighter result.
So: THANKS AGAIN GUYS, for thinking with me and give me good advises!
Nothing more changeable than a human being.
Regards, Peter
 
Last edited:
Well Dean .......
Because:
-the saw makes such a nice clean cut;
-I have now a clear view of the intended water line on the inside;
-and because I have also read all the advice,
I decided to first apply the inner ceiling to just below the intended saw cut:
View attachment 250084
But it will soon save work and presumably a tighter result.
So: THANKS AGAIN GUYS, for thinking with me and give me good advises!
Nothing more changeable than a human being.
Regards, Peter
That's great! A man with a plan! :p
 
It’s good to be able to brainstorm together. That’s what I do at work sometimes in design meetings. You throw things at the wall until something sticks…lol :p
That's a good trait, Dean.
In my previous work, it was common: Thinking out loud. It prevents from thinking the wrong way or in tunnel vision.
For an outsider, that was pretty strange. Are those guys talking to themselves? :confused:o_O:rolleyes:
Thinking about what you are going to write here on the SoS sometimes also gives a new point of view.
Regards, Peter
 
For all the sympathetic forummers: a (saw) update.
The planks of the ceiling on the port side inside is in place till beyond the saw cut:
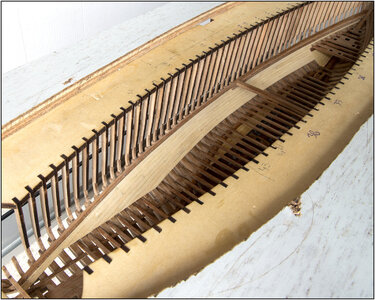
274 Planking.jpg
When I have the two parts apart, I finish the wall and the connection with the floor. Then I can do better. Because now I was bent over to work with 2 big hands in the hull. Fortunately, a row always had to dry before the next could go in. So I was also able to relax my back.

In the Saga only the length of the outside planks is mentioned: between 25 and 30 feet. That is between 7.6 and 9.1 meters. In 1:72 that is 10.5 - 12.6 cm. I kept around 12 cm / 4.72". Then a plank is laid over 12 frames. I put them in a wild bandage. Once the inner walls are in, I'll look at how the seams are divided and visible. Then you can always make new ones.

With the sawing I have now passed through the stringers, arrived at the ceiling and through the first 2 frames where the sawn upper parts are partly hanging free:
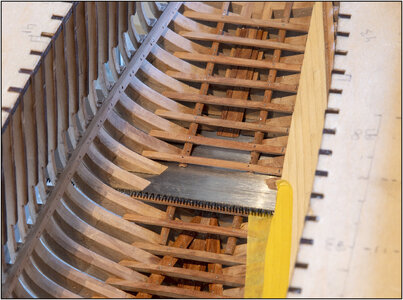
275 Stringers.jpg
In the end, only 1 floor beam had to be removed from the stringers.
And a relief: there is almost no movement in the now freely hanging frame parts. Or you have to go rough. Then the 'premeditated' connection of glues and nails with the bearing beams has proven its reliability.
Another relief: all now visible sawing angles and distributions of beams are very symmetrical on both sides. Phew......

On the intended saw cut I stuck on the planks (gaffer) painter's tape as extra protection to get a nice saw cut.
When I am more than 1 saw blade width further, I lay the floor boards on the stringer beams. Then I turn the saw over and saw through those planks. Then I press the saw against the planks/trusses. And that saw cut is also flush with the rest.

So still, step by step and keep thinking about the possible in-between steps.
Regards, Peter
 
Peter i an only commend you. This decision was certainly not one taking lightly and that plenty of hours of thought have gone into the process, is clear. However, it doesn't matter how well you plan and how you well you measure, once the actual process starts, there will always be variables to contend with. The fact that you are able to do that on the go, is testament to good critical thinking and unquenched desire to make something very special of this build. For that, you stand to be admired!
 
Peter i an only commend you. This decision was certainly not one taking lightly and that plenty of hours of thought have gone into the process, is clear. However, it doesn't matter how well you plan and how you well you measure, once the actual process starts, there will always be variables to contend with. The fact that you are able to do that on the go, is testament to good critical thinking and unquenched desire to make something very special of this build. For that, you stand to be admired!
Dear Heinrich: Thanks you very much for your comment. Thinking is now paying off!
Regards, Peter
 
Back
Top