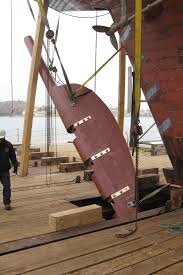
Breathtaking...
-

Win a Free Custom Engraved Brass Coin!!!
As a way to introduce our brass coins to the community, we will raffle off a free coin during the month of August. Follow link ABOVE for instructions for entering.
-

PRE-ORDER SHIPS IN SCALE TODAY!
The beloved Ships in Scale Magazine is back and charting a new course for 2026!
Discover new skills, new techniques, and new inspirations in every issue.
NOTE THAT OUR FIRST ISSUE WILL BE JAN/FEB 2026
- Home
- Forums
- Ships of Scale Group Builds and Projects
- Bluenose PoF Group Build
- Bluenose Group Build Logs
You are using an out of date browser. It may not display this or other websites correctly.
You should upgrade or use an alternative browser.
You should upgrade or use an alternative browser.
YUANQING BLUENOSE - Peter Voogt [COMPLETED BUILD]
- Thread starter Peter Voogt
- Start date
- Watchers 74
Thanxs, Paul. Please, Keep breathing ......Breathtaking...


 Absolutely great


- Joined
- Sep 3, 2021
- Messages
- 5,197
- Points
- 738

Marvelous, just marvelous...Thanxs, Heinrich. These are much appreciated comments. Indeed very busy today, with special for you in this reply on your post:
The last contribution for today.
After the ink has dried, time for the linseed oil. When that was also dry, this showed up:
View attachment 292690
Also taken outside for the 'exploded-view':
View attachment 292691
The profile of the section above the waterline:
View attachment 292692
Not very clear in the photo, but the treenails also shine through here. Mission accomplished.
Some extra attention to the stern. We already had some discussion about planking the stern first and then the planking of the hull. And I just did it the other way around.
I came across some pictures of the BN-II and the original BN. Especially with the old ones they show a solid edge around the stern face. Would they then.......
View attachment 292693
That's why at my stern on the natural starboard side a heavy edge over the side of the stern planks.
A little stubborn is okay with me. Otherwise ...... AL-FI.
For now, I sit back, rest and enjoy the view on my BN.
Regards, Peter
Absolutely great

Thanxs, Johan & Jan. Sometimes the progress is slow, but once the preparatory work is done, you can suddenly take big steps with a high visual impact.Marvelous, just marvelous...
Your hull is looking great - I am happy, that you had also a good experience with the ecoline colours
You haven chosen the correct "red" for this purpose
I am a big fan of your model and hope to see it once in real
You haven chosen the correct "red" for this purpose
I am a big fan of your model and hope to see it once in real
Thanxs, Uwe. I appreciate it very much. The Ecoline, but also the Aero Color, are a eye opener.Your hull is looking great - I am happy, that you had also a good experience with the ecoline colours
You haven chosen the correct "red" for this purpose
I am a big fan of your model and hope to see it once in real
I also hope to see this year you and/or other builders with there models.
Regards, Peter
Fantastic work Peter,
She looks just perfect.
She looks just perfect.
Remarkable work PeterThe 2nd inserted plank also succeeded:
View attachment 290817
And immediately proceeded to close it.
And the lotal picture 'on the waterline' with the drill holes already marked:
View attachment 290818
Not sanded much yet, so the dirt from pressing etc. is still there.
Lots of trennels to go!
Regards, Peter

This remains a fascinating build Peter. I can't wait to see the finished product of course, but the journey there is a privilege to observeThe warthog finally has its load complete:
View attachment 292131
Almost 2500 screwed in on this side.......
Before I can sand this side of the hull smooth, I first applied the waterline strip:
View attachment 292132
This protrudes slightly over the edge and will be sanded into shape.
Now that the seam is filled, I can adjust the seam:
View attachment 292133
I had to put a small insert in 2 places. They'll go with the sanding soon.
Regards, Peter

Now it's coming to life!Exciting!!! I couldn't wait: the first layers of Ecoline Carmine Red:
View attachment 292496
Now has a matte appearance.
The treenails remain visible:View attachment 292497
Let it dry for a while before we continue with the layer of Linseed Oil.
Regards, Peter
Absolutely superb, the recognisable Bluenose is starting to emergeThanxs, Heinrich. These are much appreciated comments. Indeed very busy today, with special for you in this reply on your post:
The last contribution for today.
After the ink has dried, time for the linseed oil. When that was also dry, this showed up:
View attachment 292690
Also taken outside for the 'exploded-view':
View attachment 292691
The profile of the section above the waterline:
View attachment 292692
Not very clear in the photo, but the treenails also shine through here. Mission accomplished.
Some extra attention to the stern. We already had some discussion about planking the stern first and then the planking of the hull. And I just did it the other way around.
I came across some pictures of the BN-II and the original BN. Especially with the old ones they show a solid edge around the stern face. Would they then.......
View attachment 292693
That's why at my stern on the natural starboard side a heavy edge over the side of the stern planks.
A little stubborn is okay with me. Otherwise ...... AL-FI.
For now, I sit back, rest and enjoy the view on my BN.
Regards, Peter
Thanxs, Maarten. Thanks to your posts, and the others who start using, I was drawn to the use of this 2 kinds of ink. Sometimes the Ecoline works fine, but the Aero Color also. With the accent differences and color tones.Fantastic work Peter,
She looks just perfect.
You have to be very aware of the acting properties. Therefore: making tests is important.
Regards, Peter
Remarkable work Peter
This remains a fascinating build Peter. I can't wait to see the finished product of course, but the journey there is a privilege to observe
Now it's coming to life!
Thanxs, Mark, for sharing my journey through my panking, sawing and painting adventure.Absolutely superb, the recognisable Bluenose is starting to emerge
I really appriciated this!
Regards, Peter
Because I can still easily put the model on its back, I first made the rudder.
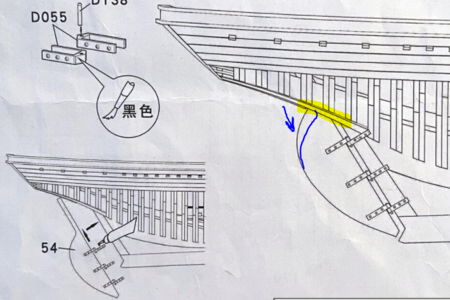
If you mount the rudder as shown in YQ's drawing, there is a problem:
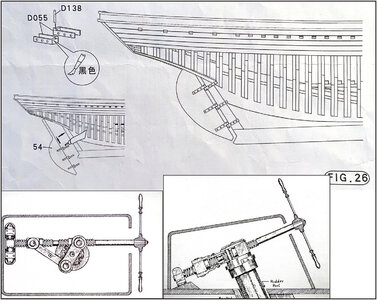
The steering mechanism provides rotational movement around the center of the rudder shaft. The rudder hinges on the YQ design lie outside the rudder blade. As a result, the rudder would not turn but a swinging movement.
In Chapelle's book it is stated on pag. 595 a nice detail drawing of a rudder:
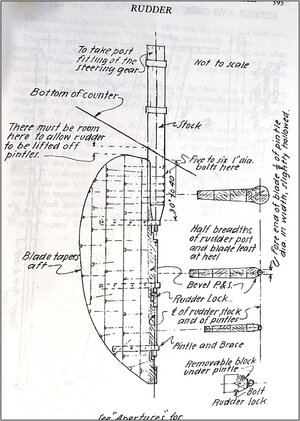
With the details mentioned in the text to the drawing:
-This type of rudder had a round stock from its head down to the upper pintle;
-The blade was formed of four or five planks, edge-bolted together and to the stock;
-The center line of tyhe pintles lined up with that of the stock;
-There were three sets of rudder braces ("pintles" and "gudgeons") equally spaces;
-The straps of these were let in flush into the blade but not into the sternpost;
-The rudder lock, which prevented the rudder lifting and unshipping was a block of wood under the middle brace.
Getting started with the YQ rudder:
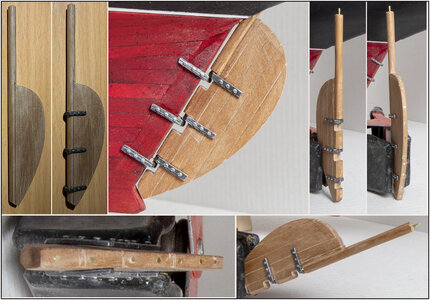
-centre line of the rudder stock extended and the blade sanded tapered;
-position of the hinges determined, both on the blade and on the keel;
-the rudder stock is visually extended to the 1st hinge;
-a hole drilled in the hinge parts of the rudder and pins made of spring steel 0.5 mm;
-recesses made to be able to take out the hinge;
-the pivot pins aligned to the center of the rudder stock;
-5 stirring boards drawn and assembled at the front and back with pins;
-the rudder is tapered to the rear;
-the top of the rudder stock is nibbling finished with a center pin, just like the masts.
The port side of the rudder in the red Ecoline and after drying the whole rudder in the linseed oil:

I can take the rudder off. This is also necessary if I want to disassemble or assemble both hull parts. That goes upright. That wouldn't be possible with a locked rudder.
I have yet to see if I will align the now protruding toe of the keel beam with the rudder. YQ had therefore designed the rudder further out. Then the line would continue.
Regards, Peter
If you mount the rudder as shown in YQ's drawing, there is a problem:

The steering mechanism provides rotational movement around the center of the rudder shaft. The rudder hinges on the YQ design lie outside the rudder blade. As a result, the rudder would not turn but a swinging movement.
In Chapelle's book it is stated on pag. 595 a nice detail drawing of a rudder:

With the details mentioned in the text to the drawing:
-This type of rudder had a round stock from its head down to the upper pintle;
-The blade was formed of four or five planks, edge-bolted together and to the stock;
-The center line of tyhe pintles lined up with that of the stock;
-There were three sets of rudder braces ("pintles" and "gudgeons") equally spaces;
-The straps of these were let in flush into the blade but not into the sternpost;
-The rudder lock, which prevented the rudder lifting and unshipping was a block of wood under the middle brace.
Getting started with the YQ rudder:

-centre line of the rudder stock extended and the blade sanded tapered;
-position of the hinges determined, both on the blade and on the keel;
-the rudder stock is visually extended to the 1st hinge;
-a hole drilled in the hinge parts of the rudder and pins made of spring steel 0.5 mm;
-recesses made to be able to take out the hinge;
-the pivot pins aligned to the center of the rudder stock;
-5 stirring boards drawn and assembled at the front and back with pins;
-the rudder is tapered to the rear;
-the top of the rudder stock is nibbling finished with a center pin, just like the masts.
The port side of the rudder in the red Ecoline and after drying the whole rudder in the linseed oil:

I can take the rudder off. This is also necessary if I want to disassemble or assemble both hull parts. That goes upright. That wouldn't be possible with a locked rudder.
I have yet to see if I will align the now protruding toe of the keel beam with the rudder. YQ had therefore designed the rudder further out. Then the line would continue.
Regards, Peter
Last edited:
- Joined
- Dec 11, 2021
- Messages
- 287
- Points
- 238

Thanks, Piero. That picture is new for me. Nice to see.
- Joined
- Dec 11, 2021
- Messages
- 287
- Points
- 238

Very easy Peter: just digit on the web "Bluenose's rudder" and you get all the pics you need!!!
Thanks and correct, Dean. I made some changes to the top of the blade.Looks great Peter!
The biggest problem with the YQ drawing, is the height of the rudder, it couldn't turn regardless of what shape the rudder shaft is!
It needs to be lowered to clear the hull. I see you have that covered!
View attachment 293124


