YUANQING BLUENOSE - Peter Voogt [COMPLETED BUILD]

Thanks and correct, Dean. I made some changes to the top of the blade.
I did too, however I may have missed the round rudder shaft? I would have to go back and check...lol ;)

PS - The hull turned out really very nice! I know you have to be glad to be moving past that!
However I think you are a brave man to have used ink...lol, but you survived it! I'm wiping my brow for you on that one! ;)
As you know, ink soaks into wood very fast and its hard to get a good even color due to that without really saturating the wood, and that can lead to blotches. Also putting a second coat too soon can lead to blotches where the ink puddles because the first layer is not fully dry. . I think you can thin it out some with alcohol to help it spread better. You can try on a sample piece. Anyway, I am just glad it worked out for you! I would have used wood dye! ;)
 
Oh yeah, since the rudder is in place....I see a steering mechanism in the near future! ;) Will you split the rudder shaft at the water line or inside the hull?
 
I see a steering mechanism in the near future! ;) Will you split the rudder shaft at the water line or inside the hull?
It’s inside the hull. Because under the steering mechanisme comes a short piece of shaft.
(It won’t connect to the nibbling top and pin of the shaft, but please, don’t tell this to the others ....... ;), but the masts do!)
 
Perché posso ancora appoggiare facilmente il modello sulla schiena, ho prima realizzato il timone.
Se monti il tempo viene mostrato nel disegno di YQ, c'è un problema:
[ALLEGARE=completo]293104[/ALLEGARE]
Il meccanismo di guida fornisce il movimento rotatorio attorno al centro dell'albero del timone. I cardini del timone sul design YQ si trovano all'esterno della pala del timone. Di conseguenza, il tempo non gira ma un movimento oscillante.

Nel libro di Chapelle si legge a pag. 595 un bel disegno di dettaglio di un timone:
[ALLEGARE=completo]293105[/ALLEGARE]
Con i dettagli citati nel testo del disegno:
-Questo tipo di timone aveva un calcio tondo dalla testa in giù fino al cardine superiore;
-La lama era formata da quattro o cinque assi, imbullonate insieme e al ceppo;
-La linea centrale dei cardini allineata con quella del calcio;
-C'erano tre serie di sostegni del timone ("spintles" e "gudgeons") equispaziati;
-Le cinghie di questi sono state fatte entrare a filo nella lama ma non nel palo di poppa;
-Il blocco del timone, che impediva il sollevamento e lo sbarco del timone, era un blocco di legno sotto il rinforzo centrale.

Iniziare con il tempo YQ:
[ALLEGARE=completo]293106[/ALLEGARE]
-l'asse del tempo allungato e la pala levigata rastremata;
-posizione delle cerniere determinata, sia sulla pala che sulla chiglia;
-l'asta del timone è visivamente estesa al 1° cardine;
-un foro pratico nelle parti di cerniera del timone e perni in acciaio per molle 0,5 mm;
-incavi realizzati per poter estrarre la cerniera;
-i perni di articolazione allineati al centro dell'asse del timone;
-5 agitatori trafilati e assemblati anteriormente e posteriormente con perni;
-il timone è rastremato all'indietro;
-la parte superiore dell'albero del timone è rosicchiata rifinita con un perno centrale, proprio come gli alberi.

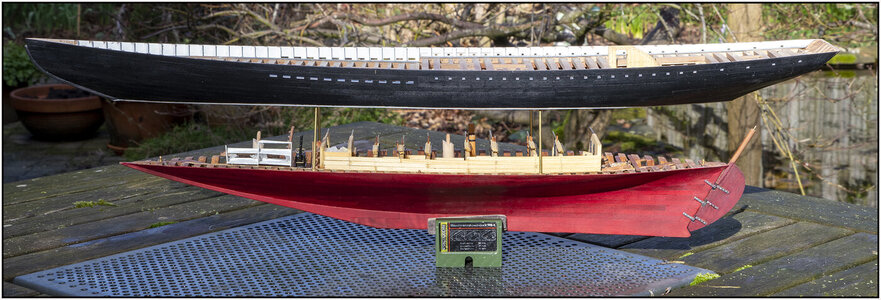
Il babordo nell'Ecoline rossa e dopo aver asciugato tutto il timone nell'olio di lino:
[ALLEGARE=completo]293107[/ALLEGARE]
Posso togliere il tempo. Ciò è necessario anche se voglio smontare o assemblare entrambe le parti dello scafo. Va bene. Non sarebbe possibile con un timone bloccato.
Devo ancora vedere se allineerò la punta ora sporgente della trave della chiglia con il timone. YQ aveva quindi dovuto il tempo più fuori. Quindi la linea sarebbe continuata.
Saluti, Pietro
 
Last edited:
Thanxs, Heinrich. These are much appreciated comments. Indeed very busy today, with special for you in this reply on your post:

The last contribution for today.
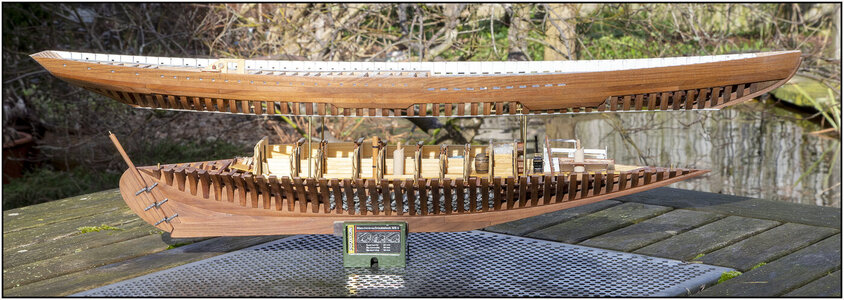
After the ink has dried, time for the linseed oil. When that was also dry, this showed up:
View attachment 292690

Also taken outside for the 'exploded-view':
View attachment 292691

The profile of the section above the waterline:
View attachment 292692
Not very clear in the photo, but the treenails also shine through here. Mission accomplished.:)

Some extra attention to the stern. We already had some discussion about planking the stern first and then the planking of the hull. And I just did it the other way around.
I came across some pictures of the BN-II and the original BN. Especially with the old ones they show a solid edge around the stern face. Would they then.......
View attachment 292693
That's why at my stern on the natural starboard side a heavy edge over the side of the stern planks.
A little stubborn is okay with me. Otherwise ...... AL-FI.
For now, I sit back, rest and enjoy the view on my BN. :)
Regards, Peter
@Henk Liebre and I saw the beauty real life today; the posted pictures don't do justice to the Ecoline finish: stunning! :p
 
Back
Top