Endurance (1912) - Occre, Scale 1:70 - My First Shipbuilding Adventure

Where’s all those planks then?
Ah Hah !!
I've been making a little progress mate, playing around a bit with different things here and there, and you'd be proud of me mate, I done-did my
first bit of "boat-bling" ROTF
Having put LED's in, the light from the open doors at the companionway would show an empty shell and a bunch of red and black spaghetti wiring,
so I decided to make a false wall with a handrail. Thumbsup:)
12 (2).jpg
 
Ah Hah !!
I've been making a little progress mate, playing around a bit with different things here and there, and you'd be proud of me mate, I done-did my
first bit of "boat-bling" ROTF
Having put LED's in, the light from the open doors at the companionway would show an empty shell and a bunch of red and black spaghetti wiring,
so I decided to make a false wall with a handrail. Thumbsup:)
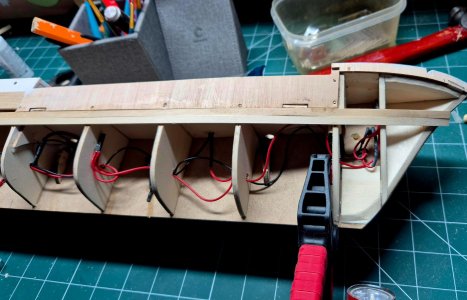
Oh well done! I like it. Simple and very effective with the planking inside lit up like that. You’re a star, old pal!

First step on the road to scratchbuilding a Victory.
 
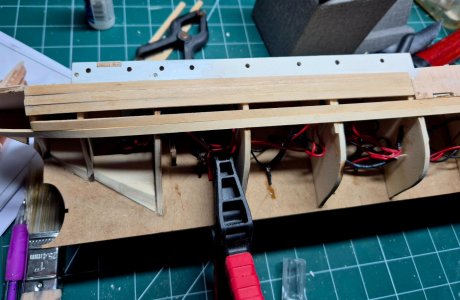
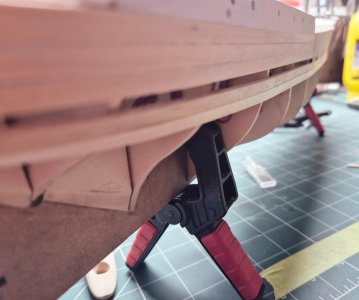
Planking: Looks daunting, and I have to keep reminding myself this is NOT the finished surface, but can't help making sure everything is as close to perfect as I possibly can.
I feel I might to get a few comments on relaxing and "she'll be right" but I think introducing new skills is 30% learning, 65% confidence building and 5% sheer luck.
In the back of my mind I kept thinking of the comments in SOS regarding plank bending.
Hmm....I'll give that a go Thumbs-Up ;)
A little wet sponge, a soldering iron, a few twists in the right direction and I was into the swing of it, actually really started to enjoy myself in getting the shapes and contours right and was able to glue in place without too many clamps, and better still, zero nails............so far..........;)

12 (6).jpg 12 (5).jpg 12 (1).jpg
 
Oh well done! I like it. Simple and very effective with the planking inside lit up like that. You’re a star, old pal!
Thanks mate, means a lot Thumbsup:)
I actually got a piece of scrap wood and drew pencil lines to represent the paneling of an inside wall but the pencil left subtle indentations which when painted over looked even better :p
 
Those hull planks are the dog’s!

It’s a really good hull shape for learning on. Straight flat sides (which were Endurance’s ultimate downfall) and relatively gentle bow and stern curves give you a smooth run for polishing your skills.

Did you read the part in my thread about quick setting the glue with heat? If you’ve got a soldering iron hot and handy that might be worth a try.
 
Get a thermoaplicator, which is not an interchangeable thing in modeling, it is easy to bend slats with it, in some cases even on dry, it is also indispensable when gluing slats on carpentry glue, and plus it costs pennies.I recommend it to everyone, and I advise everyone to purchase it.

View attachment 478493
I’ve never seen one of those before but it looks like the tool I’ve been waiting for. Thanks.

On Amazon UK they are called Hotfix rhinestone applicators and cost under a tenner delivered.
 
Last edited:
I’ve only used it with Titebond
Nah mate, couldn't get it to work with the PVA, it was either the glue or my technique :confused:
Anyway, I did take note of that glue you like, and you've mentioned it a few times so, as they say:
If the Titebond wont go to Mohamed, then Mohamed must go and get......no.... wait
If Mohamed can't afford Titebond, then Titebond must buy Mohamed.......nope :mad:
Mohamed and Titebond walk into a bar..........dang !

I bought some from Amazon Thumbsup:p
 

It’s good. Sticks to wood like marmalade to a blanket.

I’ve been thinking about that handrail and interior bulkhead of yours. It’s reminded me how much difference a little super detailing makes. When I was building aircraft I’d always add seatbelts, a pilots helmet and maps in the cockpits. I’d open up some panels and make avionics black boxes inside, maybe make an engine. And then there would be a bit of weathering, peeling paint and oil stains. It all helped make my model mine, you know, but mostly it added ‘human interest’ showing where people interacted with the machine.

I’ve made a lot of big changes from the kit spec to Alert but I find I’ve neglected the small but effective details. I could have had steps leading down the companionways or left the main hatch off to show the stowed cables or opened the bread room hatch. As it is, with all the hatches closed there’s not even a clear sense of scale.

It’s too late for those internal things on this build but that handrail has reminded me about all this stuff and prompted the improvements to my pumps and the proper research that led to them.

I’ve been so concerned with getting the basic carpentry right that adding ‘human interest’ details has suffered. I think I’ll revisit some of the sub-assemblies I thought were finished…
 
Back
Top