H.M.S. Surprise by Artesania Latina - Build log

Did the bolts have the raised circle in the top for the pin part?
Could you just make the very top of the bolt and glue it in place? I know it won't have the pin to hold it, but I would think the glue would be sufficient since there is no stress on the part.
 
Did the bolts have the raised circle in the top for the pin part?
Could you just make the very top of the bolt and glue it in place? I know it won't have the pin to hold it, but I would think the glue would be sufficient since there is no stress on the part.
I had drilled a hole in the top of the bolt to push the wire through, but it would be far easier to just make the hexagonal head and glue that by itself. Do you think that would look better? Do you think I should use these "bolts" on the davits or just use the kit brass nails? Thank you for any suggestions Jeff. I really do appreciate your advice.
 
hehe Its up to you as to if it looks better or not. Its also up to you where you use them. :) However, I think just making the "bolt head" and gluing it in place with save you a bunch of work of you use them to any significant quantity. :)
 
Very slowly! LOL! I have several sheets of brass plate that are 5" x 5" (yes, us old guys still use inches here in Canada sometimes) and the sheets are 1/64" to 1/16" thick. So I did some 1/48 scale conversions and determined which sheet would do the job. Then I inscribed the sheet with the bolt head size(s) I wanted, and drilled out the 0.5mm shaft holes first. After that I just used my Byrnes tablesaw with a fine metal cutting blade and the angle gauge that came with the saw. It worked well, but my fingers kept slipping. Thus the 50% completion rate. I think that skill is improving, hopefully. :) The shafts for the small bolts is 0.5mm brass wire, and the larger bolts use 0.625 wire - which I filed smooth after using the wirecutters then roughed up the top edge so the glue would grab for the bolthead attachment.There's probably an easier way that you know how to make these - and I'd be happy to defer to your expertise.
Good morning Reg. I think you have pulled these tiny bolts off brilliantly. Cheers Grant
 
I get a bit depressed when I see the comment on the kit box that states this ship kit is for those over 14 years. Glad it doesn't say "For Beginners"! However, with my limited experience in this hobby I really have no idea where this kit stands in the Easy, Medium, or Difficult model list. My type A personality traits have probably made this more difficult than it needed to be.

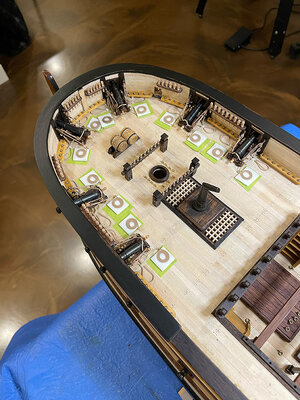
The final canon installation completed. Rope "training" underway.
Bow-01.jpg

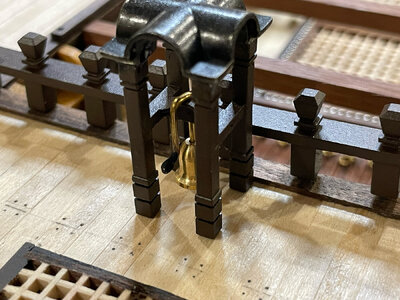
Bell Tower course woodgrain filled, sanded, and painted.
BellTower-03.jpg

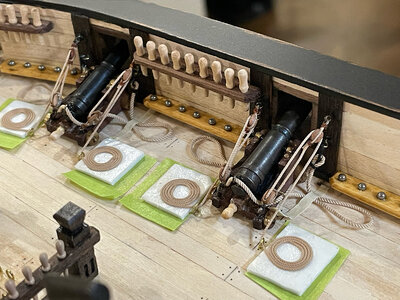
A closer look at the canon rigs.
Canons-01.jpg
 
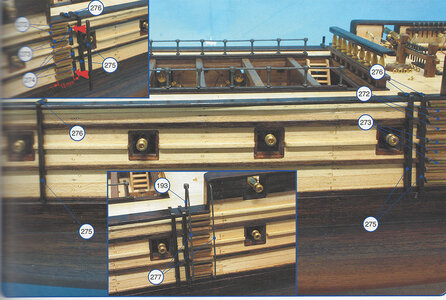
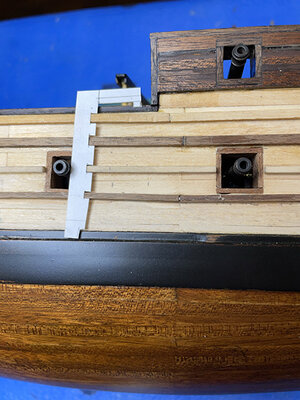
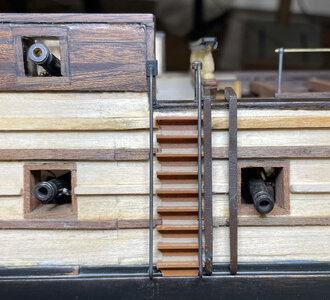
Working on hull exterior detailing. The A.I. plan called for embarkation ladders using 1.5 x 2 and 1.5 x 3mm walnut strips. I tried this but was unhappy with my results. So I changed the dimensioning to 1.0 x 4 and 1.0 x 3mm walnut. I found it impossible to get sharp edges on the step treads, so I used highly diluted poly varnish to coat these pieces first, then the edges stayed sharp. Poly varnish dries in seconds.
PlanEmbarkLadder.jpg

The plan also called for making the load hoister rails from multiple pieces (can be seen in the plan photo above, top-left red arrows), which seems dubious to me. So I made a template and made the four of these rails from a single piece of walnut. I followed the plan details (above) and built the metal handrails which were not seen on ships of this era.
A Template.jpg

I plan to have this model in a case once completed showing the port side. So, my experiments are always applied to the starboard side to see if they work.
This photo shows my version of the embarkation steps/ladder.
IMG_6280.jpg
I am generally satisfied with the steps now, but disappointed that the left rail is not exactly parallel with the step edges. Shrug. I'll get it right on the port side :)

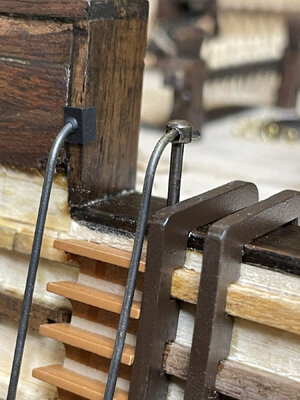
From my photos of the actual shi[p, I noticed that the rail had a metal elbow support. The kit does not include such tiny pieces. So I made my own to match the photo:
Rail Support flange.jpg

Maybe next time I'll remember to dust off the model before taking photos. Maybe.
 
Last edited:
Hi Reg
The metal rails look very nicely done. I looked but could not find any contemporary based information on metal hand rails, only rope. Were you able to find any contemporary information on this or just the modern ship? The reason this is puzzling to me is that the metal hand rails could be knocked about when docking or hauling in cargo as they stick out further than the fenders which were there to prevent damage in such operations.
Thanks!
Allan
 
Last edited:
...I looked but could not find any contemporary based information on metal hand rails, only rope.

Hello Allan, I just went with the kit plan with the rails. The ship in San Diego looked like something was missing (besides all the canons). Shrug. I've seen paintings of old ships and those seemed to use rope - like you mentioned. The plans that I have found for this ship in the 1750's doesn't show this kind of detail in any case. However, I think the metal rails should protrude exactly the same amount as the load hoisters/fenders and would assist with preventing hull damage.
 
Working on hull exterior detailing. The A.I. plan called for embarkation ladders using 1.5 x 2 and 1.5 x 3mm walnut strips. I tried this but was unhappy with my results. So I changed the dimensioning to 1.0 x 4 and 1.0 x 3mm walnut. I found it impossible to get sharp edges on the step treads, so I used highly diluted poly varnish to coat these pieces first, then the edges stayed sharp. Poly varnish dries in seconds.
View attachment 465632

The plan also called for making the load hoister rails from multiple pieces, which seems dubious to me. So I made a template and made the four of these rails from a single piece of walnut.
View attachment 465633

I plan to have this model in a case once completed showing the port side. So, my experiments are always applied to the starboard side to see if they work.
This photo shows my version of the embarkation steps/ladder.
View attachment 465636
I am generally satisfied with the steps now, but disappointed that the left rail is not exactly parallel with the step edges. Shrug. I'll get it right on the port side :)

From my photos of the actual shi[p, I noticed that the rail had a metal elbow support. The kit does not include such tiny pieces. So I made my own to match the photo:
View attachment 465638

Maybe next time I'll remember to dust off the model before taking photos. Maybe.
Good morning Rev. That is handy work! Your notches for the rail are neat and accurate- something I don’t get right. I agree with Alan re the rope, however those metal hand rails look very impressive and unlesss you are going for a replica model I would leave them - just my opinion. As for the steps themselves- fantastic. Love the colour and that close up photo. Cheers Grant
 
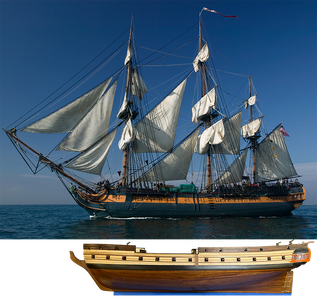
I must make a decision now, that I should have made a long time ago. The image below shows the actual Surprise with her current colour scheme. I already chose to keep the lower hull natural so that I can enjoy the wood grain. However, I may need to run that orange (caramel) colour from bow to stern.... a masking nightmare. I'll think on this for a few days, while scratching whats left of my hair.
2 orange Or Not 2 orange.png
To orange, or not to orange? That is the question.
I'll decide within 3 days, or if I find a word that rhymes with orange - whichever occurs first.
 
Last edited:
Fantastic build you have going. You have to appreciate the scale you get to work with. Mine is 1/75 and very challenging. I will follow this build for sure.
 
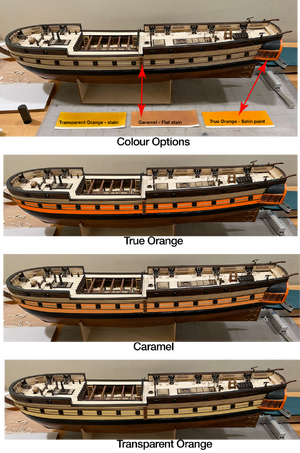
My friend is helping me with the colour decision. He is a wizard with Photoshop and gave me this image to help me with the problem:
OrangeOrNot4.png

The true orange colour leaps off the page, and I cannot image that any ship was painted that brightly - but it is interesting. The caramel stain more closely approximates the actual ship as pictured above. Transparent orange is very subtle, but nice too - however, the boxwood/linden planks have very little visible grain to show through. The true orange paint and the caramel stain will both result in an opaque cover. Spraying stain is a risky adventure, but I've done it before. Probably should invest in a proper mask. Any suggestions or opinions on the preferred colour is always welcomed/requested.

Note: The top image is about the same as the image on the cover of the kit box.
 
Last edited:
I think the caramel will most closely reflect the color in the picture of the real ship, assuming the colors in the photo are correct. :) If you are concerned about working with the stain, you can probably come close to the same color with the paint by toning down the orange with some tan and white added. Just keep track of how you mix it in case you need more. :)
 
I think the caramel will most closely reflect the color in the picture of the real ship.
Thank you for your suggestion Jeff. I already mixed a couple of stains to reach the caramel colour in order to match the actual ship. The photo colours are very close. I have an accurate mixture measurement for making more, if required. A single bow-to-stern stripe will not require much stain, but a heap of patience with masking of the canons. I'm still learning the concept of patience... but age is helping LOL!
 
based on my personal taste I like the transparent orange most, but caramel fitts more the original ship
 
My friend is helping me with the colour decision. He is a wizard with Photoshop and gave me this image to help me with the problem:
View attachment 466004

The true orange colour leaps off the page, and I cannot image that any ship was painted that brightly - but it is interesting. The caramel stain more closely approximates the actual ship as pictured above. Transparent orange is very subtle, but nice too - however, the boxwood/linden planks have very little visible grain to show through. The true orange paint and the caramel stain will both result in an opaque cover. Spraying stain is a risky adventure, but I've done it before. Probably should invest in a proper mask. Any suggestions or opinions on the preferred colour is always welcomed/requested.

Note: The top image is about the same as the image on the cover of the kit box.
Good morning Reg. I like the transparent colour as it fits nicely with the natural wood of the lower hull. This is always the question wether you want to go for an authentic ship or a good looking model. Just my 2 cents. Lovely build so far BTW. Cheers Grant
 
I thank all of you for your valued opinions and input. This has helped me with this dilemma, and I've made my choice. Throughout this build I have attempted to add details to the kit to match the actual ship - except for colour. I personally do not like the current colour scheme of the actual ship. I have always liked working with wood but the varieties included with this kit have presented me with new challenges to deal with. I'll now get busy with masking the canons, but do not expect any shareable results for a couple of weeks. <insert deep, respectful bow here>
 
I thank all of you for your valued opinions and input. This has helped me with this dilemma, and I've made my choice. Throughout this build I have attempted to add details to the kit to match the actual ship - except for colour. I personally do not like the current colour scheme of the actual ship. I have always liked working with wood but the varieties included with this kit have presented me with new challenges to deal with. I'll now get busy with masking the canons, but do not expect any shareable results for a couple of weeks. <insert deep, respectful bow here>
I fully understand your dilema - I know this feeling(s)
 
Back
Top