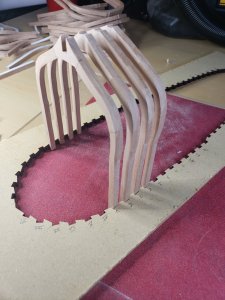
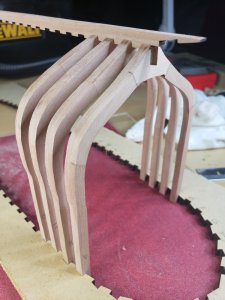
-

Win a Free Custom Engraved Brass Coin!!!
As a way to introduce our brass coins to the community, we will raffle off a free coin during the month of August. Follow link ABOVE for instructions for entering.
-

PRE-ORDER SHIPS IN SCALE TODAY!
The beloved Ships in Scale Magazine is back and charting a new course for 2026!
Discover new skills, new techniques, and new inspirations in every issue.
NOTE THAT OUR FIRST ISSUE WILL BE JAN/FEB 2026
You are using an out of date browser. It may not display this or other websites correctly.
You should upgrade or use an alternative browser.
You should upgrade or use an alternative browser.
- Joined
- Feb 18, 2019
- Messages
- 717
- Points
- 353

Right now the ribs are 6 mm thick, the slots on the keel (and overall spacing on the ship) is 5 mm. So it will be easier to cut the slots on the keel to a bigger size, but is that what I want to do. Or should I sand the ribs down to the 5 mm they are supposed to be. Thoughts appreciated here.
3 solutions
1) I would sand them down closer to 5 mm. To do that you will have to take a little bit of material on both sides: it would be best as you would not want to take a full mm on 1 side only. It will change the angle of the bevel too much on one side.
You could use a scrapper for that: it is quick and it cleans up the faces of the frames nicely.
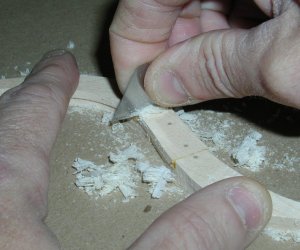
But ...
2) if you decide to keep them as is and cut wider notches on the keel, make sure you take the centre of each frame (the glue line between the 2 assembled halves) as the reference. If not you will be pushing all the frames back or forward depending on which side you increase the width on the notch from. Best would be to start at the centre frame and work your way aft and fore from there.
If you do not adjust the size of the notches on both sides of each notch, you will quickly eat space at both ends. Not sure how many frames you have on your vessel, but moving each frame 1 full mm in either direction, you will quickly end up with a noticeable difference on either side of the hull: fore and aft. It will also affect your beveling although I would assume it is not 100% accurate and you have to do more sanding as is. As a result it would also slightly change the shape of your hull. 1mm multiplied by X number of frames will make a difference.
It would also affect your jig as some of the frames will be pushed back or forth or both ways.
The third solution would be to just sand 0.5mm on each side of the foot of each frame to fit the notch on the keel. Then your frames would be thicker (except for the foot), your spacing would be slightly narrower, but the overall placement of each frame on the keel would stay the same. In this case you may also have to slightly adjust your notches in the jig as the frames would remain at 6 mm.
The most important is to keep the centre of each frame the same on the original keel tracing as being off X number of times at each end will affect too many things later.
Model ship building does not have to be a super exact science but 1 or 2 cm offset at either end or both ends could / would cause problems in some areas: Framing the stern and the hawse-timbers at the front (among other things).
G
Last edited:
@Gilles Korent That is super helpful information, thank you!
I like the idea of cutting them down the 1 mm to get them to the right size. Any suggestions on what kind of scrapper? In your photo it looks like it's just a blade, which I have plenty of.
@Norway Thanks, the build is going pretty well I think. I'm looking forward to Hahns Rattlesnake, when I finish the Hannah I want to look into the Rattlesnake and the Halifax to see which one should be next.
- Joined
- Feb 18, 2019
- Messages
- 717
- Points
- 353

I like the idea of cutting them down the 1 mm to get them to the right size. Any suggestions on what kind of scrapper? In your photo it looks like it's just a blade, which I have plenty of.
A blade works fine. Very sharp and cheap to replace.
G
- Joined
- Feb 18, 2019
- Messages
- 717
- Points
- 353

Gilles, good, how do you do the pictures when you hold the same thing with both hands? do you have a tripod?
Yes tripod.
G
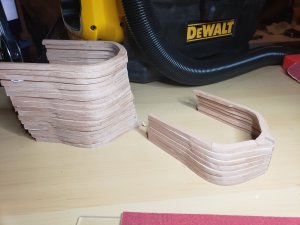
It's been a couple weeks since the last update. Just been moving along with the beveling and thinning of all the ribs.
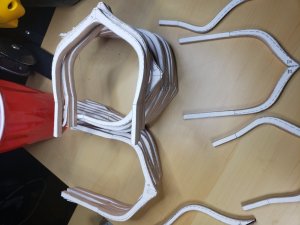
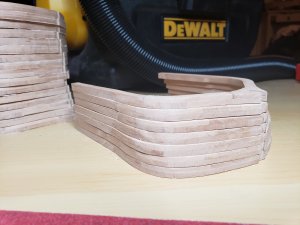
It's hard to tell from this angle actually but they are noticeably slimmer than before. And cutting/scrapping with the blade really does add a nicer finish to the ribs. I'll still go back with the really fine sand paper before I'm done but the blade helps that process.
The rib pieces are all roughly 6 mm thick, they need to be 5 mm so I'm striving to take .5 mm each side as has been suggested. So far I've taken .5 mm off all of the bottom pieces. Then I moved on to the beveling of all the pieces, which as of last night is now complete.
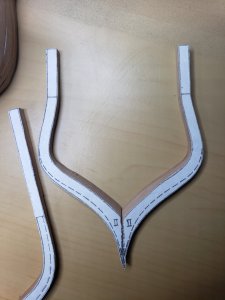
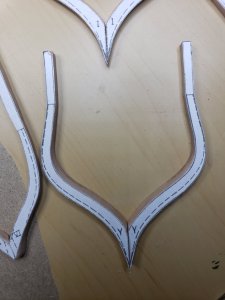
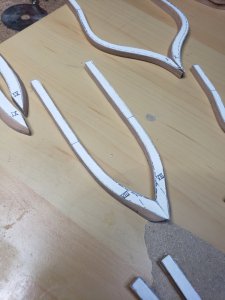
I think they've turned out pretty good. The bevel was done with a mix of sand paper grit, dremmel and a fine blade as suggested above.
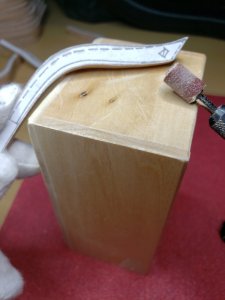
It's taken a good amount of time to get them all correct and cut properly.
The next step is going to be to cut out the sections on the main rib where they slide onto the keel. Then once that is done I can remove the top paper and remove the .5 mm from that side and make sure everything is as even as possible. I also still need to put together the keel. I'll be traveling for a couple weeks and this is all probably a couple weeks more worth of work. So probably about a month away from another update. I think the ribs are coming along nicely though. This really is the meat of the model and I think is the longest part. I already know that in the future I'll want to do some more work on the wood planks to ensure

It's hard to tell from this angle actually but they are noticeably slimmer than before. And cutting/scrapping with the blade really does add a nicer finish to the ribs. I'll still go back with the really fine sand paper before I'm done but the blade helps that process.
The rib pieces are all roughly 6 mm thick, they need to be 5 mm so I'm striving to take .5 mm each side as has been suggested. So far I've taken .5 mm off all of the bottom pieces. Then I moved on to the beveling of all the pieces, which as of last night is now complete.


I think they've turned out pretty good. The bevel was done with a mix of sand paper grit, dremmel and a fine blade as suggested above.

It's taken a good amount of time to get them all correct and cut properly.
The next step is going to be to cut out the sections on the main rib where they slide onto the keel. Then once that is done I can remove the top paper and remove the .5 mm from that side and make sure everything is as even as possible. I also still need to put together the keel. I'll be traveling for a couple weeks and this is all probably a couple weeks more worth of work. So probably about a month away from another update. I think the ribs are coming along nicely though. This really is the meat of the model and I think is the longest part. I already know that in the future I'll want to do some more work on the wood planks to ensure
Your frames a looking very good- very accurate sanding
Steady progress and good work!
Wow! looks like it worth spending so much time sending those frames. Now the real fun is coming up, rewarding fun!!!
D
Danno71
Guest
I look forward to watching your progress. I learn something new every time I open the blog!
Thank you!
Thank you!
Thanks everyone! Things are going well and this has been pretty enjoyable.
Now that I'm back I've gotten some work done the last couple days. I finished thinning all the ribs, now I'm on to working on the half ribs.
Before finishing those I decided to take a break and work on the jig. It was nice to take a break from scrapping ribs and I thought it was time to have somewhere to store the the finished ribs. I kept knocking into them and didn't want one to break or get lost.
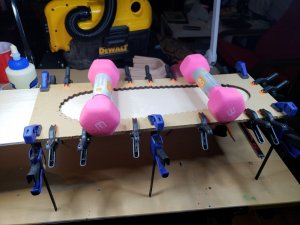
The jig is good, just needed a little clean up from where the parts break out. Because I'm thinning the ribs by hand I didn't sand the laser scrotch off. I wanted a snug fit and didn't want to distort the jig in any way.
After this dried I drilled some holes in the middle, I'm going to put it on the scroll saw and cut our the center. It needs to be cut our so I can get inside the framing later.
Now the fun part!
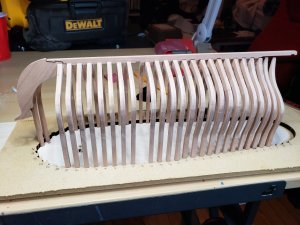
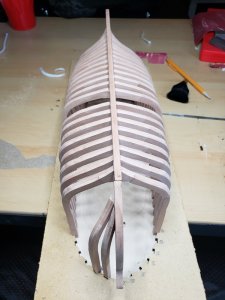
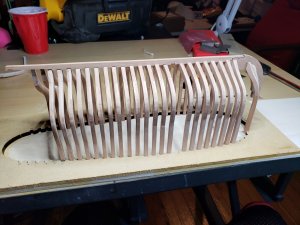
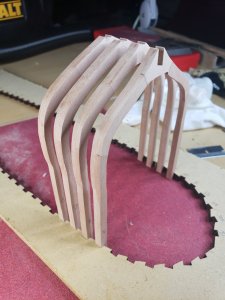
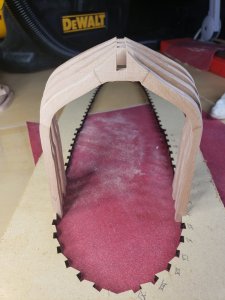
This is all dry fit. And everything fits soooo well. Well almost everything, the keel struggles a little bit in some places, but that will have to be fixed once everything is glued so I can see where it needs to be shaped.
The one rib is missing because it needs a little extra work.
The couple half ribs I've finished are also in place, it looks like VIII half rib will need to be remade, it seems the angle is wrong, we'll see what happens once it's all together.
Otherwise it's shaping up nicely!
Now that I'm back I've gotten some work done the last couple days. I finished thinning all the ribs, now I'm on to working on the half ribs.
Before finishing those I decided to take a break and work on the jig. It was nice to take a break from scrapping ribs and I thought it was time to have somewhere to store the the finished ribs. I kept knocking into them and didn't want one to break or get lost.

The jig is good, just needed a little clean up from where the parts break out. Because I'm thinning the ribs by hand I didn't sand the laser scrotch off. I wanted a snug fit and didn't want to distort the jig in any way.
After this dried I drilled some holes in the middle, I'm going to put it on the scroll saw and cut our the center. It needs to be cut our so I can get inside the framing later.
Now the fun part!


This is all dry fit. And everything fits soooo well. Well almost everything, the keel struggles a little bit in some places, but that will have to be fixed once everything is glued so I can see where it needs to be shaped.
The one rib is missing because it needs a little extra work.
The couple half ribs I've finished are also in place, it looks like VIII half rib will need to be remade, it seems the angle is wrong, we'll see what happens once it's all together.
Otherwise it's shaping up nicely!
Absolutely love how you model getting the shape and the way you build! You must really enjoy the building process.
and we enjoy this log very muchAbsolutely love how you model getting the shape and the way you build! You must really enjoy the building process.

I think Blandford crosssection - is the great first step into POF builds, not to mention scratch builds. Various skills can be acquired, and a great understanding of ship construction: keel and frames assembly in particular.I'm going to build Blandford first so that I can train my skills with tools and various techniques.

YES JIM IT SURE IS, wish I knew when I started this build WHAT I KNOW NOW. Don
Good progress, I follow closely because I will later build Rattlesnake in the same way as you.
I'm going to build Blandford first so that I can train my skills with tools and various techniques.
Good luck.
Greeting-
Thanks! Rattlesnake is definitely on my list.
I think Blandford crosssection - is the great first step into POF builds, not to mention scratch builds. Various skills can be acquired, and a great understanding of ship construction: keel and frames assembly in particular.
I started with the Blandford CS but when it had some of the issues with the plans I moved onto this, I'm hopefully I'll go back and finish it but I think I may have to start over based on some of the mistakes that were made. But I thought it would be super helpful to do before doing this, I had at least gotten the framing done so that was good experience for here.


