True storyLooking very good
-

Win a Free Custom Engraved Brass Coin!!!
As a way to introduce our brass coins to the community, we will raffle off a free coin during the month of August. Follow link ABOVE for instructions for entering.
-

PRE-ORDER SHIPS IN SCALE TODAY!
The beloved Ships in Scale Magazine is back and charting a new course for 2026!
Discover new skills, new techniques, and new inspirations in every issue.
NOTE THAT OUR FIRST ISSUE WILL BE JAN/FEB 2026
You are using an out of date browser. It may not display this or other websites correctly.
You should upgrade or use an alternative browser.
You should upgrade or use an alternative browser.
HMS Blandford 1:48 POF Modelship Dockyard [COMPLETED BUILD]
- Joined
- Apr 20, 2020
- Messages
- 6,256
- Points
- 738

thanks my friend for the information
our friend Herman send me a great information to
our friend Herman send me a great information to
Hi Shota, again thanks. As I haven’t had a chance to use these scrapers yet I don’t know how good they are. I would normally use a Stanley blade for levelling the planks on the deck and hull sides before sanding, but with a straight blade I couldn’t do the stern or bow but that’s where I think these shaped ones will help. As the name suggests you just drag them across the surface in a scraping motion, most useful for levelling the slight differences in plank heights, it’s much better initially than sanding surfaces to get them level. There isn’t a particular technique that I know of, use them as they come, once you start it’s pretty intuitive, almost therapeutic. Ken
- Joined
- Dec 16, 2016
- Messages
- 1,193
- Points
- 493

Hello and welcome once again. Only a very small update with not much to say about it. The photos are showing my steady progress on the deck beams. Some of the beams don't look perfectly straight, but as this is the lower deck I don't think that will be noticed. I'm learning, I know where I'm making the small errors and I'm certain that once I get to the upper deck I'll be able to make it perfect, that's the plan anyway.
Over recent years I have downsized my photographic equipment and now have just one trusty old SLR and a general purpose lens which until now I have used to take all my pictures, sadly the lens has developed a fault and I’ve had to send it off for repair ( probably at great expense ). I’ve dug out a ten year old pocket compact, a simple one without even a zoom to use until my lens is fixed, I’m told in about a month. What has amazed me is using it with care just how good the pictures can be, I’m finding the challenge of going back to absolute basics a great deal of fun. Is this a reflection of life in general, as a society we are now so technically advance that we don’t often realise that simple things are sometimes more rewarding.
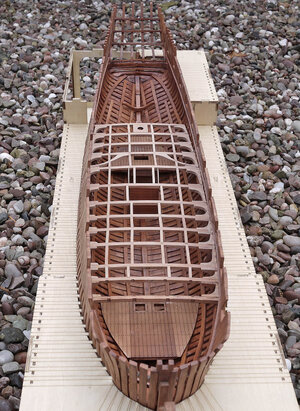
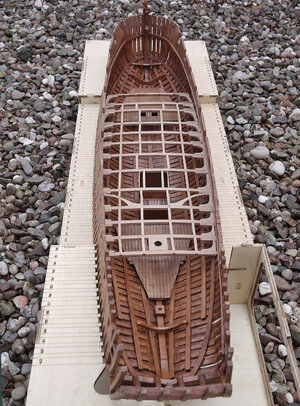
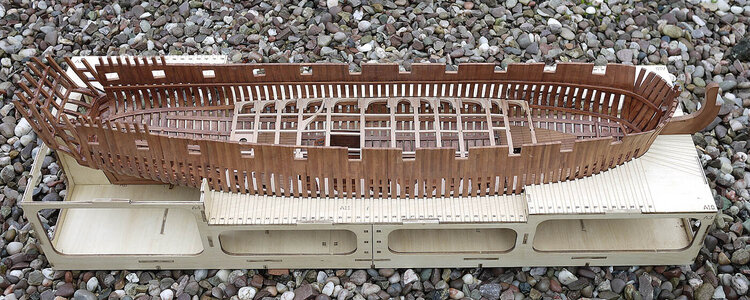
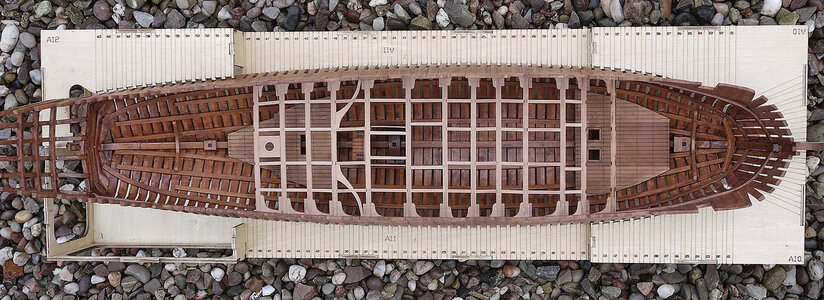
Over recent years I have downsized my photographic equipment and now have just one trusty old SLR and a general purpose lens which until now I have used to take all my pictures, sadly the lens has developed a fault and I’ve had to send it off for repair ( probably at great expense ). I’ve dug out a ten year old pocket compact, a simple one without even a zoom to use until my lens is fixed, I’m told in about a month. What has amazed me is using it with care just how good the pictures can be, I’m finding the challenge of going back to absolute basics a great deal of fun. Is this a reflection of life in general, as a society we are now so technically advance that we don’t often realise that simple things are sometimes more rewarding.


Last edited:
Actually, your lawn looks better using the other camera...
Your ship looks fantastic regardless!
Your ship looks fantastic regardless!
- Joined
- Dec 16, 2016
- Messages
- 1,193
- Points
- 493

Hi Paul, That’s my front lawn, no maintenance there eitherActually, your lawn looks better using the other camera...
Your ship looks fantastic regardless!
- Joined
- Oct 15, 2017
- Messages
- 1,191
- Points
- 443

Low maintenance Ken? I'm going to guess your home is brick or field stone and beautiful? 
It's obvious you hold yourself and your work to a high standard. Your ship looks beautiful, without question. The Pearwood's color/hue is so very warm. Very appealing to my and I venture to say, many viewers' eyes.
Really well done.
It's obvious you hold yourself and your work to a high standard. Your ship looks beautiful, without question. The Pearwood's color/hue is so very warm. Very appealing to my and I venture to say, many viewers' eyes.
Really well done.
- Joined
- Dec 16, 2016
- Messages
- 1,193
- Points
- 493

Hi Ken, Thanks for your thoughts. I wish that I lived in a storybook English stone cottage but alas no, an ordinary fairly nice brick one that we’ve lived in for nearly forty years and have made it our home. I bet that you don’t live on a ranch either.Low maintenance Ken? I'm going to guess your home is brick or field stone and beautiful?
It's obvious you hold yourself and your work to a high standard. Your ship looks beautiful, without question. The Pearwood's color/hue is so very warm. Very appealing to my and I venture to say, many viewers' eyes.
Really well done.
- Joined
- Oct 15, 2017
- Messages
- 1,191
- Points
- 443

Actually, Ken, while not a ranch, up until 6 years ago, we lived on 37 wooded acres, bordered on two sides by state protected park lands. Very peaceful, idyllic actually.
Alas, for two people in their 60s maintenance proved to be too much for us. We moved into a gated community and a townhome where all of the snow plowing, landscaping and other mundane tasks are done for us for a "HOA" fee. About 5 of our original acreage was lawn. I don't think we could have afforded 5 acres of beautiful artificial turf!
Alas, for two people in their 60s maintenance proved to be too much for us. We moved into a gated community and a townhome where all of the snow plowing, landscaping and other mundane tasks are done for us for a "HOA" fee. About 5 of our original acreage was lawn. I don't think we could have afforded 5 acres of beautiful artificial turf!

- Joined
- Dec 16, 2016
- Messages
- 1,193
- Points
- 493

Ken, What a great reply, I doubt that there is another online community that spans the world, has such a diversity of people with skills and experiences as those that you find on this site, I’m glad to be part of it.Actually, Ken, while not a ranch, up until 6 years ago, we lived on 37 wooded acres, bordered on two sides by state protected park lands. Very peaceful, idyllic actually.
Alas, for two people in their 60s maintenance proved to be too much for us. We moved into a gated community and a townhome where all of the snow plowing, landscaping and other mundane tasks are done for us for a "HOA" fee. About 5 of our original acreage was lawn. I don't think we could have afforded 5 acres of beautiful artificial turf!
- Joined
- Jan 10, 2022
- Messages
- 862
- Points
- 403

Looks great Ken and the slight, and l mean slight, misalignment of the carlings will not notice at all especially when you add the 2x2mm ledges. As you say, it's good practice for the upper deck which is the one you want to get as good as possible. There is more than enough 2x2mm strips provided but l kept all off-cuts to use for the smaller spaces just in case. Are you going to fit the mortar to the upper deck or make it an open hatch /grating?Hello and welcome once again. Only a very small update with not much to say about it. The photos are showing my steady progress on the deck beams. Some of the beams don't look perfectly straight, but as this is the lower deck I don't think that will be noticed. I'm learning, I know where I'm making the small errors and I'm certain that once I get to the upper deck I'll be able to make it perfect, that's the plan anyway.
Over recent years I have downsized my photographic equipment and now have just one trusty old SLR and a general purpose lens which until now I have used to take all my pictures, sadly the lens has developed a fault and I’ve had to send it off for repair ( probably at great expense ). I’ve dug out a ten year old pocket compact, a simple one without even a zoom to use until my lens is fixed, I’m told in about a month. What has amazed me is using it with care just how good the pictures can be, I’m finding the challenge of going back to absolute basics a great deal of fun. Is this a reflection of life in general, as a society we are now so technically advance that we don’t often realise that simple things are sometimes more rewarding.
View attachment 406001
View attachment 406002
View attachment 406003
View attachment 406004
- Joined
- Dec 16, 2016
- Messages
- 1,193
- Points
- 493

Hi Keith, Thanks for your comments they’re very much appreciated. I don’t know yet what I’m going to do about detailing the upper deck I’ll wait until I get that far. KenLooks great Ken and the slight, and l mean slight, misalignment of the carlings will not notice at all especially when you add the 2x2mm ledges. As you say, it's good practice for the upper deck which is the one you want to get as good as possible. There is more than enough 2x2mm strips provided but l kept all off-cuts to use for the smaller spaces just in case. Are you going to fit the mortar to the upper deck or make it an open hatch /grating?
- Joined
- Jan 10, 2022
- Messages
- 862
- Points
- 403

Sorry, didn't mean to jump the gun. l didn't decide until l got there myself. l actually fitted the square piece with the hole, intending to fit the mortar but after seeing build logs of bomb vessels that are actually equipped with sea mortars l could see how sturdy the support beams were that supported the weight of these weapons and realised the kit did not cater for this and it would look completely wrong. So l cut back the square and made it into a hatch as a spare grating is supplied. Just thought l'd give you a heads up and something to think about in advance
- Joined
- Dec 16, 2016
- Messages
- 1,193
- Points
- 493

Hi Keith, Your right when you say ‘something to think about’. There’s plenty for me here to be going on with, You’ll soon have plenty yourself taking on the Granado, it looks like another level of kit, but at least there are some nice, pretty comprehensive logs here.Sorry, didn't mean to jump the gun. l didn't decide until l got there myself. l actually fitted the square piece with the hole, intending to fit the mortar but after seeing build logs of bomb vessels that are actually equipped with sea mortars l could see how sturdy the support beams were that supported the weight of these weapons and realised the kit did not cater for this and it would look completely wrong. So l cut back the square and made it into a hatch as a spare grating is supplied. Just thought l'd give you a heads up and something to think about in advance
You have a steady pace, Ken. The deck beams looks nice.Hello and welcome once again. Only a very small update with not much to say about it. The photos are showing my steady progress on the deck beams. Some of the beams don't look perfectly straight, but as this is the lower deck I don't think that will be noticed. I'm learning, I know where I'm making the small errors and I'm certain that once I get to the upper deck I'll be able to make it perfect, that's the plan anyway.
Over recent years I have downsized my photographic equipment and now have just one trusty old SLR and a general purpose lens which until now I have used to take all my pictures, sadly the lens has developed a fault and I’ve had to send it off for repair ( probably at great expense ). I’ve dug out a ten year old pocket compact, a simple one without even a zoom to use until my lens is fixed, I’m told in about a month. What has amazed me is using it with care just how good the pictures can be, I’m finding the challenge of going back to absolute basics a great deal of fun. Is this a reflection of life in general, as a society we are now so technically advance that we don’t often realise that simple things are sometimes more rewarding.
View attachment 406001
View attachment 406002
View attachment 406003
View attachment 406004
And about the old camera: old stuff is not always bad at all.
Regards, Peter
- Joined
- Dec 16, 2016
- Messages
- 1,193
- Points
- 493

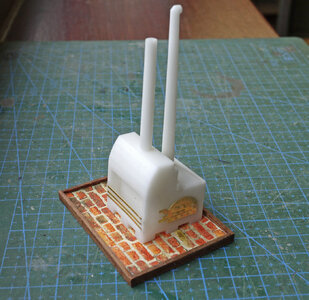
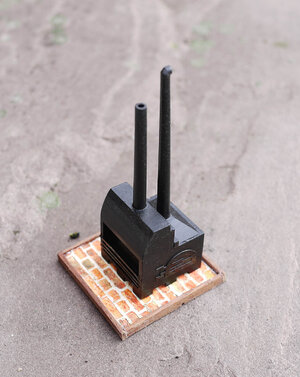
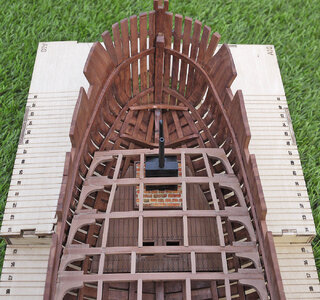
Hello, Thanks for dropping by and for your many likes and kind comments. The build continues, this time it’s the completion of the ships stove which I started earlier. I only added the most basic details as this will hardly be seen, I also made up and fitted the beams which enclose the stove, so moving along quite nicely.


- Joined
- Dec 16, 2016
- Messages
- 1,193
- Points
- 493

Hello, and again thanks for looking and for those likes that so many of you are giving.
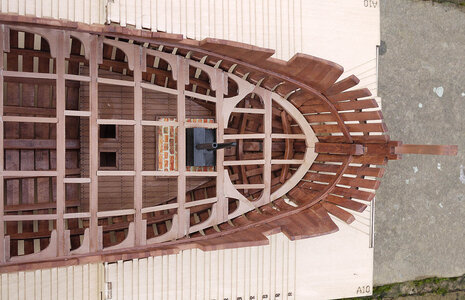
Today’s episode is to show you the completed main beams, no explanation needed just much of the same. I’m pleased with the result, just some sanding needed, I now need to add the small batens that go between these beams, only about a hundred and fifty so shouldn’t take too long, he says! I’m not too bothered about the small edge unevenness as I intend to put in a waterway which will hopefully give them a nice even edge. I’m also going to give it just a little more detailing, ladders, barrels, pillars etc. which are not included in the kit.
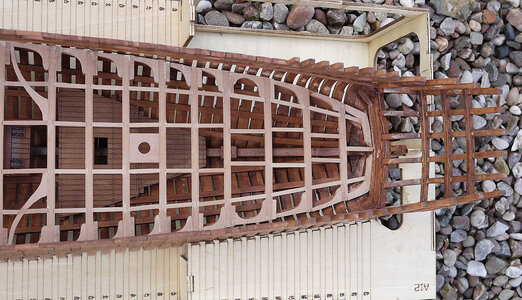
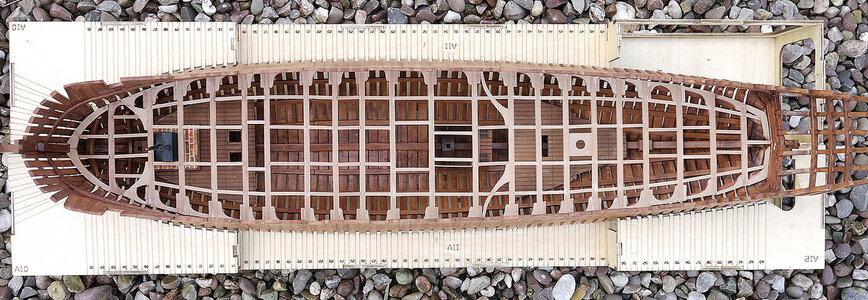
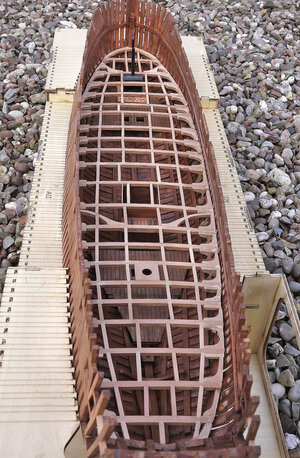
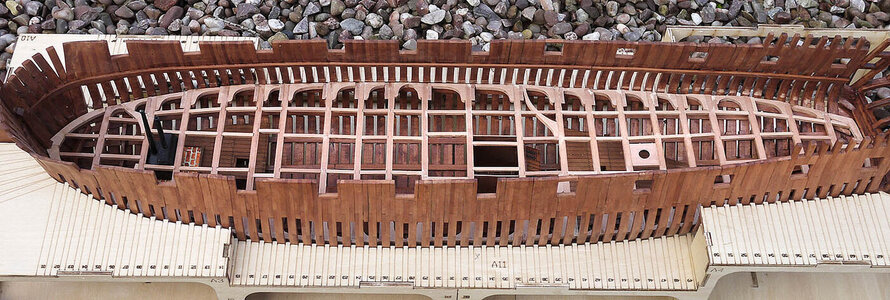
Today’s episode is to show you the completed main beams, no explanation needed just much of the same. I’m pleased with the result, just some sanding needed, I now need to add the small batens that go between these beams, only about a hundred and fifty so shouldn’t take too long, he says! I’m not too bothered about the small edge unevenness as I intend to put in a waterway which will hopefully give them a nice even edge. I’m also going to give it just a little more detailing, ladders, barrels, pillars etc. which are not included in the kit.


Last edited:
Good afternoon Ken. Wow you are making impressive progress- main beams look good and I enjoy the wood contrast.Hello, and again thanks for looking and for those likes that so many of you are giving.
Today’s episode is to show you the completed main beams, no explanation needed just much of the same. I’m pleased with the result, just some sanding needed, I now need to add the small batten that go between these beams, only about a hundred and fifty so shouldn’t take too long, he says! I’m not too bothered about the small edge unevenness as I intend to put in a waterway which will hopefully give them a nice even edge. I’m also going to give it just a little more detailing, ladders, barrels, pillars etc. which are not included in the kit.
View attachment 406467
View attachment 406468
View attachment 406469
View attachment 406471
View attachment 406472
I’m with you. If something ,I.E. your water ways, covers up a part of the build there is no need to be concerned if is not 100%…..I know many of our friends will disagree with us here
- Joined
- Dec 16, 2016
- Messages
- 1,193
- Points
- 493

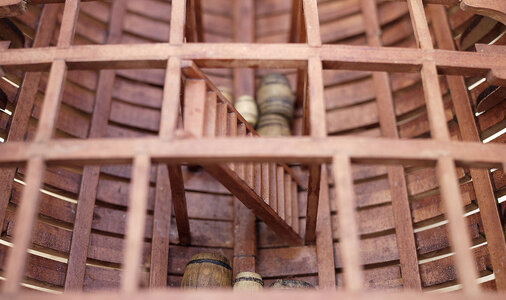
Hi, Just a very short one today, the photo shows the hold, I made up from scrap and fitted some ladders and eight support pillars. I had some barrels left over from past kits, they're not brilliant but are better than just a blank space.
Hi Grant, Thanks for your comment. I'm sorry to tell you that I'm going to stain the beams to match the hull so there won't be a contrast. However I take your point so I'm going to do the cross batons a lighter shade to give me that slight contrast.
Hi Grant, Thanks for your comment. I'm sorry to tell you that I'm going to stain the beams to match the hull so there won't be a contrast. However I take your point so I'm going to do the cross batons a lighter shade to give me that slight contrast.

Hello Ken, I just spent the last little bit enjoying your very fine build log here. I loved your introduction with a view of your work area and previous builds.
While this may be your first POF your craftsmanship it is right up there with the best of them. I will be looking forward to watching the rest of this build.
While this may be your first POF your craftsmanship it is right up there with the best of them. I will be looking forward to watching the rest of this build.
Very good progress - and very good looking work
It is looking like a lot of fun working on this model
It is looking like a lot of fun working on this model

