Kurt Konrath
Kurt Konrath
Your not trying to say this build project is becoming a full circus!
 |
As a way to introduce our brass coins to the community, we will raffle off a free coin during the month of August. Follow link ABOVE for instructions for entering. |
 |
 |
The beloved Ships in Scale Magazine is back and charting a new course for 2026! Discover new skills, new techniques, and new inspirations in every issue. NOTE THAT OUR FIRST ISSUE WILL BE JAN/FEB 2026 |
 |

Hi Kurt, Yes, a full three ring one with me being the clown!Your not trying to say this build project is becoming a full circus!

Hi Lorax’s, Thanks for your nice comment, welcome aboard and I hope that you continue to enjoy the voyage.Wonderful build, I really enjoy your logs... please keep it coming.


Hi Jack, Good advice, I’m using yours and Keith’s log for clues. I like your galley, I don’t intend to give mine as much detail but it has prompted me to do something more than I would normally do just to give it a lift. KenHi Ken,
Its all looking great. Don't be discarding the building frame too soon, it is a handy help to determine the right positions for the deck clamps and 'thick stuff'. I found it very difficult to get the right height of the lower deck, especially at the stern. Mind you that could just be me and my ten thumbs!
Cheers JJ..
It is good to keep a positive state of mind with this hobby, as hard as it gets figuring things out.Hi Kurt, Yes, a full three ring one with me being the clown!

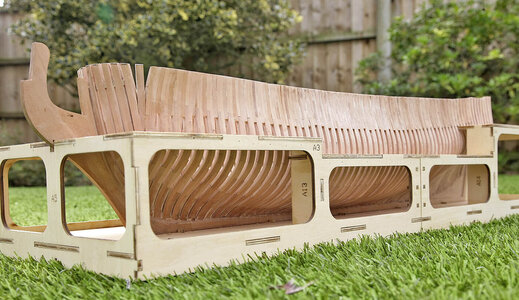


Dear KenHello everyone, welcome and again and thanks for your kind comments and likes. I’m getting close to the big day, it’s release from the jig, that will be my next post, so expect lots of pics of that occasion.
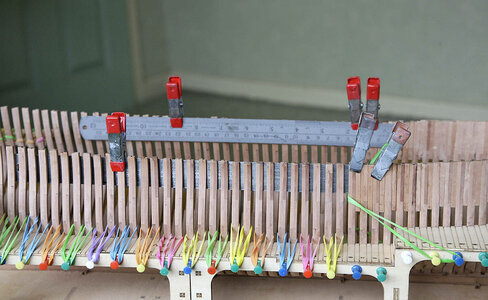
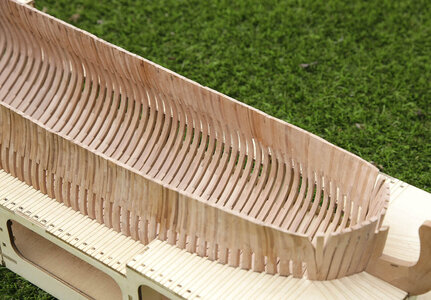
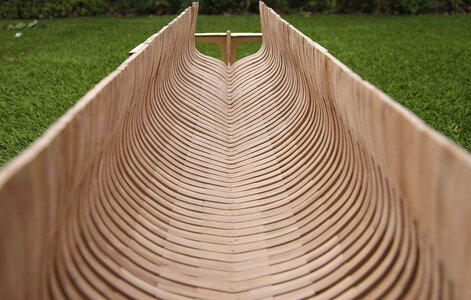
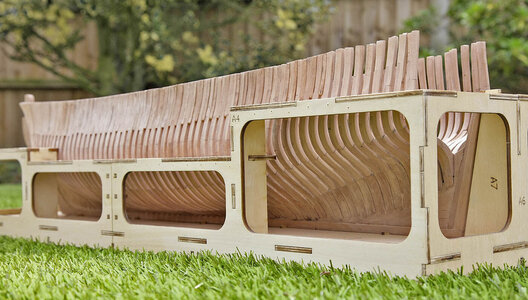
I’ve now completed all the rib fillers. To align them when fitting I clipped a metal rule which I’d curved to shape to some of the ribs then in turn clipped the fillers to the rule along with their adjacent rib until the glue had a good grab. As you can see when done this resulted in what looks to me like a perfectly aligned hull, I finished it off with a good sanding and I’m really pleased with the result so far. I was a bit scared of starting this type of build at first thinking that perhaps my skills wouldn’t be up to it but I’m gaining in confidence as I’m progressing and really enjoying its construction very much.
View attachment 402260
View attachment 402256
View attachment 402257
View attachment 402258
View attachment 402259

It’s looking nice, Ken. And using the steel rule is a good idea.Hello everyone, welcome and again and thanks for your kind comments and likes. I’m getting close to the big day, it’s release from the jig, that will be my next post, so expect lots of pics of that occasion.
I’ve now completed all the rib fillers. To align them when fitting I clipped a metal rule which I’d curved to shape to some of the ribs then in turn clipped the fillers to the rule along with their adjacent rib until the glue had a good grab. As you can see when done this resulted in what looks to me like a perfectly aligned hull, I finished it off with a good sanding and I’m really pleased with the result so far. I was a bit scared of starting this type of build at first thinking that perhaps my skills wouldn’t be up to it but I’m gaining in confidence as I’m progressing and really enjoying its construction very much.
View attachment 402260
View attachment 402256
View attachment 402257
View attachment 402258
View attachment 402259

Hi Paul, Thanks, I think that you have the more challenging build and from what I can see it’s as usual cleaner and more accurate than I would try and attempt, there’s quite a difference between quality and quantity but I’m having more fun with it so far than any build for some time.Wonderful Ken! You should pass me up (build progress wise) next week Tuesday, Wednesday latest...

Thanks Shota, After the effort that you make it’s rewarding when things turn out the way that you’d hopedDear Ken
you have done wonderful work on the hull, indeed it's perfectly aligned hull.
well done my friend


Thanks Peter, I hadn’t planned it but the rulers were lying on my bench in front of me and it just struck me as a good idea to use them.It’s looking nice, Ken. And using the steel rule is a good idea.
Regards, Peter
Good afternoon Ken. Wow you are doing this kit justice. Cheers GrantHello everyone, welcome and again and thanks for your kind comments and likes. I’m getting close to the big day, it’s release from the jig, that will be my next post, so expect lots of pics of that occasion.
I’ve now completed all the rib fillers. To align them when fitting I clipped a metal rule which I’d curved to shape to some of the ribs then in turn clipped the fillers to the rule along with their adjacent rib until the glue had a good grab. As you can see when done this resulted in what looks to me like a perfectly aligned hull, I finished it off with a good sanding and I’m really pleased with the result so far. I was a bit scared of starting this type of build at first thinking that perhaps my skills wouldn’t be up to it but I’m gaining in confidence as I’m progressing and really enjoying its construction very much.
View attachment 402260
View attachment 402256
View attachment 402257
View attachment 402258
View attachment 402259

Hi Loracs, Thanks for the thumbs up. This is my first build of of this type and my first Chinese kit so I don’t have much of a comparison to go by, but I can honestly say that its the best quality kit that I’ve ever had by some margin, the wood is perfect, the accuracy and cut of parts is almost perfect with little fettling needed and a good build design. I’ve played about with some of the other parts on a dry fit basis trying to understand the next stages of the build and all seems ok. The instructions however leave a lot to be desired though, as there have been other logs at least there is help on hand. Cleaning up the laser char is a pain! and is probably no better than other kits. I’m pleased that you are interested and following my build. KenKen, this looks like a great POF kits... and you are doing it a great justice. Please keep posting. I like your approach with the metal rule, simple and very effective. Thanks for the tip.
I'm edging toward this as my next build (not before a while), mainly because of the wood. It looks great. It seen to cleanup from laser burn nicely, with a little room of play as for tolerance (accuracy). The design and quality seen quite nice overall.


Hi Jack, Thanks for your comment and advice. I think that I’ve got the sheer right, I took the measurements from the bottom of the keel, using the steel rulers as they slotted nicely between the ribs, it’s a fingers crossed at the moment but all looks well.Hi Ken,
Your frames all look good, nice and level and that will make the fairing a lot easier. It was a good idea to use the rulers to get the filler pieces level with the top of the frames. I cannot judge from the pics if you have adjusted the frame heights to allow for the run of the sheer, from memory it dips by around 8mm by frame 30 then rises again towards the stern by a bit more than the bow. I took my measurements from the top of the building dock and marked each frame to cut as to the heights taken from the front profile in the one to one scale plan sheet. After you get the first measurement from keel up, (I used frame 30) you can work out the rest from the top of the dock. I hope this makes sense and if you have done all this already kindly disregard all.
All the best Jack
