A very, very nice deck Uwe! Congratulations!
-

Win a Free Custom Engraved Brass Coin!!!
As a way to introduce our brass coins to the community, we will raffle off a free coin during the month of August. Follow link ABOVE for instructions for entering.
-

PRE-ORDER SHIPS IN SCALE TODAY!
The beloved Ships in Scale Magazine is back and charting a new course for 2026!
Discover new skills, new techniques, and new inspirations in every issue.
NOTE THAT OUR FIRST ISSUE WILL BE JAN/FEB 2026
You are using an out of date browser. It may not display this or other websites correctly.
You should upgrade or use an alternative browser.
You should upgrade or use an alternative browser.
HMS GRANADO - full hull - POF kit by CAF in 1:48 - by Uwe
Uwe, could you explain the process of "treenailing"? It looks very nice and professional. Thanks, Magic Mike
Take a look at this post #625 in which I am showing several working steps of my "actual" treenailing method - I hope everything will be more clear - otherwise I will be happy to answer or show additional photosUwe, could you explain the process of "treenailing"? It looks very nice and professional. Thanks, Magic Mike
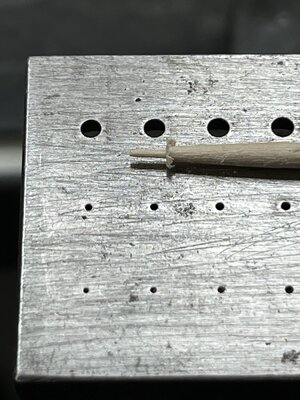
I use toothpicks - cut them into two halfs
put the pick on top of a drawplate and give one or two small hit with a hammer
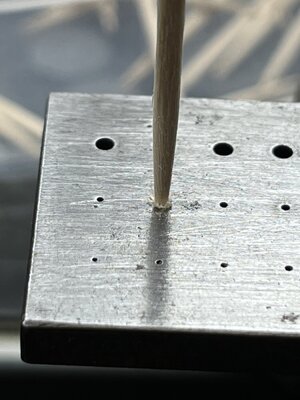
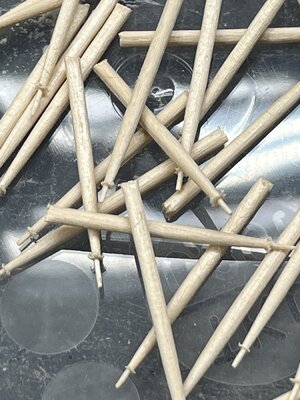
than it is looking like this - o,5mm thick
After marking the lines where the treenailing should be - I press a small mark with a scriber and drill a hole of 0,48mm (smallest Proxxon drill)
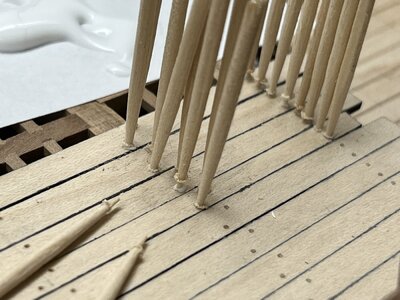
In the meantime I am not using any glue - no need
Also single planks are getting treenails - this one is a strip of the inner planking
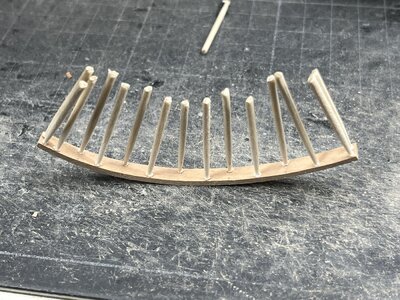
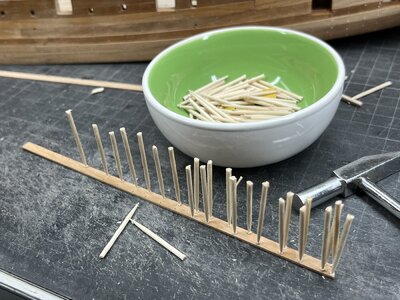
afterwards I cut the toothpicks with some pliers
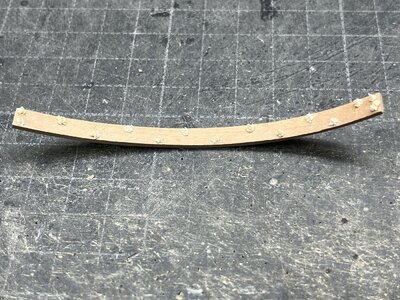
and sand or scratch the surface
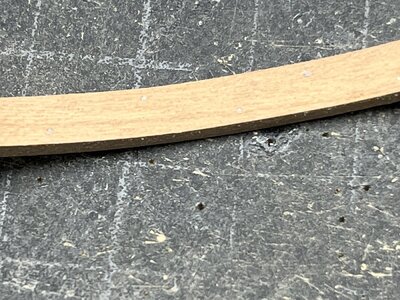
HMS GRANADO - full hull - POF kit by CAF in 1:48 - by Uwe
Sorry my friends for the bigger break and not posting any update of the works. I was on a business trip in sunny Panama, with most of the time not in Panama City, but driving with car direction to Columbian border, with bad or no internet connection, and very small free time definitely the...
shipsofscale.com
Last edited:
Many Thanks to @pianoforte , @Herman , @dockattner , @Magic Mike and @Lucian29 for your kind words - much appreciated and a big motivation
also for all the likes recieved - Many Thanks
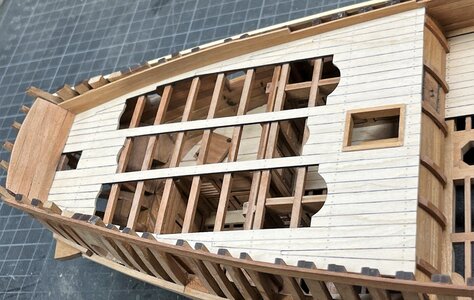
a small further step is done with the interior planking of the poop deck
the treenailing seems not to end
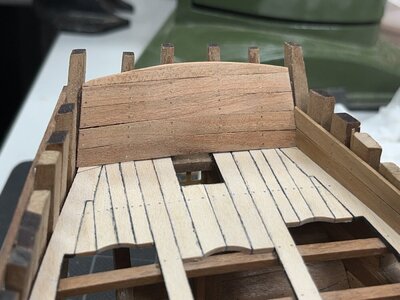
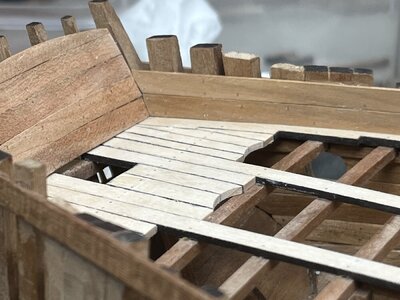
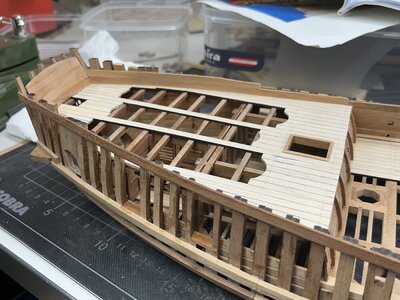
The final top plank can only be adjusted when I know exactly where the planksheer rail is known ..... the next working step on my list
Many Thanks for your interest .... to be continued ....
also for all the likes recieved - Many Thanks
a small further step is done with the interior planking of the poop deck
the treenailing seems not to end


The final top plank can only be adjusted when I know exactly where the planksheer rail is known ..... the next working step on my list
Many Thanks for your interest .... to be continued ....
That the way it is with treenailing: you know where it starts, but the end.......the treenailing seems not to end
It's just beautiful work and it brings the planks alive.
For my possible new build it’s the same with rivets ………
Regards, Peter
after reading your new log, I can fully understand your words - Puh - this will be some workThat the way it is with treenailing: you know where it starts, but the end.......
It's just beautiful work and it brings the planks alive.
For my possible new build it’s the same with rivets ………
Regards, Peter
but problems are there to be solved....
BALDER, Vlaardingen Herring Lugger from 1912, scratch build scale 1:50 Plate-On-Frame
It's time for a new build-log. Towards the end of the build of my Bluenose, there was the thought of what to build. Of course, that had to be a challenge (again). I had already suggested building a Vlaardingen herring sail lugger from around 1900. My place of birth is Vlaardingen, and my...
shipsofscale.com
Peter - especially for you (and a lot of others)

Uwe, thanks for the detailed explanation of treenails and I also took your advice and checked out post #625 with Maarten. After viewing his workmanship on the "Royal Caroline" and yours on the "Granado" I was already in awe of both you "masters"! Not only are you both gifted but both are very kind to pass along your knowledge to us apprentices. Maarten took the time to give me a detailed report on how and why he does tree-nails the way he did on the Caroline. Thanks to you both (I'm not sure if he is copied on this reply) "Novice" Magic MikeTake a look at this post #625 in which I am showing several working steps of my "actual" treenailing method - I hope everything will be more clear - otherwise I will be happy to answer or show additional photos
I use toothpicks - cut them into two halfs
put the pick on top of a drawplate and give one or two small hit with a hammer
View attachment 391619 View attachment 391621
than it is looking like this - o,5mm thick
After marking the lines where the treenailing should be - I press a small mark with a scriber and drill a hole of 0,48mm (smallest Proxxon drill)
View attachment 391622
In the meantime I am not using any glue - no need
Also single planks are getting treenails - this one is a strip of the inner planking
View attachment 391623
afterwards I cut the toothpicks with some pliers
View attachment 391624
and sand or scratch the surface
View attachment 391625
HMS GRANADO - full hull - POF kit by CAF in 1:48 - by Uwe
Sorry my friends for the bigger break and not posting any update of the works. I was on a business trip in sunny Panama, with most of the time not in Panama City, but driving with car direction to Columbian border, with bad or no internet connection, and very small free time definitely the...shipsofscale.com
View attachment 391620
Kurt Konrath
Kurt Konrath
Doing treenailing is like copper plates, you get started and wonder when it will ever end.
But with both tasks, when your done the ship looks as fantastic as ever.
But with both tasks, when your done the ship looks as fantastic as ever.
Looks great Uwe!
Treenailing at it’s best.
Many Thanks to @Peter Voogt , @Magic Mike , @Kurt Konrath , @Dean62 , @pianoforte and @Ptèr for your kind words about the latest post and my work on the treenailing
and also to all the likes received
Today only a last photo related to the deck planking of the quarter deck, where I would like to show and compare my planking solution with the model built by Robert A. Lightley
The Original
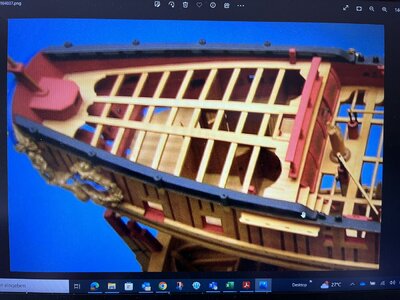
My Copy
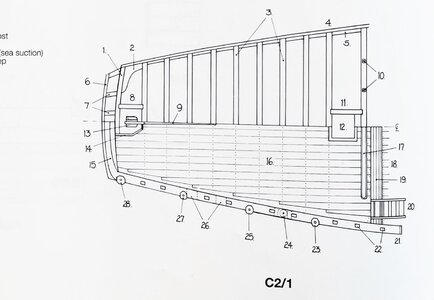
and interesting also the drawing by Goodwin in jis Anatomy book - with straight planking
Everytime I am looking at this original model, I am realizing how much still to do on my model
The next work will be the ....... we will see
Many Thanks for your interest .... to be continued
and also to all the likes received
Today only a last photo related to the deck planking of the quarter deck, where I would like to show and compare my planking solution with the model built by Robert A. Lightley
The Original

My Copy

and interesting also the drawing by Goodwin in jis Anatomy book - with straight planking

Everytime I am looking at this original model, I am realizing how much still to do on my model
The next work will be the ....... we will see
Many Thanks for your interest .... to be continued
Last edited:
It’s not often that someone can compare their model with a famous museum piece and survive the scrutiny. Bravo Uwe! You should be very proud of your work thus far! I can’t wait to see the continuation of this fantastic build.
True storyIt’s not often that someone can compare their model with a famous museum piece and survive the scrutiny. Bravo Uwe! You should be very proud of your work thus far! I can’t wait to see the continuation of this fantastic build.
Many Thanks to Paul and Tyler for these kind words 
The next work will be the sheer rails, so I can finalize the outer and inner planking and the installation of all elements which are in contact with the rails ( like the cathead, anchor lining etc.)
This are the Goodwin drawings showing the vessel from the side
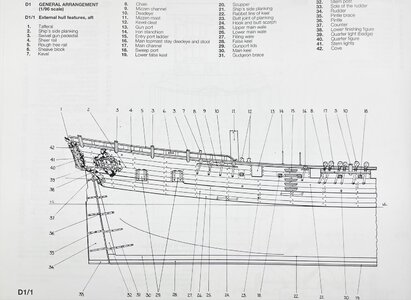
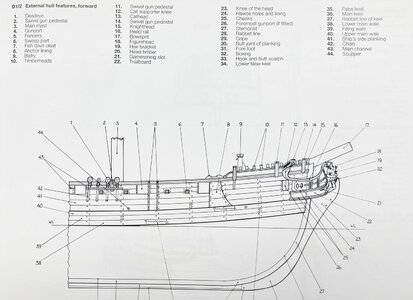
In the kit included are some boxwood strip material, which can be used for the ornamental part of the sheer rails
Unfortunately I did not make a photo of the scratching of teh sheer rail, so for information here a photo showing a strip which is used at the stern, this I made some time ago for testing
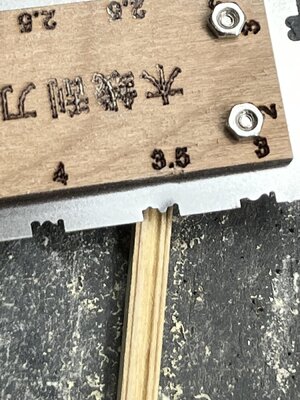
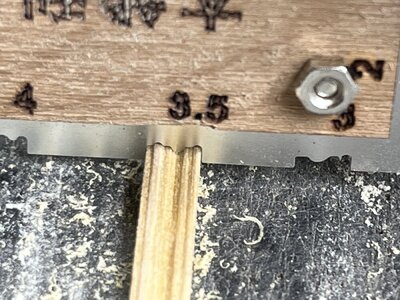
The boxwood can be bended like a normal wood - watering and hot iron
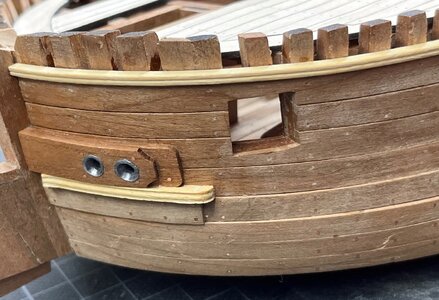
This boxwood strip is now installed from the bow up to the stern (sorry no photo) showing the complete length
With the installed boxwood strip I know exactly where at the end the sheer rail is, means also the innerplanking can be adjusted and filled up to this height
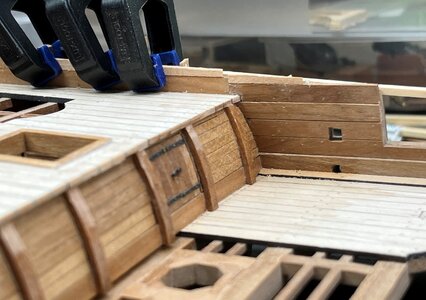
I wish you all a nice and relaxing weekend .... many thanks for your interest .... see you soon

The next work will be the sheer rails, so I can finalize the outer and inner planking and the installation of all elements which are in contact with the rails ( like the cathead, anchor lining etc.)
This are the Goodwin drawings showing the vessel from the side


In the kit included are some boxwood strip material, which can be used for the ornamental part of the sheer rails
Unfortunately I did not make a photo of the scratching of teh sheer rail, so for information here a photo showing a strip which is used at the stern, this I made some time ago for testing


The boxwood can be bended like a normal wood - watering and hot iron

This boxwood strip is now installed from the bow up to the stern (sorry no photo) showing the complete length
With the installed boxwood strip I know exactly where at the end the sheer rail is, means also the innerplanking can be adjusted and filled up to this height


I wish you all a nice and relaxing weekend .... many thanks for your interest .... see you soon
- Joined
- Apr 20, 2020
- Messages
- 6,257
- Points
- 738

my dear friendMany Thanks to Paul and Tyler for these kind words
The next work will be the sheer rails, so I can finalize the outer and inner planking and the installation of all elements which are in contact with the rails ( like the cathead, anchor lining etc.)
This are the Goodwin drawings showing the vessel from the side
View attachment 392401 View attachment 392400
In the kit included are some boxwood strip material, which can be used for the ornamental part of the sheer rails
Unfortunately I did not make a photo of the scratching of teh sheer rail, so for information here a photo showing a strip which is used at the stern, this I made some time ago for testing
View attachment 392398
View attachment 392399
The boxwood can be bended like a normal wood - watering and hot iron
View attachment 392394
This boxwood strip is now installed from the bow up to the stern (sorry no photo) showing the complete length
With the installed boxwood strip I know exactly where at the end the sheer rail is, means also the innerplanking can be adjusted and filled up to this height
View attachment 392395
View attachment 392396
View attachment 392397
I wish you all a nice and relaxing weekend .... many thanks for your interest .... see you soon
you have done wonderful work on the sheer rails, it's looks beautiful
- Joined
- Sep 3, 2021
- Messages
- 5,199
- Points
- 738

Very impressive modeling. A lot of lessons can be learned from this build.Many Thanks to Paul and Tyler for these kind words
The next work will be the sheer rails, so I can finalize the outer and inner planking and the installation of all elements which are in contact with the rails ( like the cathead, anchor lining etc.)
This are the Goodwin drawings showing the vessel from the side
View attachment 392401 View attachment 392400
In the kit included are some boxwood strip material, which can be used for the ornamental part of the sheer rails
Unfortunately I did not make a photo of the scratching of teh sheer rail, so for information here a photo showing a strip which is used at the stern, this I made some time ago for testing
View attachment 392398
View attachment 392399
The boxwood can be bended like a normal wood - watering and hot iron
View attachment 392394
This boxwood strip is now installed from the bow up to the stern (sorry no photo) showing the complete length
With the installed boxwood strip I know exactly where at the end the sheer rail is, means also the innerplanking can be adjusted and filled up to this height
View attachment 392395
View attachment 392396
View attachment 392397
I wish you all a nice and relaxing weekend .... many thanks for your interest .... see you soon
And then, daring to compare one's build with a renowned museum piece and surviving, kudos!
Many Thanks for your kind replies and all the likes received
Now I came to the top rail of the sheer rail - herefore some laser cut elements are available in the kit
The first element is the part towards the stern, after sanding down all the tops of the frames etc.
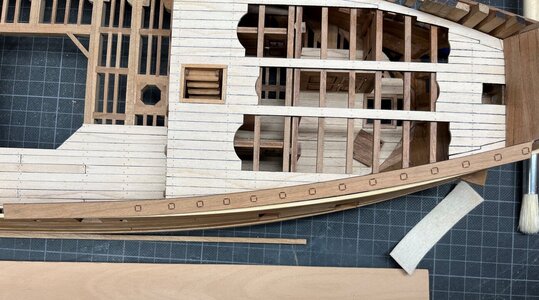
Based by some imperfection of my work, the part is not fitting correctly and has a wider curvature than needed for my hull
based on the original kit part and the real needs, I prepared a correct form in cardboard, which would be my template for cutting out
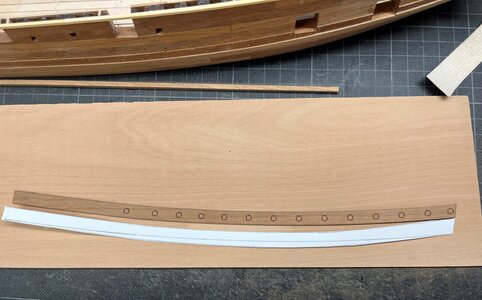
checking tha cardboard template
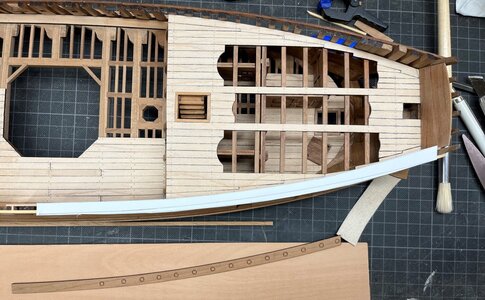
With the jigsaw it was not a big deal to cut out from some pear wood (at the end this part will be painted black (I think so in moment)
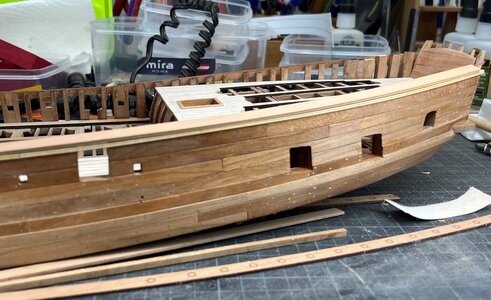
from outside the sheer rail will have the correct height according Goodwins sketches - from inside only the pear element is visible
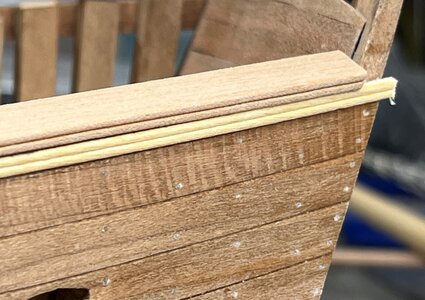
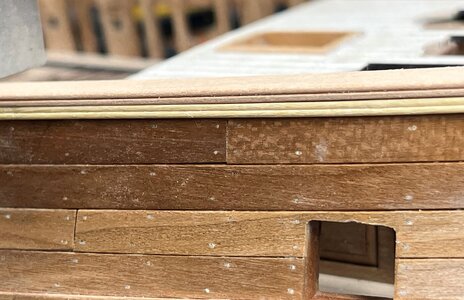
Soon I will show the sheer rail preparation at the bow .... many thanks for your interest
Now I came to the top rail of the sheer rail - herefore some laser cut elements are available in the kit
The first element is the part towards the stern, after sanding down all the tops of the frames etc.

Based by some imperfection of my work, the part is not fitting correctly and has a wider curvature than needed for my hull
based on the original kit part and the real needs, I prepared a correct form in cardboard, which would be my template for cutting out

checking tha cardboard template

With the jigsaw it was not a big deal to cut out from some pear wood (at the end this part will be painted black (I think so in moment)

from outside the sheer rail will have the correct height according Goodwins sketches - from inside only the pear element is visible


Soon I will show the sheer rail preparation at the bow .... many thanks for your interest


