-

Win a Free Custom Engraved Brass Coin!!!
As a way to introduce our brass coins to the community, we will raffle off a free coin during the month of August. Follow link ABOVE for instructions for entering.
-

PRE-ORDER SHIPS IN SCALE TODAY!
The beloved Ships in Scale Magazine is back and charting a new course for 2026!
Discover new skills, new techniques, and new inspirations in every issue.
NOTE THAT OUR FIRST ISSUE WILL BE JAN/FEB 2026
You are using an out of date browser. It may not display this or other websites correctly.
You should upgrade or use an alternative browser.
You should upgrade or use an alternative browser.
I was never really successful in bending ebony - therefor I use black hornbeam for the wales.
I guess 3mm would be a task..... but I hope that somebody has better experience - I am also interested in the possibilities
I guess 3mm would be a task..... but I hope that somebody has better experience - I am also interested in the possibilities
Bending ebony can be very hard to do at the best of times as it can be so brittle. I have never been all that successful with it and tend to use another wood that is easier to bend instead. I then use a black dye to get the same color appearance.
Harold Hahn used to apply ebony veneer over boxwood. I believe he described the procedure in his book "Ships of the American Revolution". Great work by the way, looks lovely.So here is where I run into my first true problem. How do I bend this 3mm ebony for use as the wales it seems pretty sturdy and I've read that bending ebony is rather difficult. Any suggestions? Just regular soaking and heat bending?
View attachment 133902
I never have success bending Ebony either, and also, as Uwe, use black 'Grab' (Russian for Hornbeam). I would love to learn to bend Ebony. Is it making a difference what Ebony to bend? There so many Ebony's...
Happy Birthday Gventura.
I have successfully bent 2mm Ebony wales but the process is quite scary.Firstly I cut a softwood plank to suit the curve giving a former for inside and outside the bend.It is essential to have an external former otherwise the Ebony will splinter on the outsides.
Next the Wale was thoroughly cleaned with Acetone to remove as much oil as possible from the timber otherwise the timber will not take moisture onboard.The strip was then immersed in water for 3days.
The strip was set up in the former and warmed using a blowtorch from around 12inches away.The formers were slowly closed together as more heat was applied.The strip was left clamped solid for several hours whilst fully cool.
My former was Pine and ended up black and chared but the Ebony was undamaged.It has a much higher "flash point" than the softwood.
It is extreme but it works.
Kind Regards
Nigel
This is modelling of heroic endeavor. Interested how many failures until you reached this method .Happy Birthday Gventura.
I have successfully bent 2mm Ebony wales but the process is quite scary.Firstly I cut a softwood plank to suit the curve giving a former for inside and outside the bend.It is essential to have an external former otherwise the Ebony will splinter on the outsides.
Next the Wale was thoroughly cleaned with Acetone to remove as much oil as possible from the timber otherwise the timber will not take moisture onboard.The strip was then immersed in water for 3days.
The strip was set up in the former and warmed using a blowtorch from around 12inches away.The formers were slowly closed together as more heat was applied.The strip was left clamped solid for several hours whilst fully cool.
My former was Pine and ended up black and chared but the Ebony was undamaged.It has a much higher "flash point" than the softwood.
It is extreme but it works.
Kind Regards
Nigel
Happy Birthday, Gventura! Health and happiness for many more years to come 

Hello Stuglo, It is called - a learning curve!Interested how many failures until you reached this method .
Totally correct, but I have a forgetting curve so I need this website and books to REMIND me . However, your perseverance and attainment is exceptional - more like a a mountain climb. Keep going and sharing.Hello Stuglo, It is called - a learning curve!
Thanks to all for the birthday wishes! Very nice quarantine birthday.
That sounds crazy but also awesome. So I haven't posted in a while because I was awaiting my order. I tested cutting some ebony down to 1 mm thickness and laminated in onto a 1 mm thick balsa strip. It worked quite well, I don't have a picture at the moment. So what I decided I need was more ebony that I could shape down. If anyone has any suggestions for making 1 mm thick 3 mm wide strips out of 3/16" thick 1" wide pieces that would be great! I don't have a planer, but I could use the spindle sander to sound down the ebony, but that seems like a serious waste of ebony wood planks. Because I haven't found a solution to this yet I've been working on my other hobby resin/plastic projects in the mean time.
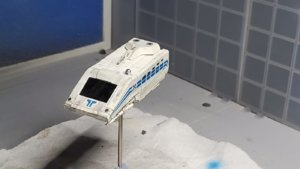
Fans of Disneyland/Star Wars will recognize it
Happy Birthday Gventura.
I have successfully bent 2mm Ebony wales but the process is quite scary.Firstly I cut a softwood plank to suit the curve giving a former for inside and outside the bend.It is essential to have an external former otherwise the Ebony will splinter on the outsides.
Next the Wale was thoroughly cleaned with Acetone to remove as much oil as possible from the timber otherwise the timber will not take moisture onboard.The strip was then immersed in water for 3days.
The strip was set up in the former and warmed using a blowtorch from around 12inches away.The formers were slowly closed together as more heat was applied.The strip was left clamped solid for several hours whilst fully cool.
My former was Pine and ended up black and chared but the Ebony was undamaged.It has a much higher "flash point" than the softwood.
It is extreme but it works.
Kind Regards
Nigel
That sounds crazy but also awesome. So I haven't posted in a while because I was awaiting my order. I tested cutting some ebony down to 1 mm thickness and laminated in onto a 1 mm thick balsa strip. It worked quite well, I don't have a picture at the moment. So what I decided I need was more ebony that I could shape down. If anyone has any suggestions for making 1 mm thick 3 mm wide strips out of 3/16" thick 1" wide pieces that would be great! I don't have a planer, but I could use the spindle sander to sound down the ebony, but that seems like a serious waste of ebony wood planks. Because I haven't found a solution to this yet I've been working on my other hobby resin/plastic projects in the mean time.
Fans of Disneyland/Star Wars will recognize it

I think you will have to use the sander and reduce the strip to 3mm thick.Then cut strips 1mm wide on the tablesaw with a fine tooth blade.This stuff is very splintery and is doesn't like large tooth blades when you get to thinner stock.I would cut slightly wider than 1mm to allow for sanding on the model.It is safer to sand any saw marks out once glued to the hull,1mm by 3mm Ebony will be fragile in strip form.
Kind Regards
Nigel
Kind Regards
Nigel
Alright, I was very stubborn about making this work, and in the end I had to compromise some, but I think it was worth it. Since it's survived and dried out over 12 hours I think I can say it's worked.
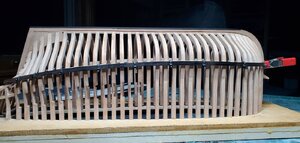
It still needs to be glued in place but it's taken it's shape.
So I asked for a lot of advice and got a lot of suggestion on how to make this work and how to move on without it, in the end I stuck pretty close to the books.
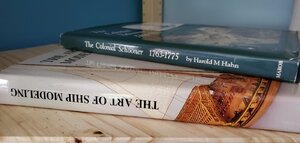
So useful. So Hahn was pretty clear that he used ebony, which is impossible to bend, so he laminated 1mm thick, 3mm wide strips. No one sells those, so you have to make your own.
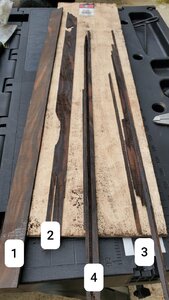
Many ebony planks died in the making of these strips, but only because it was a learning process.
1. What I started with. Maybe one pass through the planer. I used carpenters taped, which was too strong next time I will use regular double sided tape, to hold the plank onto a balsa wood board and run it through the planer at the lowest setting possible.
2. You have to run it at the lowest setting possible and just graze the ebony otherwise it was crack, shatter, and explode, like this piece.
3. Even while being careful and working through the learning curve I broke a number of planks. What's no pictured here is the step between 2 and 3 which is cutting these thinner pieces on a proxxon table saw to get them to the correct 3mm width. That also will break some pieces.
4. In the end I finished with 4 or 5 strips long enough and in good enough shape to use.
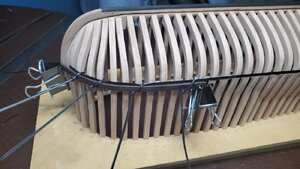
Originally I tested laminating two ebony strips on top of each other, that's the way Hahn did it. I wasn't ready for that. I didn't have enough strips to try and do it without breaking them. So I cheated and used someone's suggestion and made the base out of balsa.
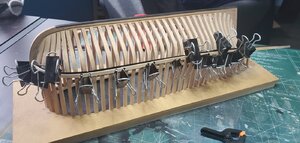
It was one piece, took some shaping, but normal soaking and heating to the shape.
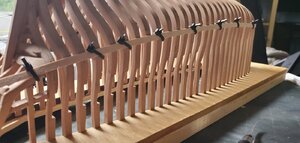
After a day of shaping I glued it in place. If you haven't noticed I love zipties. They are essential for these tough shapes. I forgot to take a photo but I was able to get both sides nearly perfectly level with each other. Oh and as you can see I had already cut out the top parts here. Its a bit out of order but I wanted to cut these out before doing the ebony, less chance of causing damage.
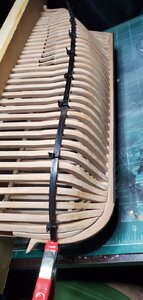
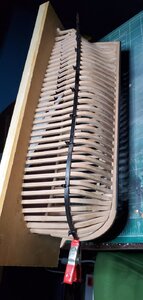
Two days after I glued in the balsa I started on the ebony. I soaked the two best strips I had for about a day, then I soaked them in hot water for about a half hour before I started working. It took time, probably an hour or two for each side, but you just slowly, slowly, bend with heat to shape. I started at the bow and worked that into place. Once the bow was shaped I zip tied into place and worked my way slowly down the haul using zip ties as I went. That was important because that's what kept the shape. The balsa has to be glued well to the haul in order to hold the ebony in place. But in the end here we are!

Note the zip tie isn't damaging the ebony because it's flush, so no dents.
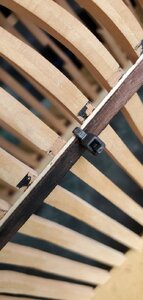
So the ebony will only be 2mm thick instead of 3mm but I don't think it'll make a big difference.

It still needs to be glued in place but it's taken it's shape.
So I asked for a lot of advice and got a lot of suggestion on how to make this work and how to move on without it, in the end I stuck pretty close to the books.

So useful. So Hahn was pretty clear that he used ebony, which is impossible to bend, so he laminated 1mm thick, 3mm wide strips. No one sells those, so you have to make your own.

Many ebony planks died in the making of these strips, but only because it was a learning process.
1. What I started with. Maybe one pass through the planer. I used carpenters taped, which was too strong next time I will use regular double sided tape, to hold the plank onto a balsa wood board and run it through the planer at the lowest setting possible.
2. You have to run it at the lowest setting possible and just graze the ebony otherwise it was crack, shatter, and explode, like this piece.
3. Even while being careful and working through the learning curve I broke a number of planks. What's no pictured here is the step between 2 and 3 which is cutting these thinner pieces on a proxxon table saw to get them to the correct 3mm width. That also will break some pieces.
4. In the end I finished with 4 or 5 strips long enough and in good enough shape to use.

Originally I tested laminating two ebony strips on top of each other, that's the way Hahn did it. I wasn't ready for that. I didn't have enough strips to try and do it without breaking them. So I cheated and used someone's suggestion and made the base out of balsa.

It was one piece, took some shaping, but normal soaking and heating to the shape.

After a day of shaping I glued it in place. If you haven't noticed I love zipties. They are essential for these tough shapes. I forgot to take a photo but I was able to get both sides nearly perfectly level with each other. Oh and as you can see I had already cut out the top parts here. Its a bit out of order but I wanted to cut these out before doing the ebony, less chance of causing damage.


Two days after I glued in the balsa I started on the ebony. I soaked the two best strips I had for about a day, then I soaked them in hot water for about a half hour before I started working. It took time, probably an hour or two for each side, but you just slowly, slowly, bend with heat to shape. I started at the bow and worked that into place. Once the bow was shaped I zip tied into place and worked my way slowly down the haul using zip ties as I went. That was important because that's what kept the shape. The balsa has to be glued well to the haul in order to hold the ebony in place. But in the end here we are!

Note the zip tie isn't damaging the ebony because it's flush, so no dents.

So the ebony will only be 2mm thick instead of 3mm but I don't think it'll make a big difference.
- Joined
- Dec 1, 2016
- Messages
- 6,383
- Points
- 728

bending wood
another method used by Harold Hahn was form bending. he would make a jig using the hull lines for the shape of the hull. Then use thin pieces of wood soak them and press them into the forum. He did several laminations when each was dry he used glue and put the pieces in the jig and clamped it...
shipsofscale.com
Hahn laminated Ebony
- Joined
- Dec 1, 2016
- Messages
- 6,383
- Points
- 728

Harold Hahn | Navy Board Models
Harold Hahn designed a system for building his models. All his models use the same system so you might find hints and tips in the Navy Board Hahn library.
actually no matter what ship you build any Hahn model build log will apply for the general build.
Kurt Konrath
Kurt Konrath
Thanks for sharing your tips and troubles on using Ebony wood.
Thanks for all the info everyone! Next step was cutting all the ribs that need to be singles. I made a new template to mark out the locations for where the cuts need to be made.
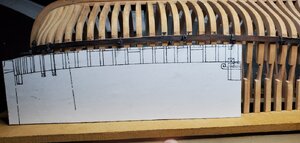
One of the issues with using the paper plans is it doesn't wrap around the ship properly. So after marking off most of the lines I used some tape to create a level line all around. The cuts need to be level because I believe that is how we'll set the decking. So this is a good start.
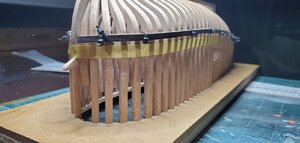
It worked out nicely. Of course this is also where I noticed that the wale is just a bit off.
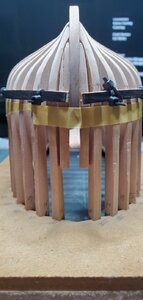
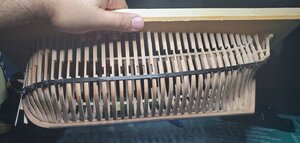
Before I glued on the wale here is a look at what the ebony looked like after 3 days of forming. Held it's shape rather well. I was able to glue both sides on without breaking the piece, so as long as the glue keeps a tight bond it should be good to go.
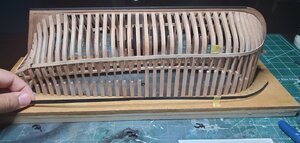
Also above you can see the final cut outs for each rib. Some are longer than others, just because some got started on different locations. But they all end in the correct place. I've seen others do this differently, where they plank the haul and then remove the second rib piece, but that seems like a really unnecessary and difficult step. Sure the ribs are a little more fragile now but the end result should be cleaner then having to scrap glue off places and fix broken pieces.
In order to make sure everything attached to the ribs and get a flush finish I zip tied some extra wood to hold it all down.
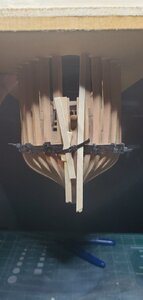
Happy with where I'm at now. Next step is to start planking the hull so I can remove the ship from the jig.

One of the issues with using the paper plans is it doesn't wrap around the ship properly. So after marking off most of the lines I used some tape to create a level line all around. The cuts need to be level because I believe that is how we'll set the decking. So this is a good start.

It worked out nicely. Of course this is also where I noticed that the wale is just a bit off.

Before I glued on the wale here is a look at what the ebony looked like after 3 days of forming. Held it's shape rather well. I was able to glue both sides on without breaking the piece, so as long as the glue keeps a tight bond it should be good to go.

Also above you can see the final cut outs for each rib. Some are longer than others, just because some got started on different locations. But they all end in the correct place. I've seen others do this differently, where they plank the haul and then remove the second rib piece, but that seems like a really unnecessary and difficult step. Sure the ribs are a little more fragile now but the end result should be cleaner then having to scrap glue off places and fix broken pieces.
In order to make sure everything attached to the ribs and get a flush finish I zip tied some extra wood to hold it all down.

Happy with where I'm at now. Next step is to start planking the hull so I can remove the ship from the jig.

Last edited by a moderator:


