The more You show about Your progress, the more I'm convinced in getting this kit someday, too. So I would be happy to hear about the next batch.Due to the fact, that I am in contact with Tom from CAF, I can make here in our forum an anouncement, when I get the info of a re-edition
-

Win a Free Custom Engraved Brass Coin!!!
As a way to introduce our brass coins to the community, we will raffle off a free coin during the month of August. Follow link ABOVE for instructions for entering.
-

PRE-ORDER SHIPS IN SCALE TODAY!
The beloved Ships in Scale Magazine is back and charting a new course for 2026!
Discover new skills, new techniques, and new inspirations in every issue.
NOTE THAT OUR FIRST ISSUE WILL BE JAN/FEB 2026
You are using an out of date browser. It may not display this or other websites correctly.
You should upgrade or use an alternative browser.
You should upgrade or use an alternative browser.
HMS GRANADO (1742) - midship section - POF by CAF in 1:48 - by Uwe
Not much to show..... Started with the deck planking and the necessary treenailing of the planks
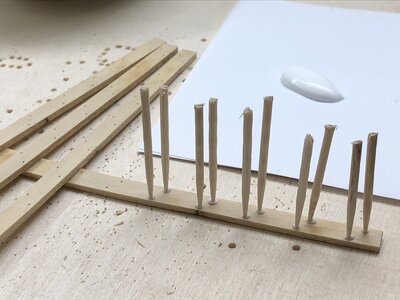
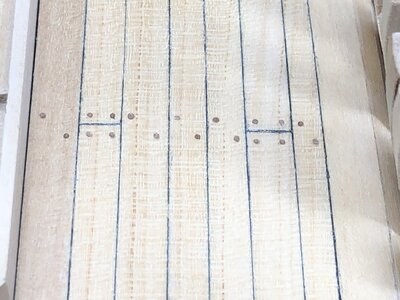
a principle photo showing the treenailing
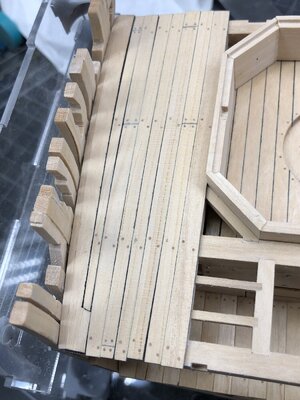
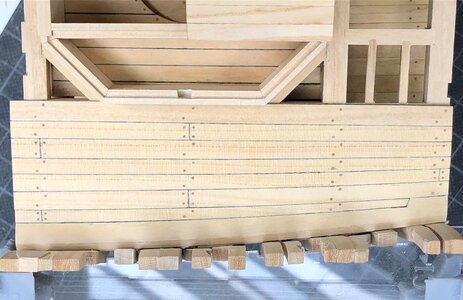
and here the result on the deck planking - not finally glued and fixed, and the caulking also only painted on one side of the joints
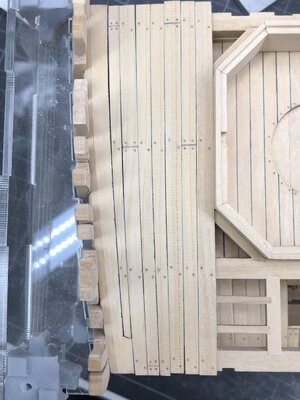
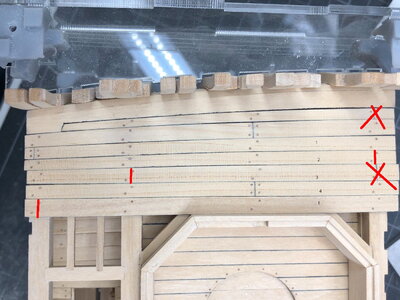
for the butt joint pattern (in general every 4th plank) I tried to completely follow here the Anatomy book by Goodwin
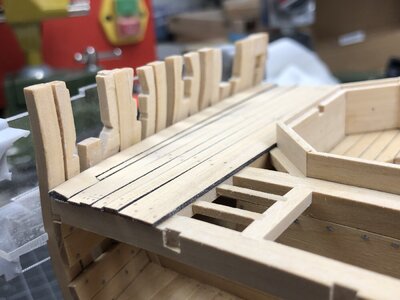
the side view where you can see best the sanded waterway plank
to be continued .....
a principle photo showing the treenailing

and here the result on the deck planking - not finally glued and fixed, and the caulking also only painted on one side of the joints

for the butt joint pattern (in general every 4th plank) I tried to completely follow here the Anatomy book by Goodwin

the side view where you can see best the sanded waterway plank

to be continued .....
- Joined
- Oct 17, 2020
- Messages
- 1,691
- Points
- 488

Hello Uwek, there is something that does not convince me about the planking as aNot much to show..... Started with the deck planking and the necessary treenailing of the planks
a principle photo showing the treenailing
View attachment 288406
and here the result on the deck planking - not finally glued and fixed, and the caulking also only painted on one side of the joints
View attachment 288407
for the butt joint pattern (in general every 4th plank) I tried to completely follow here the Anatomy book by Goodwin
View attachment 288408
the side view where you can see best the sanded waterway plank
View attachment 288409
to be continued .....
What do you mean exactly? What is not convincing you?Hello Uwek, there is something that does not convince me about the planking as a
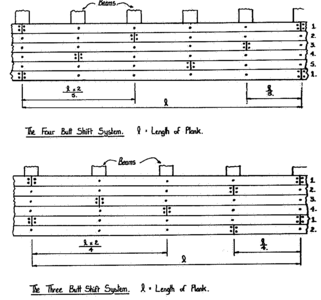
The sketch you showed is the shift system originally I think published by Mondfeld and taken over by Lavery.
It is showing a theoretical idea and is simpliefied - f.e. he is showing only one treenail, insteed of two (which would be usually correct) where no butt joint is.
I mentioned "every fourth planks" which is in general the "three butt shift system"
In the evening I will make a photo of the deckplan of the anatomy book showing what I wanted to express with my words in the previous post
- Joined
- Oct 17, 2020
- Messages
- 1,691
- Points
- 488

Hello Uwek, the sequence of the planking as a scheme, is just my opinion, without taking away your patient work you are doingWhat do you mean exactly? What is not convincing you?
The sketch you showed is the shift system originally I think published by Mondfeld and taken over by Lavery.
It is showing a theoretical idea and is simpliefied - f.e. he is showing only one treenail, insteed of two (which would be usually correct) where no butt joint is.
I mentioned "every fourth planks" which is in general the "three butt shift system"
In the evening I will make a photo of the deckplan of the anatomy book showing what I wanted to express with my words in the previous post
I know very wellDon"t trust Mondfeld, he's often wrong. He made a great book, but not trust full on all aspects.
Many Thanks for your interest and your suggestion, but.....Hello Uwek, the sequence of the planking as a scheme, is just my opinion, without taking away your patient work you are doing
View attachment 288460
Sorry to say, that I am here not of your opinion.
Especially on a section model, which a very short cut out, you can not define a butt joint system like you showed in your photo - it is too theoretical
First point - the shipwrights started with planking usually from the center axis with the Kings-plank, and not from the waterway
second - the shipwrights used the planks what they had in stock - if possible they used more or less planks of similar lengths, but if not available the length differs by meters - also they used planks of different widths -> it was a pure question of availability of planks
take here a view on the real existing pattern on the individual decks of the Victory - extreme on the Vasa
Third - the Granado is somehow special, because she had not only the normal hatches as interruptions of the planking, but also two much wider mortar pits. Between the mortar pits the had to make long planks without any butt joints - therefore the next planking row needed a butt joint somewhere between the two pits => with this the pattern was starting
with green arrows the first group and with blue arrows the second group of butt joints
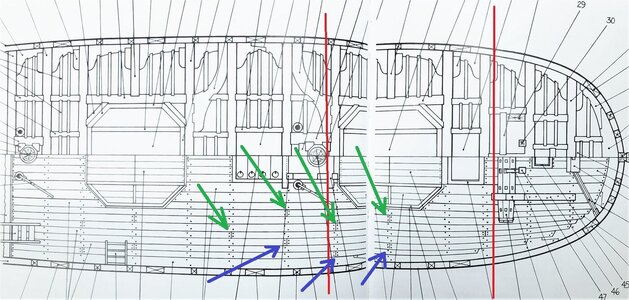
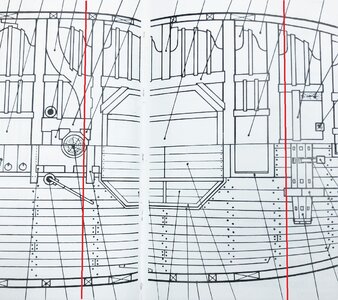
The red lines are showing the area of the section model
- Joined
- Oct 17, 2020
- Messages
- 1,691
- Points
- 488

Hello Uwek thank you for answering me and I respect your opinion as I do mineMany Thanks for your interest and your suggestion, but.....
Sorry to say, that I am here not of your opinion.
Especially on a section model, which a very short cut out, you can not define a butt joint system like you showed in your photo - it is too theoretical
First point - the shipwrights started with planking usually from the center axis with the Kings-plank, and not from the waterway
second - the shipwrights used the planks what they had in stock - if possible they used more or less planks of similar lengths, but if not available the length differs by meters - also they used planks of different widths -> it was a pure question of availability of planks
take here a view on the real existing pattern on the individual decks of the Victory - extreme on the Vasa
Third - the Granado is somehow special, because she had not only the normal hatches as interruptions of the planking, but also two much wider mortar pits. Between the mortar pits the had to make long planks without any butt joints - therefore the next planking row needed a butt joint somewhere between the two pits => with this the pattern was starting
with green arrows the first group and with blue arrows the second group of butt joints
View attachment 289137
The red lines are showing the area of the section model
View attachment 289136
View attachment 289135
Going further with the planking construction
I fixed / glued the planks together with the waterway on a glass plate - premade also the treenailing (forgot to make the treenails on the waterway)
afterwards the deck element was fixed on top of the beams
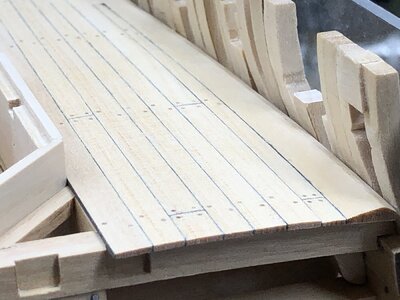
closeup of the treenailing and the caulking
spirketing up to the gunports was done with 2mm planking - and also the treenailing of waterway was made
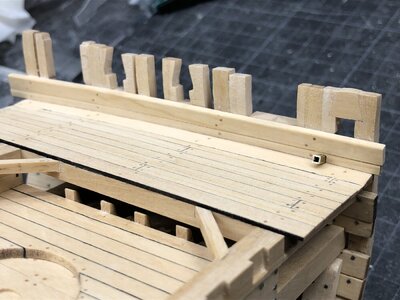
In the Anatomy book a scupper is shon in the area of the mortar - so I took over this information and installed a square brass tube
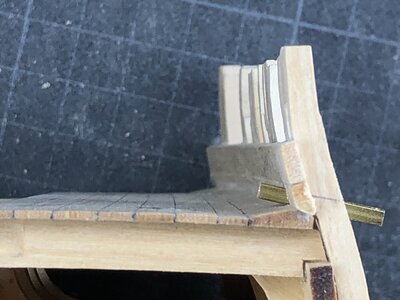
still has to be adjusted with the planking and also blackened
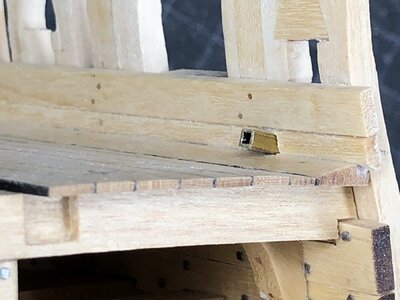
to be continued ....... many thanks for your interest
I fixed / glued the planks together with the waterway on a glass plate - premade also the treenailing (forgot to make the treenails on the waterway)
afterwards the deck element was fixed on top of the beams

closeup of the treenailing and the caulking

spirketing up to the gunports was done with 2mm planking - and also the treenailing of waterway was made

In the Anatomy book a scupper is shon in the area of the mortar - so I took over this information and installed a square brass tube

still has to be adjusted with the planking and also blackened

to be continued ....... many thanks for your interest
What I forgot yesterday to mention and show.
In the kit the spirketing plank is 1mm thick - I decided, like also our friend @stan167 shown in his log in his post #33
to use also 2mm plank
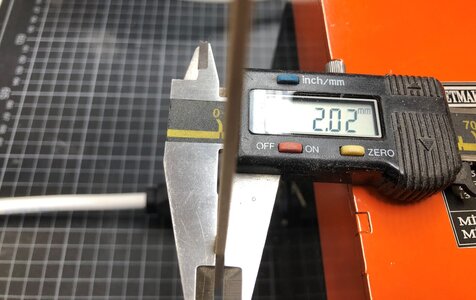
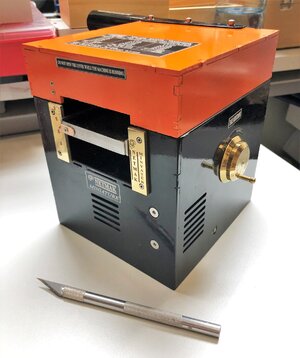
To produce a 2mm plank I used my turkish thicknesser from Netmak miniature - what a great tool - for such needs much better than the Proxxon
some timber form a kit wooden sheet
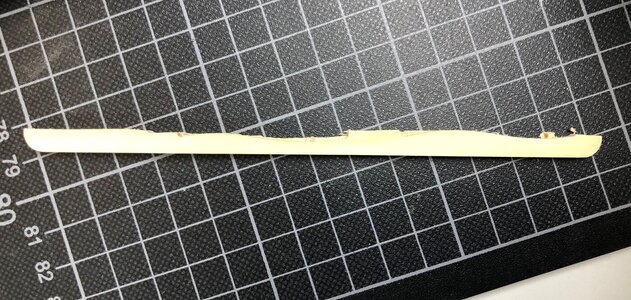
after some runs through the thicknesser
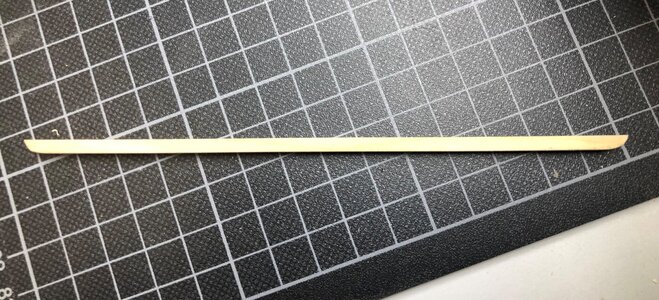
exactly 2mm all over the length
this is the small orange box - highly recommended
In the kit the spirketing plank is 1mm thick - I decided, like also our friend @stan167 shown in his log in his post #33
HMS GRANADO (1742) - section - POF by CAF in 1:48 [COMPLETED BUILD]
Small progress, all parts just glued together. I like this kit how it fit together. In the area of small platform I will do some small? modifications, so stay tuned :)
shipsofscale.com
To produce a 2mm plank I used my turkish thicknesser from Netmak miniature - what a great tool - for such needs much better than the Proxxon
some timber form a kit wooden sheet

after some runs through the thicknesser

exactly 2mm all over the length

this is the small orange box - highly recommended

Purchased shortly ago / sthg new in your workshop -> present it here
and here together with the voice recorder - my Admiral is watching me ...... ;) I hope you like it Uwe. :)
shipsofscale.com
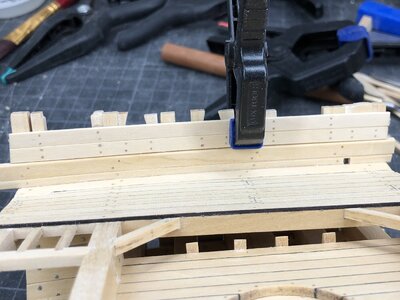
Going further with the inner planking of the rails
spirketting plank way installed so the next two rows of planking - but before the sills and lintels have to be installed
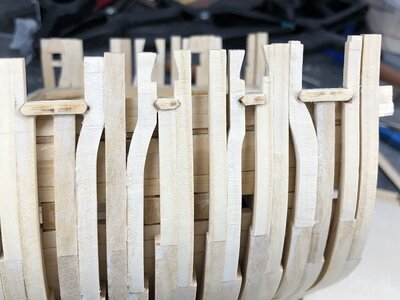
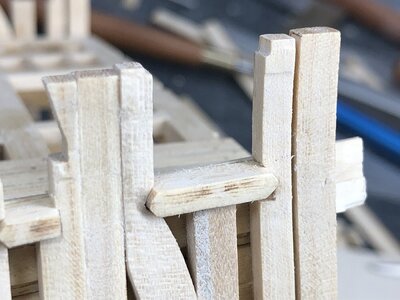
still some smaller sandings are necessary - on this side of the model all sills and lintels will be covered by planking - on the other side more accuracy will be necessary
treenailing was prepared before - according the later openings for the gun-ports and the oar-ports
now the locations of the treenails are making more sense......
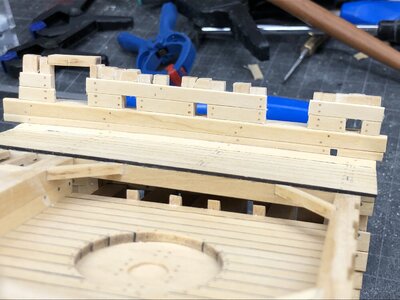
spirketting plank way installed so the next two rows of planking - but before the sills and lintels have to be installed


still some smaller sandings are necessary - on this side of the model all sills and lintels will be covered by planking - on the other side more accuracy will be necessary

treenailing was prepared before - according the later openings for the gun-ports and the oar-ports

now the locations of the treenails are making more sense......

Very nice development my friend, looks stunning. Ganz großes Kino.
The ladder down to the galley
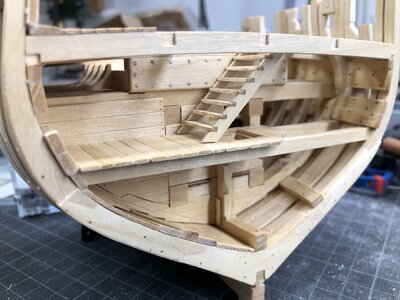
In the meantime also the frame of the hatch was done - I go here the english way, means the frame is installed on top of the beams and carlings. The frnehc often installed such a frame on top of the deck planking, but we are english
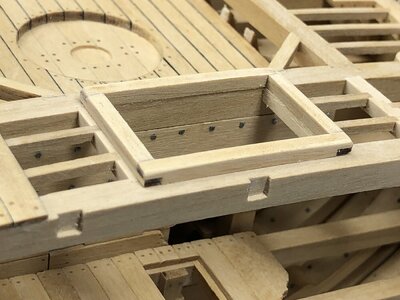
Both frame and ladder have to be finetuned
And the two cover roofs on top of the mortar pit were prepared
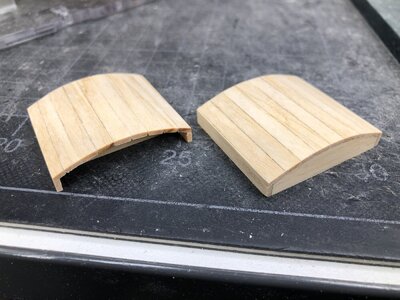
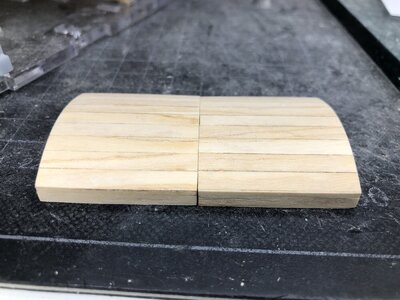
the covers on top of the pit
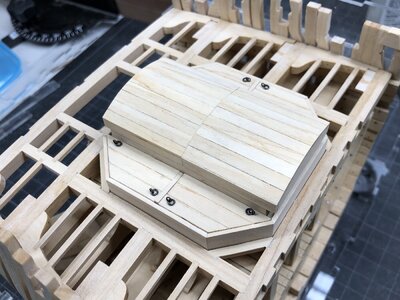
slided sidewards to open the pit
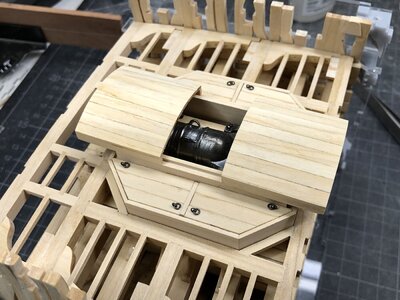
and lifted away so that the mortar could be prepared for action - step by step the model is getting a bomb vessel (section)
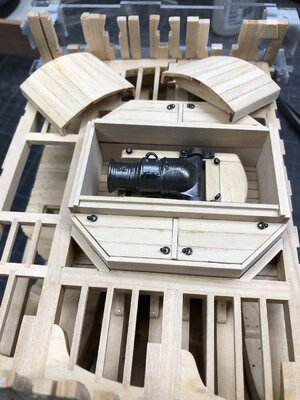
Many Thanks for your interest

In the meantime also the frame of the hatch was done - I go here the english way, means the frame is installed on top of the beams and carlings. The frnehc often installed such a frame on top of the deck planking, but we are english

Both frame and ladder have to be finetuned
And the two cover roofs on top of the mortar pit were prepared


the covers on top of the pit

slided sidewards to open the pit

and lifted away so that the mortar could be prepared for action - step by step the model is getting a bomb vessel (section)

Many Thanks for your interest
OK, so You shaped the deck planks on the model without glueing the previous plank? Hiw did You prevent the previous (several) planks from shifting while working on the next?
Shouldn't there be a treenail on the narrowed end of the plank? Maybe You missed it or are planning on doing it during final installation...
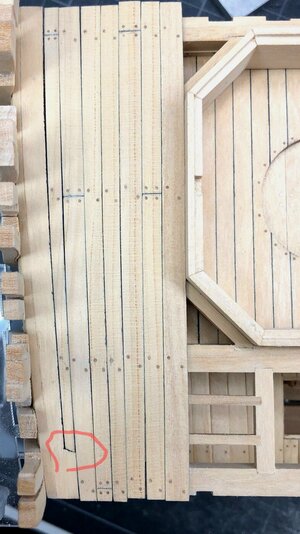
Shouldn't there be a treenail on the narrowed end of the plank? Maybe You missed it or are planning on doing it during final installation...

Last edited:
- Joined
- Dec 9, 2019
- Messages
- 970
- Points
- 403

Pięknie to wszystko wyglądam.Drabina w dół do kambuza
View attachment 289729
W międzyczasie zrobiono też ramę włazu - jadę tutaj po angielsku, czyli ramę montuje się na belkach i karmelach. Frnehc często montował taką ramę na poszyciu pokładu, ale jesteśmy Anglikami
View attachment 289730
Zarówno rama, jak i drabina muszą być dopracowane
I przygotowano dwa dachy przykrywające na dole z zaprawą
View attachment 289725
View attachment 289724
osłony na górze dołu
View attachment 289726
przesunięty na boki, aby otworzyć dół
View attachment 289727
i podnoszone, by moździerz był przygotowany do działania - krok po kroku model dostaje bombowiec (sekcja)
View attachment 289728
Wielkie dzięki za zainteresowanie
Pozdrawiam Mirek
It all looks beautiful.
Regards Mirek
Last edited by a moderator:
I made this small area in principle like I did also at the Le Coureur - unfortunately I did not make any photos here with the Granado, but in the for information some older photo of the luggerOK, so You shaped the deck planks on the model without glueing the previous plank? Hiw did You prevent the previous (several) planks from shifting while working on the next?
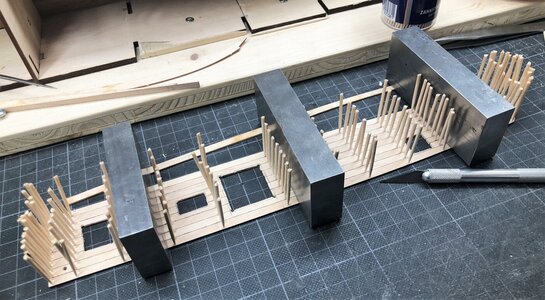
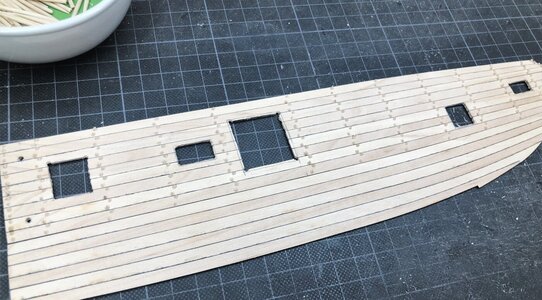
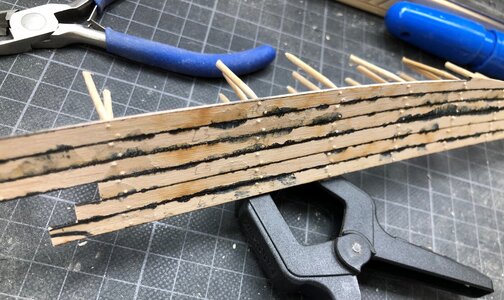
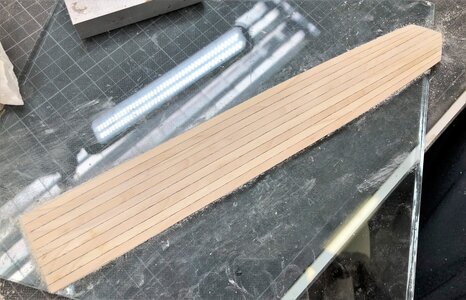
LE COUREUR - french Lugger 1776 - POF kit from CAF in 1:48 by Uwe
Hello Uwe, I like the plain toothpick as well, bear in mind, if you will decide to oil the deck, it will actually emphasize the caulking effect (it will darken the around the hole). :)
shipsofscale.com
Shouldn't there be a treenail on the narrowed end of the plank? Maybe You missed it or are planning on doing it during final installation...
Many thanks for this comment - in the meantime I made the treenailing also on the waterway plank vut really forgot the one treenail at the end of the first plank.
I will make it soon - Many Thanks for the supervising and comment
Many Thanks for the positive feedback MirekIt all looks beautiful.
Regards Mirek
As always, Uwe, your work is inspiring for its precision. Thank you for sharing the details and the close-up images. I am challenged by what I see to continue to improve.


