-

Win a Free Custom Engraved Brass Coin!!!
As a way to introduce our brass coins to the community, we will raffle off a free coin during the month of August. Follow link ABOVE for instructions for entering.
-

PRE-ORDER SHIPS IN SCALE TODAY!
The beloved Ships in Scale Magazine is back and charting a new course for 2026!
Discover new skills, new techniques, and new inspirations in every issue.
NOTE THAT OUR FIRST ISSUE WILL BE JAN/FEB 2026
You are using an out of date browser. It may not display this or other websites correctly.
You should upgrade or use an alternative browser.
You should upgrade or use an alternative browser.
Hohenzollernmodell 1660-1670 Scale 1/75 POF build by Stephan Kertész (Steef66)
- Thread starter Steef66
- Start date
- Watchers 57
-
- Tags
- 1:75 dutch two-decker pof
- Joined
- Aug 8, 2019
- Messages
- 5,570
- Points
- 738

Difficult to explain, but I give it a try.Hi Stephan,
Looking at position 17 I see you are at more or less the centre frame( the "hals" of the hull)
In that case I think your floor is not flat enough. From the keel up the garboard should be at an +/- 45 deg. angle and the following floor planks at ships centre should have a very slight angle creating a more or less flat floor up to the planks at the bilge. I am afraid with your current floor you don t get the hull shape you are aiming for.
I have sketched it below, garboard in blue, floor in yellow and bilge in purple.
If you fill the hull now with floor timbers they will all need a high curvature or a filler piece as you see on English frames. In Dutch ships you don t see this.
See below the shell of Willem Barentz and you see the floor timbers are nearly straight, even for this jacht with its sleek hull design.
The pdf I attached are the line plans of the HZ model. You can see that not all the frames are drawn. 12 through 16 I had to make up myself from the other frames.
I use these plans to make the ship. Not easy to do, I can tell, but I get very close to the model in this way. When I build like v. Yk or Witsen write in their books I would have on that place a flat surface (around 17) But the drawing shows something else. In my 3D model I created I can show you
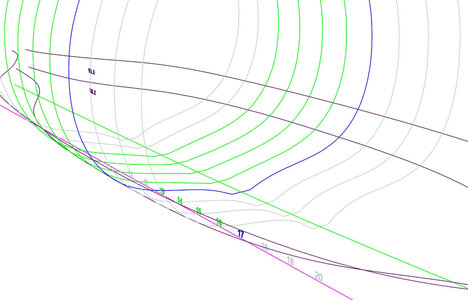
The bottom of the HZ model is different to the model like the 7P or other similar ships like a Pinas or the WB. I only use the shell first building method to build this ship. You're right when you say that part needs to be flat. In the drawing it isn't flat. There is a curve in it. Let's say they used curvy trees for the floor timber. Like in the picture of the WB you shared where they used these curved beams in the end and front.
The only mistake in the build are the first 2 planks after the garboard strake, they should have curved to the inside.
Like I said before, I knew when I started to build like this. It could be a total redo of this part. Start over with the Maze method because this ship doesn't seem to build like a shell first. Or I have to go back to the drawing table and start to redraw the line plan to a flat bottom. But in this stage I'll see where I end with this part of the hull. After the floor is done and I start with the bilges I see how close I come to the plans.
Attachments
Hi Stephan
I can’t help but think the issue you have is that your planks are glued solid edge to edge whereas the original had wooden “links” nailed across the top between planks allowing the builder a great deal of flexibility allowing him to pull the first stage of planking to the floor timbers when they are fitted
I would not disregard what you have done already if you decide the shape is incorrect.I would at least attempt thoroughly wetting the planks and try clamping the structure down to a flat surface using some temporary forms on the inside.
Kind Regards
Nigel
- Joined
- Oct 15, 2017
- Messages
- 1,191
- Points
- 443

Hi Stephan. I was going to ask you how and what you measured in the construction of the hull to ensure there was symmetry between Port and Starboard sides, but you've answered that in your last updates.On the Dutch forum there where some concerns about the shape of the hull because of the minor anomalies on the surface of the floor.
I think about to adjust the shape on the red part to get rid of the hollow form that seems to appear in the hull
View attachment 370806
For the hull shape this is not a big problem, it is a small part in the hull that is influence by this. And I think not vissible went corrected in the right way. We see what happened, I have no concerns about it.
You have to let go of the mindset in this build of I have to follow the drawings exactly. You have to think here more about building a hull that has flowing shapes, no kinks, cavities that are overdone, as well as bulges. Also, you should not expect than starboard and port sides are the same. You are building a Dutchman, there this was not important. I only use the drawings to get the size and whether I am in the right direction since I decided to do shell first. I find a deviation of 1 to 6 mm acceptable depending of course on which point of the ship. Is it very visible or is it actually not noticeable. This deviation is not going to be noticeable considering what part of the ship it is. How small that part is of the entire hull.
View attachment 370805
The green area and the blue circle show the part on the ship.
And if you look at the museum model, it appears that its builder wasn't looking too closely either.
View attachment 370812
Looking at the museum model and the difference between both sides of the hull, I can't help but think that if the actual ship had this hull profile it would list to the Starboard. Maybe there is something I'm not aware of that mitigates this?
In any case, your work is unquestionably good and I am not surprised. Keep it up.

- Joined
- Aug 8, 2019
- Messages
- 5,570
- Points
- 738

Thanks Nigel.Hi Stephan
I can’t help but think the issue you have is that your planks are glued solid edge to edge whereas the original had wooden “links” nailed across the top between planks allowing the builder a great deal of flexibility allowing him to pull the first stage of planking to the floor timbers when they are fitted
I would not disregard what you have done already if you decide the shape is incorrect.I would at least attempt thoroughly wetting the planks and try clamping the structure down to a flat surface using some temporary forms on the inside.
Kind Regards
Nigel
Yes the real thing wasn't glued. I understand now why.
And I can bend the planks a little, it is flexible, but.... when you do that the stern and bow bend also. All is connected.
I don't see so much of a problem, I've re-shape the beam I made for measuring like I mentioned and it looks a lot better when I go further. I post later pictures when I hold the beam against a ruler, you see there is almost no problem.
thanks Ken, your words helped me to go on. Yes these Dutch ships where not that symetrical on port and star. Maybe the big case the Vasa sunkLooking at the museum model and the difference between both sides of the hull, I can't help but think that if the actual ship had this hull profile it would list to the Starboard. Maybe there is something I'm not aware of that mitigates this?
In any case, your work is unquestionably good and I am not surprised. Keep it up.
 .
.What I understand was the counter weight in hull (stones, iron) where used to even the ship in the water.
At this moment I'm still planking the hull and it seems I've counter the difference between the hull and drawings with just a little bump in the bottom of the hull.
True storyIt’s amazing what you do, Stephan. And then there are model builders who say that PoB of PoF plankings is difficult……..
This is next-level-planking!
Regards, Peter
- Joined
- Aug 8, 2019
- Messages
- 5,570
- Points
- 738

@GrantTyler thanks for visiting my log and the nice comment.
@all thanks for the likes.
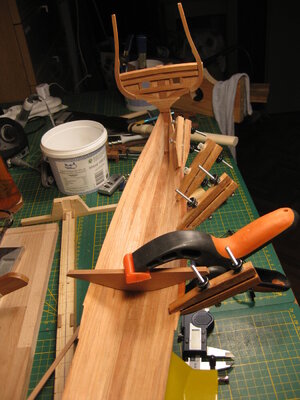
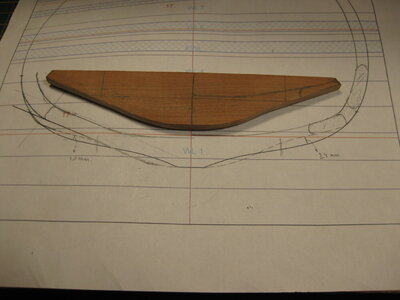
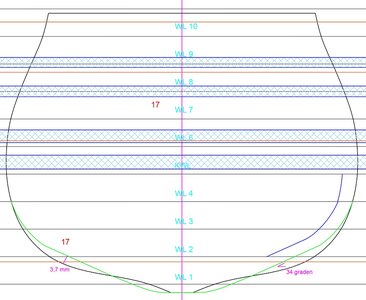
Small update about the hull.
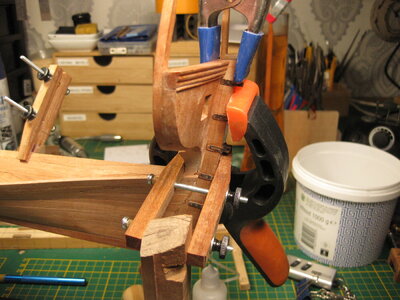
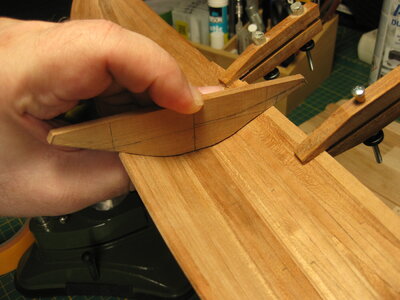
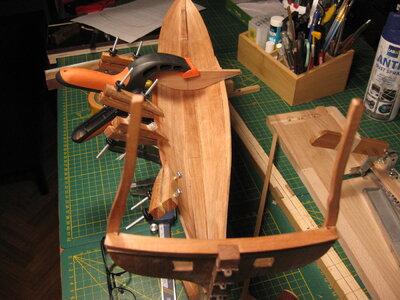
I glued the stern in place, one layer is drying in shape before I glue it. and reshape the frame number 17 to go along with the planking.
After measuring and planning how to go further, all the comments in the back-head. I found a solution somewhere in between. The difference is very small between the drawing and the build and fit in my comfort zone. The shape of the hull above the floor will be secured in this way, and the floor is flat under an angle of 34°. No redo at this point and everybody happy


I think you will switch to the maze method.
This hull is not made for shell first due to its shape.
I will post my address for the tools
This hull is not made for shell first due to its shape.
I will post my address for the tools
- Joined
- Aug 8, 2019
- Messages
- 5,570
- Points
- 738

Too many small imperfections and one far too large on the back are the reason for this major redo of the hull. In a second I had decided to remove all the planks. That was a lot easier then attach them. 
I just got the keel and stem clean again and we will start from scratch later.

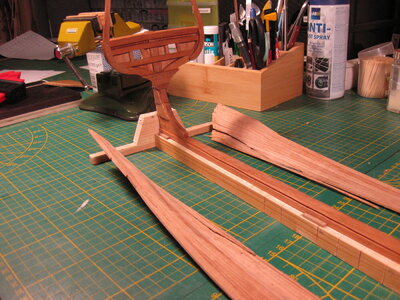
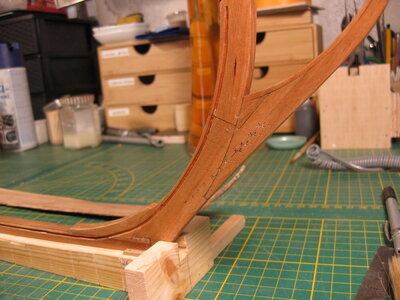
Whether it will be the Maze I don't know yet, the shell first suits me. (Sorry Maarten I still need them ) But then with a template to get the shape right. Freehand is too heavy on small imperfections and warping of the planks so the shape can't be maintained with each course you place.
I learned a lot of the mistakes I did in the beginning, so let avoid them this time and do the things right. First I go think about the template, how to.
I just got the keel and stem clean again and we will start from scratch later.


Whether it will be the Maze I don't know yet, the shell first suits me. (Sorry Maarten I still need them
I learned a lot of the mistakes I did in the beginning, so let avoid them this time and do the things right. First I go think about the template, how to.
Last edited:
I know some fine templates: we call them frames………I learned a lot of the mistakes I did in the beginning, so let avoid them this time and do the things right. First I go think about the template, how to.
Last edited:
- Joined
- Aug 8, 2019
- Messages
- 5,570
- Points
- 738

funny guyI know some fine templates: we call them frames………
Here we called it ‘een inkoppertje’ ……funny guy
I saw this coming...Too many small imperfections and one far too large on the back were the reason for this major redo of the hull. In a second I had decided to remove all the planks. That was a lot easier then attach them.
I just got the keel and stem clean again and we will start from scratch later.
View attachment 371306View attachment 371307View attachment 371308
Whether it will be the Maze I don't know yet, the shell first suits me. (Sorry Maarten I still need them) But then with a template to get the shape right. Freehand is too heavy on small imperfections and warping of the planks so the shape can't be maintained with each course you place.
I learned a lot of the mistakes I did in the beginning, so let avoid them this time and do the things right. First I go think about the template, how to.
- Joined
- Aug 8, 2019
- Messages
- 5,570
- Points
- 738

Exactly, imperfections is a word that perfectionists cannot deal withI saw this coming...
Hi Stephan,Too many small imperfections and one far too large on the back were the reason for this major redo of the hull. In a second I had decided to remove all the planks. That was a lot easier then attach them.
I just got the keel and stem clean again and we will start from scratch later.
View attachment 371306View attachment 371307View attachment 371308
Whether it will be the Maze I don't know yet, the shell first suits me. (Sorry Maarten I still need them) But then with a template to get the shape right. Freehand is too heavy on small imperfections and warping of the planks so the shape can't be maintained with each course you place.
I learned a lot of the mistakes I did in the beginning, so let avoid them this time and do the things right. First I go think about the template, how to.
This hull is not really fit for shell first due to the v shape in the beginning if the floors.
Curious what you come up with.
I am no longer surprised by members on our forum: one cut the model in half with a Japanese saw (a must to be a Japanese saw), and another just breaks in half. What else is new? 
- Joined
- Aug 8, 2019
- Messages
- 5,570
- Points
- 738

Today I study the line plans of the HZ model and the Line plans of the 7P by Dik.
I put them together in one drawing
In BLUE the Hohenzollern model
In RED the 7 Provinciën
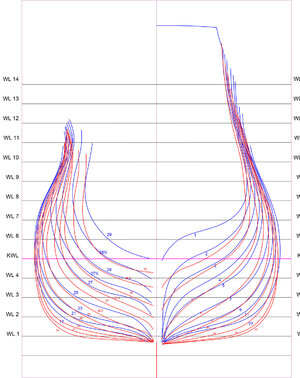
These ships are not the same in shape off course. For me is the part what makes the difference in shell first or Maze build.
The plans of the 7P are visibility shell first. Flat bottom. The HZ not, like Maarten mentioned before.
I want to go for the shell first, because I want to make that experience and it's a kind of challenge I just need.
Looking to the part of the bow, the ships look the same apart from the hollow gulf along the keel. If I correct that to? maybe. In POB this is easy to realise, in the way I want to build this is an extra difficult level. The stern part looks pretty the same, only the height of the stern. The shape is almost the same above the floor part.
I think I can redraw the HZ plans with a minimum difference in the bottom part to make it a shell first plan. Just 9 to 23 need to be straight and 2 or 3 frames in front and after need a little adjustment to make the flow smooth. I also copy the bow part of the 7P. It makes for me more sence to a typical Dutch shape. Sounds like more work then in real, AutoCAD is perfect to do this in a easy way.
So I'm back on the drawing table to change the line plan. And then I can work out my plan for the template I have in mind.
When my plans work out, only the yellow highlighted part in the picture below will be changed.
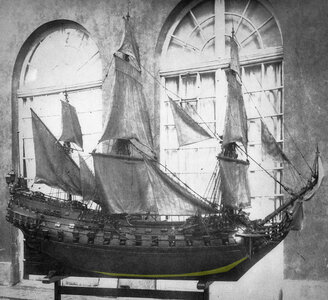
If you have some advice let me hear, I'm open for suggestions.
I put them together in one drawing
In BLUE the Hohenzollern model
In RED the 7 Provinciën

These ships are not the same in shape off course. For me is the part what makes the difference in shell first or Maze build.
The plans of the 7P are visibility shell first. Flat bottom. The HZ not, like Maarten mentioned before.
I want to go for the shell first, because I want to make that experience and it's a kind of challenge I just need.
Looking to the part of the bow, the ships look the same apart from the hollow gulf along the keel. If I correct that to? maybe. In POB this is easy to realise, in the way I want to build this is an extra difficult level. The stern part looks pretty the same, only the height of the stern. The shape is almost the same above the floor part.
I think I can redraw the HZ plans with a minimum difference in the bottom part to make it a shell first plan. Just 9 to 23 need to be straight and 2 or 3 frames in front and after need a little adjustment to make the flow smooth. I also copy the bow part of the 7P. It makes for me more sence to a typical Dutch shape. Sounds like more work then in real, AutoCAD is perfect to do this in a easy way.
So I'm back on the drawing table to change the line plan. And then I can work out my plan for the template I have in mind.
When my plans work out, only the yellow highlighted part in the picture below will be changed.

If you have some advice let me hear, I'm open for suggestions.
Build the 7P?
Just kidding, if you have set your mind to build the Hohenzollern model it would feel like giving up.
Just kidding, if you have set your mind to build the Hohenzollern model it would feel like giving up.
- Joined
- Aug 8, 2019
- Messages
- 5,570
- Points
- 738

And I have to start al over again. Another keel, stern and bow is needed. The HZ model having a lot of angels in the decoration. And my admiral loves angels, so she will not forgive me when I change plans.Build the 7P?
Just kidding, if you have set your mind to build the Hohenzollern model it would feel like giving up.


